guitarfrk741
Well-Known Member
- Joined
- January 21, 2007
- Messages
- 308
- Reaction score
- 0
- City, State
- Baton Rouge
- Year, Model & Trim Level
- '02 4.0
if i were you id get some side steps because those will hide a few inches of the frame
if i were you id get some side steps because those will hide a few inches of the frame
did you have to use the fuel filler extension when you did the lift?
just ordered my lift today

") but I'll keep quiet for now as it's not done.
but I'll keep quiet for now as it's not done.More lift? Keep us posted, I dont see how you could lift Gen 3 any more than that.
quick question for road bully...
how did you manage to squeeze the fan shroud out i can't seem to get it to slide out...
and also was it just me or were your front body mounts pretty much impossible to unscrew?
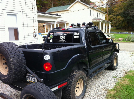
well i finally finished the lift today and it looks good..
installation went smoothly for the most part..
only problem i have is that the bolts in the kit were a little long..and they wouldn't tighten enough to pull the body to the frame very tightly ...did you have this problem?...
for now i got the front , rear and one of the middle ones tightened all the way but the others are simply too long
so i guess for now i'ma just leave em as they are and take the driving easy for the time being
oh and pictures tomorrow