Blend door replacement:
Today's test subject is a 1997 Eddie Bauer Explorer. Hopefully yours will be somewhat similar.
I’m going to assume that you’ve correctly assessed the problem, and that your blend door indeed needs replaced.
You’ll come across all sorts of instructions on the internet for repairing your blend door. Forget them. It’s less than $10 for a replacement, and unless “you want fries with that” is part of your daily work routine, your time is worth more than the cost of a replacement.
http://www.napaonline.com/MasterPag...10&Description=Heater+Blend+Door+Repair+Latch is the blend door from Napa. Please check that that part is correct for your year and model before ordering.
I purchased the Dorman replacement kit from Rock Auto, but for some reason it isn’t showing up online now. Maybe I got the last one, sorry.
The kit I received was really nice, with both a steel template for cutting the plenum to remove the blend door, and a self-adhesive steel panel to cover the hole when you’re done. The only problem is the kit assumes you’ve got access to the top of the plenum, and unless I’m mistaken, without a WHOLE lot of work, that isn’t going to happen. It also looks like the replacement door is made out of ABS, which should be a lot more durable than the cheap junk Ford made the original door from.
What we’re going to do is do it the easy way (well, easier in any case), go in from the bottom.
First, let’s get that glove compartment out of the way. Open it, and squeeze in the sides so you can open it fully to access the hinge. Using a #20 torx bit, unscrew the 3 screws holding the hinge to the dashboard.
Next, locate the blend door actuator on top of the plenum, and remove the plug going to it. Tuck the plug someplace where it’ll be out of the way, but where it’ll be accessible again later when you want to hook it back up.
NOTE: You really don’t have to remove the actuator if you know it’s working correctly, but it’ll be a LOT easier to install the new blend door if you do. Otherwise you’ll have to insert the new blend door in a position that matches the direction of the actuator’s stud, which could prove tricky. We’ll just assume that you want to remove it. If not, skip ahead 4 sections, and have fun installing the replacement!
Depending on the year and possibly model/options, some folks have reported being able to pry the blend door actuator off of its mounting base. On my ’97 Eddie, I found it quite easy to do so after the actuator had been removed from the plenum, but not such an easy thing while it was installed. If you can pry it up without damaging anything, great (skip the next 2 parts). If not, get yourself a 5/16 wrench and socket. I used a ratcheting offset screwdriver and a 5/16 socket, for the back I was able to get a slightly longer “Great Neck” brand 5/16 socket from AutoZone which gave me the extra clearance I needed, YMMV.

There are 2 bolts on the “front” side (facing the rear of the vehicle). One is easy. One is recessed behind part of the mounting base (hence the socket). The third is quite cruelly located on the opposite side of the actuator, where just about nothing can get to it. If you can, reach over the actuator and use your fingers to locate it, so you’ll know where the socket needs to get to. Once I got it aligned correctly on the bolt, I used one hand to keep downward pressure on the socket, to prevent it slipping off and assure that it was actually turning. I used the other hand to move the ratchet handle back and forth. There isn’t much room to do this, so if you can get one click per movement, you’re doing fine.
If you feel like it, keep doing this until the bolt is removed. Otherwise, after about 30 clicks, you should be able to pry up the front of the actuator, and either cut the bolt with a hacksaw blade, or any other implement of destruction you deem fit for the job. I don’t know anyone who’se ever considered putting that bolt back anyway.
Okay, now that we’ve got the blend door actuator removed, plug its connector back in, and cycle back and forth between hot and cold, ensuring that the “D” shaped stud protruding from the bottom of the actuator moves when you do this. If it does, and there’s no clicking from the actuator, it might be in good enough shape to go back in. If it doesn’t move, either replace it, or check your wiring to make sure there isn’t some other problem. In my case, both my blend door was broken, and its actuator was shot (click, click, click went the stripped gears).
Finally, the moment you’ve all been waiting for; Removal of the old blend door. Take a good look at the bottom of the plenum. The circular area which sticks down is where the bottom of the blend door shaft sits. By the somewhat triangular shape of the area around that, you should be able to judge where the door travels. We’re going to cut along the back edge (facing the front of the vehicle), the front edge (facing the rear of the vehicle), the small section between those two (facing the passenger side of the vehicle), around the shaft seat area, and partially along the last side (facing the driver’s side). We don’t want to completely cut that side, as we’re going to pry it down like a flap. This will make it easier to close when we’re ready to.

My weapon of choice is the roto-tool (Dremel, Craftsman, or whatever). I made a trip to Sears, and picked up a general purpose cutting bit for $3.99. It’s similar to a drill bit, but works like the blade in a roto-zip, and once inserted, can be moved laterally to make the cuts we need.
Start in the back (facing the front of the vehicle), towards the center and work towards you. There’s a crease in the plenum along the back edge, let this be your guide and carefully cut along it. Next, cut the front edge (facing the rear of the vehicle), again on the corner where the flat surface meets the vertical one. Then cut the remaining short edge between your first two cuts.
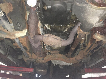
Carefully cut around the shaft seat, going about 1/3rd of the way towards the back (front of the vehicle) edge. At this point, see if you can bend down the flap like in the picture. If not, start at the back corner (front of the vehicle), and cut back towards you until you can.
Once you can pry the flap down, you should be able to reach in and remove the old blend door. Feel around for any broken bits (never found mine) and remove any small plastic pieces left from your cutting (otherwise they’ll just blow all over you vehicle when you next turn on the air).
Old Broken Blend Door
The old and new Blend Doors side by side
Insert the new blend door, large circular part upward. I found it easier if I put one hand over the hole on the top of theplenum, then I could tell when the new blend door was properly aligned. Slip the bottom stud into its seat. Rotate the blend door towards the front of the vehicle as far as it will go. This will put it into an alignment where it should be out of our way when we re-secure our flap. Push the flap back up into its original position, and secure it with a few thin strips of duct tape.
Now we just need to seal it into its original position. There are a variety of different ways to do this, from epoxy to silicon to fiberglass to just plain duct tape, but I wanted something that would be fairly rigid when done, wouldn’t need replaced, wasn’t too messy to work with, and didn’t take forever to cure. I selected QuickSeal Plastic Repair Putty, JB Weld makes a similar product, both claim to cure in 4 hours.
I opted to take a 2-stage approach to sealing the flap. I didn’t want to get much of the putty on the inside of the plenum where it might hinder the movement of the blend door. I also wanted to be sure I got the flap back in its original position. You could probably seal it back up in one shot if you’re careful.
As seen in the photo, I sealed most of 2 sides, with the duct tape strips holding the flap in place. Once that cured, I removed the duct tape and filled in the rest of the holes. As the whole shebang will be hidden behind the glove compartment, there’s no need to make it look pretty, as long as it’s functional, you’ve done the job.
Once your adhesive has cured, replace the blend door actuator. You may need to hook up the wires and cycle it back and forth between hot and cold a few times to correctly align the actuator stud with the blend door. Once that’s done, screw it back in place (or pop it back in its holder if you were able to pry it out without unbolting it), and check for proper operation of your HVAC unit. You should have hot heat, and cold air, and everything in between.
Altogether, aside from the sealant curing time, it should take less than an hour to do the whole job. Under $20 worth of parts sure beats $1400 at the stealership.


 Worked for me. Anyway his photos were posted at another site away from the forum site and now they are gone for whatever reasion. The Forum did not remove them to sell things... So don't bad mouth the forum...You know who you are.