Completed Project - TTB Terror build | Page 3 | Ford Explorer Forums - Serious Explorations

  • Register Today It's free!

Completed Project TTB Terror build

Use this prefix for completed projects that are not "How to" articles or threads asking for help.
For now the front end body work on the inner fenders is done. So I moved to the rear. Now up to this point I havent mentioned the overall plan, I'm still going with coilovers and go fast goodies but I will not be keeping the dana 35 when its all done. ;) SO I'm going to put a dana 44 under there. Now I know what you're saying this is the TTB Terror not sexy sas! Well you're right, Its getting the dana44 TTB more to come on that later. However with all that said I will be going full width rear as well so fiberglass fenders are now a must.

I always said if I was going to run them I would keep them weather proof, removable, and not keep the factory wheel wells under them. So in order to do this I had to make some custom "inner fenders" on the rear. I pictured it like a pickup with the bed skins off, this way I can remove the fenders and door skins, still be weather proof and not worry about the fenders on the trail. I would like to build a carrier in the back to hold the front/rear fenders and door skins when not in use but I'll have to see how much buldge is needed to cover the f-150 axle. If I'm going to have to run 7in rears and 6in fronts it might get tight? :dunno:
So off it comes!
explorer_29.JPG


explorer_30.JPG


explorer_311.JPG


and I started to fill it back in finally...
explorer_32.JPG


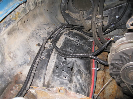
I just got that piece tacked in before I decided I should drop the tank to prevent using my last extinguisher. :fire: :hammer:
I am pretty proud that I dropped 2 tanks in 3 hours. Got the one out of my 94 for the new fuel pump, and dropped the 92 (one I'm working on). Not sure if I want to try to swap tanks completely or see if I can pull the pump out of the 92 without damaging the lockring :dunno:


Join the Elite Explorers for $20 each year.
Elite Explorer members see no advertisements, no banner ads, no double underlined links,.
Add an avatar, upload photo attachments, and more!
.


Last but not least I got this baby in the mail!
explorer_28.jpg

:burnout:
Got a few other goodies but pics of parts are no fun unless they're installed. Now I'm trying to save up for the engine related stuff, but I will try to update more often now that I have the body I need to start working on, and hopefully the drivetrain will be finished by fall. :salute:


Got the inner fenders all burnt in, and I am LESS than thrilled with the results. I didnt realize until I started burning through how thin the facotry sheet metal is. I'm pretty sure what I am replacing it with is around 14 gauge, but didnt pull out the calipers to check. The middle piece I tried to weld lapping behind the sheet metal but I got a much better result lapping the 14ga on top if the sheet metal.
explorer_33.JPG


explorer_34.JPG

The welds are ugly I know but the only concern I have is filling the 1/4" dent that formed at the top corner of the front piece. It may be too deep for normal bondo but I'm not sure. As for strength theese are beefy, and can withstand a good hit from a sledge hammer, plus they will get covered so I'm not too worried about getting them perfect. Just not really sure if I like the 14 gauge being so thick compared to the rest.

If I can cover it properly I may not feel as bad about it. The other side shouldn't be as bad since I don't have to work out all the bugs and work around the filler cap. The 14ga just seems too thick, but on the other hand it was free and I need all the weight I can get back there.


I'm still working on this project slowly but surely. I wanted to wait until I got one thing totally finished before posting again, but i keep forgetting the whole truck will never be "finished".

I wasn't really pleased with the little welds I was getting from the inside and the poor strength. As a result I cut and bent some pieces to weld on the outside for strength. I wasn't too worried about looks because everything under the window will be covered by fiberglass. This was more so I could learn body work and how to keep sheet metal from warping with heat... It warped pretty bad by the time it was cool.
IMG_1061.JPG


The overall before any paint or filler.
IMG_1117.JPG


This was after my first attempt at filler and primer, I didn't like it so I will eventually go back and re-sand and prime.
IMG_1155.JPG


Blurry but, undercoated the new inner fender.
IMG_1149.JPG


The unfinished product.
IMG_1157.JPG


While all this body work was going on I was saving up to go ahead with the suspension and axle modifications.

Found an entire front and rear axle off an 84-85 (manufacture date 9-84) bronco.
IMG_1194.JPG


It's older than I wanted to go but this was the only that I could find around that had rear and a COMPLETE front. Maybe I should have asked for an F-150 instead of Bronco axles, but It all worked out because...
IMG_1198.jpg

I got a 9in rear.


I basically had my 8.8 built in my head so I was thrown for a loop when I saw the 9in at the junk yard. They never told me the year of bronco until I finally asked so that required a little bit of a rethink on my part. At least it is a common rear, I just have to learn how to convert the driveshaft. (Any help out there :dunno:)

Unloading the axles, just thought thy made some really cool yard art all tangled up like that.
IMG_1200.JPG


I always forget to take the important pictures but the coil retainers were rusted beyond repair so, I bent them up got the coils off and took a grinder to the remaining bolt or so I thought. Turns out it's a stud that goes down to the radius arm mount and threads through there. (I am positive someone on here can explain it better than that. I'm just at a loss without pictures to explain) Point is I am stuck with a stud rusted in place holding on the radius arm. I tried a pipe wrench and a few other methods before I manned up and welded a nut on the end.
IMG_12332.jpg


First time doing that and it worked like a charm. Just welded it really hot, let it cool, and then heated the surrounding area. Best part, it worked on both sides.
IMG_12351.JPG


Lucky for me the radius arm nuts were included and the same size as the radius arm retaining bolts.


With all that going on I took a few days off work for other reasons but the plans fell through and I ended up getting rocker panels made. I simply took 3x3x1/8 square tube and cut it into a channel. Then cut 3 evenly spaced drain holes and it fit perfectly over where the old rocker was. Welded it up and looks great for now. I may have to fill some of the bigger gaps with body filler and make a few gussets to weld on the back side for strength.
IMG_12111.jpg


That apparently is the only picture of them I have, before I cut the drain holes in. You can see the other one cut laying on the ground behind the axle. I'll get more pictures when I make the gussets for the back side. That front axle made for a great cutting table by the way.
As for the unseen new progress, I started to make my inner fenders on the passenger side, modded the fuel filler surround to look better with my new fender modifications, and the one I'm most excited about, got the conversion brackets and radius arms on order! More pics to follow.


That a nice build thread, Ill be keeping track


I decided to post up some full body shots since I haven't done that since it was stock.
IMG_12661.JPG

IMG_1267.JPG


IMG_1269.JPG


As promised here is a picture of the rocker I made...
IMG_1272.JPG


And just for giggles this weeks project has been tearing the remains of mice from my blower motor. To bad I thought they were further down in than they actually were. It's pretty apparent from this process that I'm new to things like automotive heating systems and under-dash tech. Case in point...
IMG_1278.jpg


It didn't take me long before I realized I could have loosened the 3 screws on the blower to remove everything from the front but, it did help being able to get at it from the front and top because it looked like someone stuffed a quilt down in there and the smell was just horrible.
This is after I got a majority of the nest out, the little guy and his friend. There was still a lot of cleanup left to do in all the crevices at this point but I took care of that.
IMG_1279.jpg

Now in order to disinfect the area I used generous amounts of brake cleaner and then on to degreaser, even cleaned the tray under the heater core an nothing worked. Until I remembered what every teenage boy uses to mask odor AXE body spray! I pulled out my half can leftover from 2007 and emptied the bad boy in there. I'll give it a few days to air out but it worked for now. My main concern was mice feces hitting me in the face when I first turn on the vents, I think I have done all I can for now to prevent that.


What got me started on the passenger side of the truck was moving the computer up into the glove box area, I just couldn't sting the smell or thought of what lurked behind that black box. Also I had my fire in the driver side floorboard, almost toasting the wiring harness on that side. I didn't want to fry that thing as well. So as with everything I wanted to bling it out a bit just to make it a little more prominent back there. I sanded off the corrosion and painted the ovals "new holland blue". Lightly sanded again to remove the excess paint, then clear coated it.
IMG_1280.jpg


Speaking of fires I removed the emergency brake to see the damage.
IMG_12731.JPG

there is some rust in that picture and I will probably replace that footwell piece.

The main concern I have are these 2 wires. They appear to be grounds going to the emergency brake but can anyone confirm!?!? PLEASE!
IMG_12751.jpg

There is another clip meted shut further up but it appears to be a test port. I'm not sure but I'll get pics if some one thinks they can identify it. Its wayy up in there just to the side if the steering column.
To finish on a positive note I got a lot of my "special parts" out of the house and into the garage heres one of my favorites so far.
AUTOFAB SOLID MOUNTS!!!!!! should really change the feel once it gets back up and running.

Suspension conversion parts are getting made this week and should be here in a few weeks. I'm setting a pretty big goal to have my new ridged body mounts installed and frame painted before fall but we'll see!


I went to the junk yard last week and picked up a Jeep ZJ steering shaft to eliminate the rag joints on the stock steering shaft. Also picked up a hand brake out of the same vehicle. With the recent floor board fire I wanted to relocate the brake anyways, so it will be going next to my shifter in a custom console mounted vertically.
IMG_1284.JPG


I am trying to finish up the computer relocation as well and realized I wasn't going to be happy using the stock bracket way up under the dash. So, I made my own.
IMG_12901.jpg


The top will screw in first then slide the computer in and fold up the bottom via the hinges and screw it on.
like so...
IMG_1291.jpg


I didn't like the way it sat on the ridge on the heater box so I made some rubber spacers for it to sit on and taped them on so they wouldn't go anywhere. For anybody doing this at home keep in mind the bracket has to be made deeper as well. This was mainly why i wasn't re using the stock bracket.
IMG_1294.jpg


I also ran tape all the way around it 2 times to prevent corrosion. My bracket is steel and the computer housing appears to be aluminum. I'm not sure if that might affect ventilation in some way, but I doubt it as the whole thing appears to be a sealed housing anyway.
IMG_1295.jpg


Update!

It's been a long time since an update, too long:(
That's not to say I haven't been working hard though! Last I left off here I see it was on the measly computer relocation that should take a half hour and took me a few weeks. Well, that's all done and over with. I got the brackets to convert to the Dana44 ttb, as well as some BEEFY radius arms, coilovers for the front and started rebuilding both front and rear axles.

Front axle is getting a full rebuild hub to hub.
Mile marker premium hubs, 4.88 Yukon gears and Detroit track lock.

The rear is getting the same treatment.
Disc brake conversion, ruff stuff truss (9") Yukon axle shafts, 4.86 gears and the detroit soft locker.

There will be more pictures to come as things get buttoned up, this is just the forst time in a while I've had the chance to log on and check back here.


As promised I uploaded all the photos from over the winter, without a lot of blabber here they are from where I left off...

This is the final resting place for the computer, and I used much less of the custom bracket I made.


This was one of the last things I did to the body before parking it for the winter. It will be a sunken battery/tool box where the spare used to hide. I'll cut out the frame crossmembers and shock mounts when the cage comes.


After I parked it for the winter it was time to start modifying the axles, particularly the front

I started with mocking up the front uniball cups


And I got the braces TIG welded in and finished them off with a strap running the entire radius that I welded on, I didn't like these welds after I snapped the pics so I ground them off and went back over them after... sorry for the blurry pic


It started to get a little colder but I decided I could still pump out a one day project when the inspiration struck, the front glide plate! It's a little too thin to be called a skid plate but it'll at least keep the front axle from acting like a plow when backing up in mud.

Front mock up...


I thought I had more from the during process but here is the finished bottom section


and the finished product


I probably could've knocked 2-3in off the length but I didn't have the third member in to go off of so I would've rather it be long than short.


I also started tearing into the rear, it came apart in an afternoon and after the front disassembly I decided to buy a complete assembled third member for it to save time on this build.
I did get the ruff stuff truss installed though


and the diff clear coated, as well as the ruff stuff pinion guard installed.


the whole assembly is almost together in the garage I am waiting on some new t-bolts so I can install the disc brake kit, the instructions listed the torque spec for the 1/2 bearing retainer bolts. Mine are the 3/8 so I couldn't figure out why I kept stripping them. Both axles have had their little hiccups but the parts should be here mid week then hopefully it'll come together.


At this point I started wrapping up the changing of the gears in my front diff, it was a long boring process I'd much rather forget. so no pics of that. Just when I thought i was getting close turns out I was way off but thanks to Janderson4010 it wasn't so bad. I ended up with a pattern that should run smooth after he pointed me in the right direction. :salute:

Just messing around before i started reassembly, I can't wait to see it under the truck!

a fresh coat of paint and its coming back together


That brings us to last weekend. I pulled it out of the garage for the first time in a long time and decided it would be a good time to replace the body mounts. Makes sense before I install the lift and everything. So off I went on the mounts. After I figured out how they came apart it wasn't bad.

The bolts will need replaced for sure though, I had to cut about half of them out. This was the passenger rear and its all kinds of gross.


Today at work I couldn't help but wonder what was hiding in that body channel so I went right home and cut it out. Just as I thought, it was BAD.


Mouse nest rust overall not what I want to find hiding in the body. I got it cleaned up but now I'm going to have to cut a majoity of my body channels out and figure out what to do. Thankfully I have access to a plasma cutter but this will eat up time I don't really have.


I will start updating a lot more often now that in my opinion the boring stuff is over with (axles, gears, painting,) and this summer will bring more fab work and assembly, assuming I can get this body sorted out ASAP!


Join the Elite Explorers for $20 each year.
Elite Explorer members see no advertisements, no banner ads, no double underlined links,.
Add an avatar, upload photo attachments, and more!
.


What got me started on the passenger side of the truck was moving the computer up into the glove box area, I just couldn't sting the smell or thought of what lurked behind that black box. Also I had my fire in the driver side floorboard, almost toasting the wiring harness on that side. I didn't want to fry that thing as well. So as with everything I wanted to bling it out a bit just to make it a little more prominent back there. I sanded off the corrosion and painted the ovals "new holland blue". Lightly sanded again to remove the excess paint, then clear coated it.
IMG_1280.jpg


Speaking of fires I removed the emergency brake to see the damage.
IMG_12731.jpg

there is some rust in that picture and I will probably replace that footwell piece.

The main concern I have are these 2 wires. They appear to be grounds going to the emergency brake but can anyone confirm!?!? PLEASE!
IMG_12751.jpg

There is another clip meted shut further up but it appears to be a test port. I'm not sure but I'll get pics if some one thinks they can identify it. Its wayy up in there just to the side if the steering column.
To finish on a positive note I got a lot of my "special parts" out of the house and into the garage heres one of my favorites so far.
IMG_1276.jpg

AUTOFAB SOLID MOUNTS!!!!!! should really change the feel once it gets back up and running.

Suspension conversion parts are getting made this week and should be here in a few weeks. I'm setting a pretty big goal to have my new ridged body mounts installed and frame painted before fall but we'll see!

Where you get those mounts??


Back
Top