DUDER 1's 94xlt SAS | Page 4 | Ford Explorer Forums - Serious Explorations

  • Register Today It's free!

DUDER 1's 94xlt SAS

It does look good.

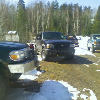
I want to get new springs now that I have done the SOA on my rig. Springs are almost flat with no load on the truck, but at least my left and right springs appear to be equally flat, unlike so many others!


Join the Elite Explorers for $20 each year.
Elite Explorer members see no advertisements, no banner ads, no double underlined links,.
Add an avatar, upload photo attachments, and more!
.


So for an update on the frankenleaf mod, i grabbed two sets of leaf packs from two fist gen explorers for around $100.00. use a c clamp and take the center bolt out holding the leafs together. Mine were rusty so i ground them off. I picked the pack with the best bushings to use on the ex and the others to cut. Once you decide which pack you want to cut, take the main leaf with the bushings and mark where you want to cut it. BKennedy measured 1.5" past where the leaf starts to bend. I could not figure where I wanted to start meausring so I butted the measure tape on the bushing and measured two inches and cut there on both ends. One I cut the main leaf two inches on each end I put the freshly cut leaf under the main leaf I decided not to cut. Next I just simply put the good second uncut leaf under the cut down main leaf to make the third leaf.

65D9A032-AA17-4A71-8695-3904E03AF87C_zpsnvumzp6o.jpg


4781057C-C703-47A5-A1C1-425EA9E2667F_zpsa5b5jahe.jpg


B62C2595-98E2-4BBD-AAB3-F9A605D27E36_zpsu8islpbv.jpg


958512BA-EAD8-4F40-815E-FB040B2E68D3_zpsaetnkivr.jpg


205AF5EB-9A60-4234-BD08-DA355FBB1DF1_zpst0nbqbrw.jpg


Where you cut should be fine, you just need to give the bend a little room so the leaf does not ride up on the bent part prior to the bushing. You don't need to orient them by marking on them, they are longer on one side than the other. You can purchase new center bolts at nearly any auto parts store. They are the larger diameter size (only two sizes that I know of). If you are planning on using a overload leaf, you won't need it, and it limits flex.

I think we are posting over each other. After the second leaf, I just split the difference between the original leafs and made my cuts.

Don't forget to taper the ends like the original leafs. And don't worry about those pads between the leafs, leave them out.


The next leaf to be cut will be the second leaf spring from the pack you have decided to cut. I cut 1.5 inches off of each end of that leaf and now stacked it under the uncut third leaf to make the fourth leaf. Finally the last leaf to be added to make the fifth leaf is the shortest leaf of the stock pack which you do not have to cut. The overload spring was not used. I hope this is not confussing lol.

FF51B0C6-60C8-42A6-AF39-984B549F1FEA_zpsh0u0t3d5.jpg


87C5D894-0717-4DF6-9229-4399946CB0B9_zpslhhfzalb.jpg


Once I had the packs cut where I wanted the I clamped an uncut leaf next to a cut leaf so I could angle the edges like factory. I used a grinder to accomplish this task.

FB935A6F-4241-4C9A-835E-90CAC4DD5139_zpsm8dxhr0u.jpg


C9852CB1-54ED-4026-BD1A-CCB42028476E_zpso75tat3g.jpg


Once I angled all the leafs corners that I cut I took both of the shortest leafs which are the fifth ones to my local machine shop to have holes drilled for the leaf spring retainers. I followed Bkennedys mod and also moved the retainers to the rear. I had the shop drill and countersink the hole in between the two existing holes from the factory plastic shims. I also used 1/4" x 1 1/2" carriage bolts. I used the chrome ones because they seemed to hold better in the countersunk hole.

50401160-0EFA-48BF-B56B-BD518DEF95F8_zpsimtseeuy.jpg


C20F9E99-2C35-4551-8C6C-75DDCDCD1473_zpsh1lptlq8.jpg


B9ED4122-5770-490D-9146-2D7B68206D37_zps5n0srbup.jpg


I will post the flat stock size later on when i get a chance to review my notes. For the spring retainers I used flat stock. I again had my local shop bend the flat stock 2.5 inches wide with 3 inch sides. The limiting bolt was a 5/16" x 3.5" fine thread grade 8 bolt with lock washers and a 1/2" x 2.5" tension pin in the center so I could tighten the bolts without the sides bending in.

5F041F76-9C67-49C9-92A0-13BD40FA3E42_zpsjeogvji2.jpg


Before putting the packs all back together I painted the leafs where there is metal to metal contact with EZ Slide graphite paint. I sanded the leafs a bit before applying this paint because like BKennedy stated this stuff does not stick very well. For the center bolt I just replaced it with the stock size, and for the length I believe I went between 3 or 3.5 inches long with a nylock nut. The new pack is now 2 inches thick. Once the packs were painted with graphite paint and assembled I painted the packs with gloss engine enamal to help the graphite paint from wearing off quickly.

6CA31451-53E0-46CA-A7F7-42B26CE07312_zps8lh39f6w.jpg


8402AB99-64F4-4048-BD43-4159B1B09FA6_zpsqywbr0hz.jpg


168D7F2A-1A06-45AE-BCFA-2ECB70CDDB56_zpsiqmcipwo.jpg


80D574CF-B555-4A65-BDC7-B45B9CB2C3E7_zpswfckzq0n.jpg


I used Ruffstuff Specialities u bolts and spring plate to install the new leafs in my ex. The new ubolts are pretty long so I measured and cut 1.5 inches off of all the ubolts before installing. I also paint the spring plate with gloss engine enamel to prevent rust. My local shop enlarged the middle hole in the new spring plate to fit the larger nylock nut. By the way I use Rustoleum gloss black engine enamel with rust inhibiter. I torqued the ubolt nuts to 90 foot pounds using the same method as BKennedy. While I was in the back I ground the rivits out of the spare tire carrier and removed the rusty piece of metal.

0F633E06-B0A8-4E47-B06E-FE74D677F664_zpspcjsprzb.jpg


803B1412-8F58-44DE-87A3-2D84ED8894F2_zpsk7tsnob0.jpg


65910763-8771-44E9-9CEB-6E44C2321085_zpskiu6yynk.jpg


C069D4DB-0962-4890-8065-7923AF26C679_zpsnl13uxtb.jpg


29C5B09E-6E97-47D2-A738-45CBA6306903_zpsetkc1zqg.jpg


77BADE05-EA2F-470C-83D5-707FF652B653_zpsboicqall.jpg


The first picture was my old setup which was stock leafs on a 2 inch block. The second picture is after the frankenleaf mod. Pleas ask any questions because I know I have left info out. I just wanted this done so I tried to take as many pictures when time permitted.

76B9383E-3C01-49E2-918B-D054B32AEE0C_zpsqfherpkp.jpg


B5851E74-BA97-4F8C-8591-293490FD36AD_zpsylyn1yk4.jpg


Wow, excellent job.

I used one of the existing holes for the spring retainer and found flat head carriage bolts at a hardware store. I used stainless tubing where you used the roll pin and nylon lock nuts instead of washers. I thought about painting over the graphite paint. Does it stick?

If you would, please double post in the frankenleaf thread.

After bolting the spring retainer to the leaf, cut the bolt off flush with the nut. I scraped my first version off on a rock and since I cut the bolts off flush, they have stayed in place.


Again, excellent job.


Where you cut should be fine, you just need to give the bend a little room so the leaf does not ride up on the bent part prior to the bushing. You don't need to orient them by marking on them, they are longer on one side than the other. You can purchase new center bolts at nearly any auto parts store. They are the larger diameter size (only two sizes that I know of). If you are planning on using a overload leaf, you won't need it, and it limits flex.

I think we are posting over each other. After the second leaf, I just split the difference between the original leafs and made my cuts.

Don't forget to taper the ends like the original leafs. And don't worry about those pads between the leafs, leave them out.

Thank you very much for all the help and ideas.


Wow, excellent job.

I used one of the existing holes for the spring retainer and found flat head carriage bolts at a hardware store. I used stainless tubing where you used the roll pin and nylon lock nuts instead of washers. I thought about painting over the graphite paint. Does it stick?

If you would, please double post in the frankenleaf thread.

After bolting the spring retainer to the leaf, cut the bolt off flush with the nut. I scraped my first version off on a rock and since I cut the bolts off flush, they have stayed in place.


Again, excellent job.


Thank you. So far the paint is holding up. I am hoping the enamel will protect the graphite paint from being worn off. The graphite paint just dosent stick very well.

Will do and I will grind them flush when the weather lets up a bit lol.


^need to do this


So I picked up some parts while I was visiting family over the New Years break. I picked up a HP Dana 44 with 1/2" tubes from a 1975 F-150. I just bought it as a housing because 1975 had drum brakes from the factory. I had a stomach bug the day I went to pull the axle so I only got the axle about half way out before I was super sick and went home for the evening. I came out the next morning and pulled it the rest of the way out. The truck was part of a dont hide/stand behind a vehicle in a shooting training because bullets go through sheet metal. Needless to say the truck was shot to heck but the axle was not thank god. I want to eventually go full width with radius arms, 5.13 gears and 37x12.50r17 wheels and tires.

2468954C-3CC1-4D70-9D5E-DB07A69B3FF2_zpsv4l9zxey.jpg


1A797D0E-EE28-4A1D-8F30-019C66879528_zpsmhrtmnt9.jpg


A7303A3D-58F8-415F-B9F1-0D3D5E0FE5A9_zpsmjrymfnv.jpg


1EB53E6D-F9A7-4D75-9A6B-75FF0566F0C4_zpsjqkefuqd.jpg


FB4EC465-8A13-4A82-8E13-7A1049B039E4_zpsq330dgcw.jpg


That's what I think is the best of the D44's. I have the same axle, but from a 76.

It's a shame what they did to that old truck.


If they are in good shape, you are going to want the radius arms, radius arm mounts, and the caps. If you don't use them, you can always sell them for good money. OEM parts from the 70's are getting hard to find.

I had the stock radius arms and two different types of mounts and sold them for a few hundred bucks when I decided I did not want to use them. Better than someone shooting holes in the stuff.


Join the Elite Explorers for $20 each year.
Elite Explorer members see no advertisements, no banner ads, no double underlined links,.
Add an avatar, upload photo attachments, and more!
.


All I grabbed from the truck were the radius arm caps. I will pick up the rest if I go back. I only paid $57.00 for the housing.


Back
Top