SyberTiger
Well-Known Member
- Joined
- May 18, 2007
- Messages
- 767
- Reaction score
- 52
- City, State
- Orlando
- Year, Model & Trim Level
- 2002 Limited 4x4 4.6L
I recently completed installation of the Dorman 615-175 aftermarket intake manifold on my 2002 Explorer with 4.6L V-8 so I thought I'd chime in with some tips and answers for those considering use of this part. The part was purchased on Amazon for $140.
First, you should be aware that while this aftermarket intake manifold works great for a 2002 4.6L it does not work for 2003-2005 models. I do not know what the specifics why this is so but maybe it has something to do with the throttle body.
When replacing your intake manifold it is a great time to change the spark plugs while you are in there as it is easier with all the "stuff" pulled out of the way. Also, you should consider cleaning your fuel injectors while they are out and at a minimum you should replace two o-rings on each injector. I had my fuel injectors professionally cleaned and tested which included ultra-sound cleaning, replacing the inlet screens, testing the solenoids and verifying spray pattern and metering across the 8 injectors as well as new o-rings. The cost was $80 total for all 8 injectors and while not mandatory I felt it reasonable given the injectors are 14 years old and have 150K miles on them.
The Dorman intake manifold kit comes with everything you need including integrated gaskets and other spare parts meant for use on other cars. You will be reusing your alternator bracket so discard the new one that comes with the kit.
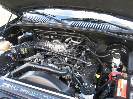
There have been questions on this forum about "heated PCV" vs "non-heated PCV" engines. My 4.6L has a heated PCV and the Dorman part supports a heated and non-heated PCV design. You can verify your engine uses a heated PCV design by noting the outlet port and hose that runs from coolant crossover on the intake manifold near the thermostat over to the throttle body. See the following picture:

If your vehicle does not have a heated PCV the Dorman kit comes with a steel pipe plug to cap off the port on the aluminum coolant crossover.
Getting the old intake manifold off is fairly straightforward and there are a number of other threads on this forum such as THIS ONE that provide helpful info on this job.
Likely, when you get your factory intake manifold out, you will note a "noise insulator" surrounds the bottom of the old intake manifold. It's has a thin plastic shell which is filled with foam insulator. It will probably be very cracked and decrepit with pieces of plastic shell falling off. The Dorman replacement manifold does not come with a new noise insulator but it is not necessary and Dorman has stated that the old one should be thrown away. I have not noticed any weirdness nor additional noise issues due to not having one.
You need to clean up the mounting surface of the engine heads. You can use throttle body cleaner or brake cleaner. Be careful to stuff paper towels or plastic bags into the intake ports, coolant openings and spark plug wells on the heads to keep crap from falling into them while you clean. After a good cleaning you may note some pitting on the mating surface which might be due to corrosion. My passenger side under the aluminum crossover looked like this:

Although I believe the integrated gaskets on the Dorman intake manifold would sit just beyond the pitting I used JB Weld and a razor blade to fill in the pits and made sure the mating surface was completely smooth such that the repair looks like this:

One of the concerns that many have with the Dorman aftermarket part is that it includes a coolant port located on the right side back corner. The coolant port is not typically used on the 2002 Explorer 4.6L but is available for other Ford products that use it as part of the cabin heater system. The Dorman part comes with a rubber cap which is removed for the those other Ford products but for the Explorer it remains in place to block the port. Many have reported problems with the rubber cap which generally rots or cracks with time resulting in engine coolant being sprayed all over the inside of the engine compartment. There are various solutions posted which include keeping a extra cap on hand for the eventual failure and spewing of coolant...or, making a better cap using a short piece of quality auto heater hose and plugging one end with a bolt and using clamps. I have another solution which I think is more graceful, permanent and aesthetically pleasing.
Here is what the unused heater port looks like:

Fill in the port with RTV such as Permatex Ultra Black. Just squirt it in the top port opening then put a piece of tape over the port to hold the wet RTV in.

Then flip the intake manifold over and fill in the port from the bottom side with generous amount of RTV. Push the RTV into the port to make sure all the voids are filled.

When it dries, take the Dorman cap and put it back on but use a better hose clamp.

Another question that comes up is regarding the fuel rail ground plug which is found on the rear passenger side fuel rail bolt/stud. This bolt stud allows the ground plug to snap on but the problem is the Dorman aftermarket intake manifold does not reuse the bolt stud(s) but rather uses four self-tapping studless bolts because there aren't brass inserts in the Dorman manifold to accept the old factory bolts. This means there is no stud sticking up to snap on the ground plug. Rather than snip off the ground plug and add a wire extension to fasten the ground wire to the fuel rail I came up with a solution that is simple, elegant, low cost and allows you to simply plug the ground wire on similar to the factory implementation.
Pick up an electrical crimp lug and an 8mm scew.

Install the screw, cut off or grind off the screw head then crimp.

This will install under the rear passenger side fuel rail bolt. After you torque down the bolts simply plug the fuel rail ground plug on.

First, you should be aware that while this aftermarket intake manifold works great for a 2002 4.6L it does not work for 2003-2005 models. I do not know what the specifics why this is so but maybe it has something to do with the throttle body.
When replacing your intake manifold it is a great time to change the spark plugs while you are in there as it is easier with all the "stuff" pulled out of the way. Also, you should consider cleaning your fuel injectors while they are out and at a minimum you should replace two o-rings on each injector. I had my fuel injectors professionally cleaned and tested which included ultra-sound cleaning, replacing the inlet screens, testing the solenoids and verifying spray pattern and metering across the 8 injectors as well as new o-rings. The cost was $80 total for all 8 injectors and while not mandatory I felt it reasonable given the injectors are 14 years old and have 150K miles on them.
The Dorman intake manifold kit comes with everything you need including integrated gaskets and other spare parts meant for use on other cars. You will be reusing your alternator bracket so discard the new one that comes with the kit.
There have been questions on this forum about "heated PCV" vs "non-heated PCV" engines. My 4.6L has a heated PCV and the Dorman part supports a heated and non-heated PCV design. You can verify your engine uses a heated PCV design by noting the outlet port and hose that runs from coolant crossover on the intake manifold near the thermostat over to the throttle body. See the following picture:
If your vehicle does not have a heated PCV the Dorman kit comes with a steel pipe plug to cap off the port on the aluminum coolant crossover.
Getting the old intake manifold off is fairly straightforward and there are a number of other threads on this forum such as THIS ONE that provide helpful info on this job.
Likely, when you get your factory intake manifold out, you will note a "noise insulator" surrounds the bottom of the old intake manifold. It's has a thin plastic shell which is filled with foam insulator. It will probably be very cracked and decrepit with pieces of plastic shell falling off. The Dorman replacement manifold does not come with a new noise insulator but it is not necessary and Dorman has stated that the old one should be thrown away. I have not noticed any weirdness nor additional noise issues due to not having one.
You need to clean up the mounting surface of the engine heads. You can use throttle body cleaner or brake cleaner. Be careful to stuff paper towels or plastic bags into the intake ports, coolant openings and spark plug wells on the heads to keep crap from falling into them while you clean. After a good cleaning you may note some pitting on the mating surface which might be due to corrosion. My passenger side under the aluminum crossover looked like this:
Although I believe the integrated gaskets on the Dorman intake manifold would sit just beyond the pitting I used JB Weld and a razor blade to fill in the pits and made sure the mating surface was completely smooth such that the repair looks like this:
One of the concerns that many have with the Dorman aftermarket part is that it includes a coolant port located on the right side back corner. The coolant port is not typically used on the 2002 Explorer 4.6L but is available for other Ford products that use it as part of the cabin heater system. The Dorman part comes with a rubber cap which is removed for the those other Ford products but for the Explorer it remains in place to block the port. Many have reported problems with the rubber cap which generally rots or cracks with time resulting in engine coolant being sprayed all over the inside of the engine compartment. There are various solutions posted which include keeping a extra cap on hand for the eventual failure and spewing of coolant...or, making a better cap using a short piece of quality auto heater hose and plugging one end with a bolt and using clamps. I have another solution which I think is more graceful, permanent and aesthetically pleasing.
Here is what the unused heater port looks like:
Fill in the port with RTV such as Permatex Ultra Black. Just squirt it in the top port opening then put a piece of tape over the port to hold the wet RTV in.
Then flip the intake manifold over and fill in the port from the bottom side with generous amount of RTV. Push the RTV into the port to make sure all the voids are filled.
When it dries, take the Dorman cap and put it back on but use a better hose clamp.
Another question that comes up is regarding the fuel rail ground plug which is found on the rear passenger side fuel rail bolt/stud. This bolt stud allows the ground plug to snap on but the problem is the Dorman aftermarket intake manifold does not reuse the bolt stud(s) but rather uses four self-tapping studless bolts because there aren't brass inserts in the Dorman manifold to accept the old factory bolts. This means there is no stud sticking up to snap on the ground plug. Rather than snip off the ground plug and add a wire extension to fasten the ground wire to the fuel rail I came up with a solution that is simple, elegant, low cost and allows you to simply plug the ground wire on similar to the factory implementation.
Pick up an electrical crimp lug and an 8mm scew.
Install the screw, cut off or grind off the screw head then crimp.
This will install under the rear passenger side fuel rail bolt. After you torque down the bolts simply plug the fuel rail ground plug on.