Mounty71's 4x4 Long Travel Build | Page 21 | Ford Explorer Forums - Serious Explorations

  • Register Today It's free!

Mounty71's 4x4 Long Travel Build

My pride and joy, the Mounty:

IMG_3596.jpg

F4EC8611-6F85-45F1-B7B1-253AE96A4719_zpsaqxtchzb.jpg

355435F5-497C-455C-89ED-393DDFAA3F8D_zpsdctggjkj.jpg


Video:

It's a 2000 Mercury Mountaineer. I acquired this fine vehicle in 2003 with just 32,410 miles on the ticker, and it was in pristine condition, having been driven by an elderly couple, and always serviced regularly at the same dealership it was delivered to from the factory.

This thing has gone through a series of different suspension setups, but currently it has:
Solo Motorsports 4" extended D35 TTB with D44 outers, and custom radius arms
2.5x12" King coilovers with 2.5x12" secondary King reservoir shocks
4WD conversion with BW4406 manual transfer case
2.5x18" rear King shocks outboard of the frame
custom ordered Deaver leaf springs with 12" 2AM Fab shackles
Full-width 8.8 rear with stock disc brakes, Blue Torch Fab diff cover/truss
4.56 gears front and rear, lunchbox front locker, limited slip rear
roll cage through dash and firewall to engine cage

(previous front suspension setup)
Long Travel front end 5" wider per side with 2.5x8" Sway Away coilovers, Dixon Bros. shock hoops
2.0x2" King bumpstops
Full heim steering
3" Procomp lift spindles
homemade lower rear A-arm crossbrace, lower A-arm mount weld-washers, upper A-arm gussets
8" limit straps
removed swaybar

(performance)
MAC performance muffler with turn down tip
MAC performance intake

(exterior)
front bumper with removable light bar, with 4 Hella 4000 55w HID conversions
custom rear receiver and swing out spare tire carrier w/ gas can
clear corners
McNeil fiberglass fenders
removed running boards
5.0 emblems
color-matched grill surround with mesh grill
clear LED light in rear bumper

(random)
ABS defeat switch
Icom race radio
recovered center console in black
fog lamp-hi beam mod
added tie-downs in cargo area
rear hatch interior handle
4x4 Ranger front towhooks
driveshaft "loop"


COMING NEXT
3-link rear suspenion
add 2.5 or 3.0x18" King bypass shocks to the rear
switch front smooth body shocks for 2.5 or 3.0x12" King bypasses
rear fiberglass
35s


_MG_8695.jpg

DSC00176.jpg

DSC00935.jpg

Picture019.jpg

mounty007mt7.jpg

mounty027pb0.jpg


Newly lifted on 31 BFG M/Ts:
004_1Aracedezert.jpg

003_0Aracedezert.jpg


After its first offroading:
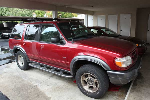
Mountaineer20and20Explorer20008.jpg

Mountaineer20and20Explorer20010.jpg


Almost stock:
Mountaineer20and20Explorer20003.jpg

Mountaineer20and20Explorer20002.jpg

Mountaineer20and20Explorer20001.jpg


Join the Elite Explorers for $20 each year.
Elite Explorer members see no advertisements, no banner ads, no double underlined links,.
Add an avatar, upload photo attachments, and more!
.


Got the crossmember mostly welded in today and made this gusset to also beef up the passenger beam mount. The two ears that are supposed to bolt the beam mount onto the bottom side of the frame weren't lining up correctly so I cut them off and drilled holes on the front and back sides. Now the beam mount will straddle this gusset which I feel is way stronger. Still need to finish welding in the crossmember and do some gusseting on the driver's side.

6AED66A7-B3E7-4F5C-8AB4-1A40F3A794B8_zpskcsubdw5.jpg


D6A91200-9F71-41A5-8F1F-9C26592D0545_zps7alknu3m.jpg


Join the Elite Explorers for $20 each year.
Elite Explorer members see no advertisements, no banner ads, no double underlined links,.
Add an avatar, upload photo attachments, and more!
.


Crossmember is fully welded in now and the steering box has a perfect amount of clearance.

D6593F32-82CF-4AF7-A60C-5064125741AE_zps6owuwjyi.jpg
18EBA727-06AC-4970-ACB2-0E620B723EC1_zpsqo4gbnae.jpg

95EF4662-04F2-464F-9556-77A6F48591A9_zps7jmxhwvr.jpg


Gusseted the driver's beam mount
181049C0-C22F-4EB2-86D3-B78A7B849A57_zpsmxdjfswz.jpg


Drilled out the spindle steering arm taper and TIG welded some sleeves into the steering arms to be through-bolted
8A2CD5EC-2799-4F84-BE6B-218D0EAE1EDF_zpsa7rao5jx.jpg


Beams and radius arms hung
4005399A-E3B1-412C-9D16-0D3DE8D2CA58_zpshuxuxvni.jpg


Cut out the shock hoops and put a coilover in position. I'm guessing this will be about where the coilovers will be at droop. I need to mount a tire and bump out both sides equally and then compress the shocks to actually know where full bump will be, and built shock hoops and steering from there.
8C2632D0-DD7C-4E52-8437-AD20B74D19C5_zpsdibgaord.jpg


hell yea dude! looks awesome!!


Set up the swing steering this weekend. I used 1.5"x1/4" wall DOM tubing and 3/4" heims. I still need to double shear the pitman arm and also set up the hydraulic assist ram. Debating between using a Tractor Supply ram that a friend has sitting around or just going for a new PSC one.

6D368C6D-48B7-4ECE-A280-E27EAFD523B9_zpsw5eq4rk4.jpg

84C0622B-A4BE-4D20-82A1-1A80BA19E5C3_zpskdwjkz0d.jpg

05D69780-4089-45F7-BE02-A6E19226B539_zpsjzsei4i6.jpg

F502044A-B694-402F-B569-8F422D3C12FD_zpsoaxtk1gc.jpg


Double sheared the steering arms on the knuckles
200868EF-6DA9-4E7E-B9B3-DF22C58F2A04_zpskrg51je6.jpg

8F10BBA1-5C9F-4901-A67B-EEB5BB805A11_zpso9z1u4pc.jpg


And added an overlay plate to strengthen the radius arm mounts on the back of the beams, and a place for the hydraulic bump stops to land. Decided to TIG weld them since the other plating on the beams was TIG welded by Solo.
D2EA267B-9B20-4709-B464-63694CB4A34D_zpsxif8tzmm.jpg
19DE140F-B403-4CDC-A3AB-24F462590821_zpsof7ldrho.jpg


looks *****in dude.

Personally, I'd go with a PSC ram. Just make sure you limit the internal stroke of the ram to whatever your limits are so it doesn't over exert the steering box of the tierod.

I'm interested to see how the stock PS pump on the 5oh works with ram assist. The 4oh one crapped out on me like the 2nd day i went wheeling. lol


Thanks. Ya they're really not as expensive as I was expecting. I'm also concerned that with the limited place I have to mount a ram, the cheapo ram I have might be too long, and PSC would likely be able to set me up with the exact ram I need. I'm hopeful that the stock pump will work okay. A friend suggested drilling the ports out to the next larger size. Is that something that people often do? I need to do some more research.


Thanks. Ya they're really not as expensive as I was expecting. I'm also concerned that with the limited place I have to mount a ram, the cheapo ram I have might be too long, and PSC would likely be able to set me up with the exact ram I need. I'm hopeful that the stock pump will work okay. A friend suggested drilling the ports out to the next larger size. Is that something that people often do? I need to do some more research.

Yes. PSC used to do it for people. Basically just pull yours off, send it to them, they rebuild it, bore it out, and send it (along with an invoice) back to you.

I've never seen hydro assist on a beamed truck before. Can't wait to see how it all works!


Modified my pitman arm today. Drilled out the taper to 3/4" and sleeved it with tubing so I can run a 5/8" bolt. Then double sheared the heim joints and plated it all in. I'm fairly new to TIG welding so I'm loving how I'm finally seeing real improvement being made and being able to actually apply it to certain areas where MIG would be more difficult.

A509B695-1EAF-48A2-B449-3DA811AAC704_zps9r33zpmq.jpg


EA38F6A8-3111-4E91-A2B8-8F9DA0EB32FB_zpscwlxgflg.jpg


F1E6257C-8D8A-4A6B-BE27-B8A1549A3322_zpsydcv6vvf.jpg


29D4B5CB-546A-4A20-B5CF-BCC7A2832C43_zpsxwsspula.jpg


welds look *****in! The double sheer is the last thing I have to do to mine.

Question... Why the double mount on the pitman arm? Is that required for swingset style steering setups?


I have two links attached to the pitman arm; a drag link on top that pushes and pulls the swinger (which is what the driver's tie rod mounts to on the passenger side) and then the passenger tie rod mounted on the bottom of the pitman arm. There's no other way to do it so that each tie rod moves independently of the other one.


Decided to give my Torquemonster headers another chance and got them re-ceramic coated before installing them. I had these Remflex gaskets sitting around for a few years and was happy to see that they fit perfectly. Picture of the package for reference.

556A6752-8582-4544-92F2-628B690B8A16_zpsodsimhn2.jpg


6E6D0C91-9957-41D3-94B6-059EF1C65BC7_zps3kbeewdn.jpg


8B81BDF9-187F-4B43-B8EA-381F2BD68A0F_zpsu0fxrz07.jpg


Had trouble bending the EGR tube into place so I cut it down and welded it back together.
1D1BCCFF-ED3E-4E2D-A562-93F4AA106175_zps1luzbpke.jpg


Also finished the rest of plating the frame
BE0E7E90-499C-4FC7-9511-F266CF8AD49C_zpsoukwxdqd.jpg


A9F98BB8-5B00-4C24-B1E3-CF35955B820A_zpsexfrr0mo.jpg


53996BC0-5D51-4D33-9B50-545FA4C745F4_zpsfgw2t5ga.jpg


Shock hoops have finally been started too, but I didn't get any pictures of that.


Shock mounts on the passenger side are pretty much done. Cycling 17" of travel. Obviously I won't have 2 coilovers on one side, I'm still waiting on the second set of shocks to be built.

5FB31770-9FF4-4C00-BC13-5E935BB99402_zpserl0g7e0.jpg


37514E96-719B-4394-8F03-FC1AD607C8FF_zpsqwj086m9.jpg


E16B3EB1-2910-419E-9B3E-677F92311C52_zps7cvhqq4y.jpg


F48925A2-712B-4832-B46D-96F6B9907609_zpsmnx4yxie.jpg


9526508F-21B6-43B5-8389-75835DB60F2E_zpsnh9hky1n.jpg


Also mounted the bump stop between the two shocks.


so are you using the coilover as the spring carrier and a bypass for the actual dampening?


Both shocks will help with damping. And the second shocks won't be bypasses, I'm just doing zero port (bottom mounted) reservoir smooth body shocks. I don't want to hear the clicking of bypasses all the time, and I don't think bypasses are really necessary on a truck like mine. Plus they're much more expensive.


Driver's side shock hoop is built. Just need to double shear the rear upper shock mounts and install the bump stop can on the driver's side. And I've started the cross brace over the motor. I'm trying something different and still not sure I'm thrilled with where it's going, but it could turn out pretty cool. That tube that's in there going across isn't the final piece.

C14170BF-9A3C-4751-8347-F7A9CD8E94A3_zps5cyrcvfn.jpg


282935C0-2018-4F33-8C62-BBDE7990BD0F_zpsu2i93vdp.jpg


FB0E9DB8-F8E8-4F90-9754-D76F189FE3C4_zpsc8jgxvt4.jpg


I haven't checked in on this thread in a while, glad I did! Looking awesome! Glad those plates worked out and I like how you even took it a step above with more plating and sinking in the steering box into the frame.


You are really doing great work. My over the engine cross bar is a little over 1/2" off the top of the intake, and the IAC still rubs the paint off the cross bar, which rubs on the hood insulation.


Thanks Brians. I had to make a new frame plate on the passenger side because when I was removing the old shock hoops and smoothing out the frame I accidentally took off too much metal. So I added a matching piece on the driver's side, and then that shock hoop ended up landing on it anyway. And yes space is tight on the passenger side with the intake and AC parts, but I think I have enough room to make it work. I had to rotate the AC accumulator up underneath the cruise control motor to make room.


Sat the truck down on the ground today finally! A couple of weeks ago I redid the cross brace in a simpler design. Today I finished plating in the bump stops and mounted limit straps on one side, and I'll do the other side tomorrow.

I'm not sure I have the optimal spring rates right now, or at least spring lengths. The uppers are so short with weight on them that there's barely any room for the slider stops, so just driving around town I will probably be hitting them. But I'll drive it around before making any changes. Also the overall width is a little narrower now with the stock Bronco wheels unfortunately.

6998C9DA-971D-44D2-8A0D-F6EA28B66E20_zpsh4vkw437.jpg


4EAA66E1-CB1A-4CDB-96AB-D89BE7D6ABAB_zpsoayapk11.jpg


Tires fit perfectly under the fenders
B1ACE24D-EBB3-4358-904D-31BA83F63A50_zpsbrqc8meb.jpg


3C64BFEF-3F7E-4066-A783-6581E875F7A3_zpsws2qniwl.jpg


93C08483-C9E1-425E-8276-AB40E6874F6F_zpswnobtu2l.jpg


82554B41-EA33-4025-955D-8756A64BBF62_zpsmn5snz4w.jpg


2CC65FCB-3CE3-4D0C-9D8D-665489C92E98_zpsxzceoxon.jpg


184BA437-5DCB-4D11-BA3F-631E364B3694_zpstgcn3nar.jpg


Join the Elite Explorers for $20 each year.
Elite Explorer members see no advertisements, no banner ads, no double underlined links,.
Add an avatar, upload photo attachments, and more!
.


Second pair of shocks came in this week!
1066E9A5-870B-49C9-BEBC-E215F074C397_zps7pr9d0jj.jpg


And started working on getting the steering ram mounted. It's a freebie from a friend, a Tractor Supply 8" that's been shortened to I think about 6" stroke. Also getting the hydraulic lines from him and figured out the other lines too.
185C2E76-1966-4157-A2D9-07D42F53CC5E_zps7tmlhdjs.jpg


30B12461-DE09-4FD4-AF38-72EC57693D87_zpsnhfslfkg.jpg


316C7291-252B-4457-B5EA-F71F4BEDA8E8_zpsscows5ti.jpg


Back
Top