5spdman's slow and cheap XLT build | Page 22 | Ford Explorer Forums - Serious Explorations

  • Register Today It's free!

5spdman's slow and cheap XLT build

I used a two piece cable system when I redid the negative cable on my old explorer. It worked like a champ, and for $17, I couldn't argue because a factory cable was unavailable for days at the tune of $50 or so and I needed it then, not later.

I did a how to post on it, and it should still be searchable. It's about a two year old post.


Join the Elite Explorers for $20 each year.
Elite Explorer members see no advertisements, no banner ads, no double underlined links,.
Add an avatar, upload photo attachments, and more!
.


Well, time for some updates!

I found the electrical gremlin that was causing the truck not to start every now and then...
IMG_20161209_130940085_HDR.jpg


Cable to the starter somehow melted (yes, melted) and was barely making contact to the terminal....little wire stripping and a new terminal solved the issue.

Now onto the bigger updates...

Slave cylinder was going out...had to pump and refill the reservoir every time I wanted to use it, so I made the decision to go ahead and replace it......this started a string of events that I will describe later.

IMG_20161220_214935202.jpg


Transmission out, obvious signs of a leaking slave cylinder...no problem; order a new one from NAPA, replace, continue on my way...

Or so I thought....and this is where I don't have pictures and my non-exsistant skills of story telling come into play...

I go into NAPA, order a new slave for a 91 Explorer. Guy tells me it'll be in the next day...not a problem, I can wait one more day. Part comes in, and I install it. Had a few small things I wanted to do/fix/replace in the meantime as well, so after I put the trans in, I spent a night or two working on said small projects. Finally, I decide "I don't know why I haven't hooked up the trans yet...the T-case is ready to go, so I'll get on that"....

Funny how when you mix and match parts from different years of Explorers, you forget little things, like when you put the clutch hose from your 93 onto your 91 clutch master cylinder so you can use the trans from your 93. After thinking I'd replace the hydraulic line to one for a 91 and seeing that a new line from NAPA would be another $80, the decision was made to just get a 93 slave and not worry about removing the master, which I already knew to be a slight pain......que trans removal #2..................

So I then decide, after also realizing that I'll probably forget about having a slave for a 93 and not a 91, that I'm gonna buck up the dough and purchase a Motorcraft slave, as the one I was replacing was a NAPA slave and it lasted a grand total of 2 years, and a Motorcraft slave would more than likely last much more than that. Made me feel better when I did the math and saw that from NAPA, the slave and line would be $160+ and the Motorcraft slave was about $35 cheaper...cheaper is good when you're on a budget! Two days later, part is picked up from the local Ford dealer and I'm ready to get back to work!

I had recently asked a few groups on Facebook if their clutch pedals felt extremely stiff...(I had always been told that my clutch was stiff, but I never noticed until I bought a new daily; 95 Escort, 5 spd, 2 door hatchback.) Had someone suggest greasing the shaft of the slave before installation to keep it moving freely, especially since it would now be sitting more often than not...so I removed the pilot bearing, started to move the slave around and discovered that I couldn't grease it like I was able to on the NAPA slave...oh well, just put it in. Another two days of installing the tranny and t-case and making sure everything hooked up right and shifted like it was supposed to and finishing/starting more small things, it was time for a fire up! Vacuum-bled the clutch system, everything was good to go!

Turn key...engine fires...strange noise...clutch pedal goes limp..............crap....what happened?!?! ......CRAP!!!!!

If you were paying attention, you may have noticed I left out a step from trying to grease the slave...you guessed it! I forgot to put the pilot bearing back onto the new slave...................$145 down the drain in 2 seconds.................que trans removal #3..................

Things started getting better from there....Ford dealer parts guy knows my father (and me; when I asked for the part, he wondered how our 'ol 93 Sport was still getting along) and when I asked if Ford had a warranty on stupidity, he said no, but he'd see if he could work on a price. Another 2 days and another $110, I had a new slave. Checked 5 times that the bearing was still on during install and also found that in 2.5 hours, I can remove a trans, replace the slave and reinstall EVERYTHING.

Vacuum-bleed clutch, and clutch pedal just hits the floor.....seriously, can't anything go right?!?! In my head, something gave in the MC when the 2nd slave was torn apart while under pressure...pulled it apart, but didn't see anything wrong but we'll have to get a new one....NAPA parts; $80.....Rockauto; $17....Rockauto, here I come....

One week later, new MC is installed, bled, and the pedal still hits the floor.....so on a whim, I decide I'm gonna grab a 2x4 and manually pump and bleed the clutch............it works........

Unfortunately, I was unable to get the original MC back together and so I was stuck with the Rockatuo part......and I say unfortunately not only because another $20 was dropped for no reason, but the shaft on the new MC was slightly different. I found this out by not being able to start the truck after it all was put together...turns out, it wouldn't let the neutral safety switch on the MC behind the pedal make contact, thus not letting the truck start...wrapped some metal around the shaft to make up some room and it all works now!!

Out of all of this, there were some good things to happen...I finally got around to hooking up the fog lights to come on with the parking lights and not just the low beams (which came in handy as both headlights went out after all this work), grounded the switches for the fog lights and 20" bar so the lights in the switches would come on when the switch was on, got the radio to work again (blown fuse), got the rear aux lights to work again (corroded wires), replaced a broken tool mount on the rear hatch, replaced a non-working tag light and replaced the license plate holder, and rebuilt a t-case......and re-que pictures!

IMG_20161228_211649327.jpg


Finally got the EF plate holder on that I got at the Moab run last spring!

And if you were reading, you noticed I said "rebuilt a t-case".....here's that story (much shorter, I promise)...

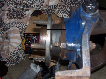
While the radio was not working and the slave was leaking, I went hunting one day when it was snowing quite a bit and the roads were getting squirrely only to find that the 4x4 wouldn't turn on, so I made the call; I was installing the manual t-case I bought from @Kris Guilbeaux at the Moab trip before last. Noticed before installation that the chain was bit sloppy (turned out to be stretched), so I swapped chains and the planetary/cover (bearings from manual case seemed really rough), put everything togehter and put in new ATF...manual case previously had gear oil in it and was really crudding everything up...

IMG_20161223_215545564.jpg


IMG_20161223_215522332.jpg


Case was cleaned up and installed! Everything works great!

Next steps now are to make a knob for the shifter (time to brush up on my wood working skills) and replace the headlights.

Headlights are being ordered tonight...after a lot of research and trying to figure out what to do with $50 worth of Amazon gift cards, I decided to upgrade to LED...more pics and reports to come...

Whew............I'm tired now....got a full weekend of hunting to do tomorrow and Sunday as deer season comes to a close, so I may as well hit the sack...

Till my next report! :D


Good thing you don't have my problems. I've been working on a Mustang GT since October and have driven it a total of five miles. I need a new rear axle. That's the short version. Out of all this, I sit back and think how I had almost zero trouble out of my explorer (I sold mine in June). Maybe one day I will own another one.


Sorry to hear about all the clutch install Juju. Those situations can be frustrating, and sometimes lead to "Accidental" fiery explosions, then becomes legend, to be passed down to generations to come. Glad you got it ironed out, and no balls of fire happened.

I am interested to see the LED headlamp project and what all you got for it. I really want a set of glass lens lights, and get away from these crappy plastic style. LED + Glass lens= Happy camper.


I am interested to see the LED headlamp project and what all you got for it. I really want a set of glass lens lights, and get away from these crappy plastic style. LED + Glass lens= Happy camper.

Are there any clear glass lenses available for our headlights? I have clear plastic lenses on my truck right now, and of course I have a set of the OEM fluted lenses on the shelf...but I'd be all over clear glass...


Are there any clear glass lenses available for our headlights? I have clear plastic lenses on my truck right now, and of course I have a set of the OEM fluted lenses on the shelf...but I'd be all over clear glass...

I haven't seen any. I am wanting them if they are available, is what I meant. If anybody finds them, please give us all a heads up! lol


The stock headlights are glass. Do you have aftermarket lights on it?

The ones AM autoparts sells are glass. Call to confirm they are still selling glass originals.

FleeBay for OEM replacements... http://www.ebay.com/itm/Headlights-Headlamps-Left-Right-Pair-Set-for-Ford-Explorer-Ranger-Pickup-Truck-/310574675366?fits=Year:1994|Make:Ford|Model:Explorer&hash=item484fb175a6:g:~~cAAOSwA3dYc00I&vxp=mtr

Mine are plastic. The 2 sets of stock spares I have are also plastic. I have been buffing the yellow/green off yearly, to try to keep them clear. I will check into the glass replacements, those would be awesome.


The stock headlights are glass. Do you have aftermarket lights on it?

The ones AM autoparts sells are glass. Call to confirm they are still selling glass originals.

FleeBay for OEM replacements... http://www.ebay.com/itm/Headlights-Headlamps-Left-Right-Pair-Set-for-Ford-Explorer-Ranger-Pickup-Truck-/310574675366?fits=Year:1994|Make:Ford|Model:Explorer&hash=item484fb175a6:g:~~cAAOSwA3dYc00I&vxp=mtr

I'm looking for some glass ones, that are clear. Not fluted like those.


I'm looking for some glass ones, that are clear. Not fluted like those.

I have seen clear lens housings on eBay, and there are a few there now, but I can't tell if they're just fluted or not...had to add "euro" or "diamond cut" to the search criteria, and sometimes search under Ranger rather than Explorer...and as far as being glass and not plastic, I can't say what they are...

And all the stock headlight housings I've seen are plastic....I did see a guy from somewhere in Europe on a Facebook page that had sealed headlights, like you'd find in old square-body Chevys and the like....

Thought about making something that would house those, and then get the 4x6 LED housings, which are expensive, but it'd for sure be something different...I always like that my rig is a bit set apart from others and I've had some wild ideas (like the D60 TTB swap rather than the already seen SAS and D44 TTB swaps) :D


Well I've got updates and questions, but we'll start with the updates...and pictures!

As I had mentioned previously, both of my headlights went out within a week of each other, and I had been debating on making the switch to LED headlights. Well, with $50 in Amazon gift cards from the holidays and my birthday, I did some research, some shopping, and made a purchase! There was a little work involved, and here's the process...

IMG_20170211_102756957.jpg


IMG_20170211_102811280.jpg


Lights were reasonable; $46. Each bulb has 3 LEDs; 2 that aim up and slightly outward for lows and another that shines down in the housing to make the light brighter and aim more light up and out onto the road. There were others that had 4 LEDs per bulb (2 up and 2 down), and I really liked that design, but they didn't list different outputs for high/low and I didn't want to take the chance of getting something that wasn't what I needed, and didn't want to pay anything over what I had in gift cards (yes, I'm cheap......)

There was one problem with them...

IMG_20170211_102822307.jpg


The bulb retainer is too big to allow the light to install...so I had to do some modification...

Started by measuring the distance I had between the base and the fan, which was a little more than 1/4".

IMG_20170211_102927782.jpg


IMG_20170211_103022714.jpg


7/8"....yeah, not gonna work. To find where I needed to make my cut for sure, I measured from the "front" of the ring to the retaining tabs, added my 1/4" and placed a mark on the outside...

IMG_20170211_103251637.jpg


(For a more accurate measurement, I used 1" as 0...)

I made a few marks around the ring to help ensure I made a straight cut, grabbed a hacksaw, and went at it...

IMG_20170211_103602132.jpg


It fits! Time for install...

Install is really simple; other than modifying the retainer, it's a plug-and-play operation....

IMG_20170211_103951713.jpg


Install the base....

IMG_20170211_104016829.jpg


Install the retainer...

IMG_20170211_104106366.jpg


Install the bulb, plug into the connector and operate the lights as normal...


And now the questions....

Ive noticed recently that when moving from a stop, I really have to feather the clutch, unless I want the truck to shake and jerk like crazy to the point I'm afraid I'm gonna stall. Once that is past, I have to go easy on the gas until the engine hits about 2,000 rpm or higher, or else it wants to stumble and essentially slow down. I've pulled my plugs and cleaned them, but they looked clean, were still gapped right and were replaced not even a year ago....(now that I'm thinking about it, wires haven't been replaced since I purchased the truck, but 3 years is too soon for wires to go bad, right?)

I had heard from several sources to check the TPS...after some searching on how to do this and what to look for/expect, I got out the multimeter and did some testing...everything looks good though from what I can tell, right?

IMG_20170214_181659832.jpg


IMG_20170214_181747787.jpg


IMG_20170214_181753675.jpg


I kept racking my brain on other things to check for, like possibly the engine was starving for air
when getting on the gas...air filter was a little dirty, but I found some other things...

IMG_20170216_124739895_HDR.jpg


IMG_20170216_124751610_HDR.jpg


IMG_20170216_124932712.jpg


Dirty...just dirty......

The last two pics are from the breathing tube from the valve cover to the intake...not only am I getting oil up though the tube, but I'm also getting water in there as well...dumped out a good table spoon of water from the tube....any ideas where this is coming from and the answers to my riddles?

We'll end this on a good note...I also recently used other gift cards to go out and purchase a Hi-Lift for use on the trails and mounted it up on the rack...

I held the jack to the side of the rack and marked the holes that lined up the best with the flat stock I had welded on the basket...by pure dumb luck the holes matched up with the middle of each bar, so I went ahead and drilled 1/2" holes for bolts (1/2" leaves only a little wiggle room in the holes on the jack). Took two 3" bolts, 4 large washers and 2 nylocks and torqued them down to the rack. Two jam nuts and a small washer hold the jack away from the rack slightly, and the jack is then held on with washers and wing nuts. For security when not on the trails, nylocks replace the wingnuts...

Weather is supposed to be kinda crazy tomorrow, but I'll try and get some pics of the lights and the updated rack...


Let us know how the LED conversion works after some time, and abuse. Hopefully the plastic lens doesn't interfere too much with them.

Check/replace your PCV. Make sure the seals on the intake tube are good. Did you remove the intake end in the fender? Might be sucking in rain or road spray. Do you have a valve cover leak that drips and burns oil into the engine bay?

I did the same Hi-lift jack mount, as you described, on both my rigs. Hi-lift makes a locking 1/2" spinner knob, but they are kinda pricey. To keep them quiet on the racks, I used upper post mount shock bushings behind the hi-lift bar.


I have not checked those things yet Greg, but I'm sure it's not the valve covers....well at least I hope its not; I just replaced those two years ago...

Well, I should have probably stopped to get pics, but here's what I see...

IMG_20170226_223503296.jpg


Low beams...

IMG_20170226_223507059.jpg


High beams...

There doesn't seem to be much of a difference between the two, but there is...I believe the lights that came with 4 chips rather than the 3 in the bulbs I purchased would probably have more of a difference, but these will do for now...I usually run my fogs as well, and they seem to be almost more than enough. I also don't usually use my brights unless there's absolutely no one around, and in that case, my 20" bar comes on as well...

They are plenty bright, that's for sure, but I haven't noticed anyone getting annoyed and brighting me...(I take that back....there was one mom in a soccer van that brighted me until she passed me, but she already looked annoyed, and I only had my fogs and parking lights on, so I'm not sure what her problem was...)

So far, I'm pleased with them, and will probably purchase more as we have two more vehicles still running halogens...

And now to end this post with some eye candy... :D

IMG_20170225_104543605.jpg


IMG_20170225_104554090.jpg


Looks really good.

Thanks!

Update on the engine gremlin that robbed me of power when getting on the gas...picked my Uncles brain about a month ago (he's the family mechanic basically, and I generally go to him with engine questions). After explaining the problem and thinking for a while, he suggested cleaning the throttle body and taking the MAF sensor out and cleaning that as well. (If you're wondering, Q-tip and rubbing alcohol.)

Problem is gone! No problems getting up to speed and mashing on the gas now!

I have done some work to Edgar recently and am in the process of something special...pics and details to come!


Join the Elite Explorers for $20 each year.
Elite Explorer members see no advertisements, no banner ads, no double underlined links,.
Add an avatar, upload photo attachments, and more!
.


Back
Top