Betty's "I want to be a mule" progress log thread | Page 47 | Ford Explorer Forums - Serious Explorations

  • Register Today It's free!

Betty's "I want to be a mule" progress log thread

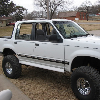
The new turd mobile. 2000 Mountaineer v8 awd.


The bad:

Was living it's prior life on a dusty road. Must tear out interior and deep clean.
Driver window off track "or something" and will not roll down. It tries but the rear part wants to stay up.

3 out of 4 door handles have issues. I have 4 new outer handles on order.
Cracked passenger side tail light housing. ( Ebay for some cool tail lights)

Compass-Thermometer thingy lit up and went out--idunno bout that yet

Door locks seem sticky, probably has to do with the handles.
It has a funky purple color trim with red metallic ( you'll have that every now and then) :(

The good
Gas tank was full
109k miles
I am the 2nd owner!!
Is from the local area, which means no salt!
The undercarriage is fairly clean
No dents to underside panels
Good rubber
Camber shims already installed
Looks like good service records, all recalls were completed.
Clean carfax believe it or not.

The "maybe" bad

The original owner, told the dealership it had a bad "heater core" however I have run it for several cycles, over an hour each idling in the driveay and see no leaks.
However, there was evidence of a windshield leak or the like,I saw condensation on the inside of the windows this AM. The moisture smell is that of water only-no anti freeze smell. I am thinking it could also be a cowl drain which is clogged???? but she did say the passenger carpet got wet.

I tried to get heat, however it is an auto climate control. Being 90 degrees outside, I doubt it would have given me heat.The heater core hoses were hot, and the coolant bypass valve does operate. AC blows Ice cold.

Maybe she meant to say "heater door"???

Anyway--here are the pics.


My intent is to drive this and use it as a tow rig for a light weight off road toy. Mods will be minimal. Edit: This plan did not work out so on to plan "b"

Current visual status

001-8_zps25438bd5.jpg


Progress pictures
025.jpg


026.jpg


027.jpg


028.jpg


031.jpg


032.jpg


044.jpg


043.jpg


042.jpg

038.jpg


Now, let's clean it up a little


Herculine'rd rocker panels. Rock sliders installed

005-4.jpg


004-3.jpg


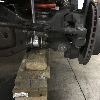
BW 4406 True 4x4 Manual transfer case ( AKA Mouse entry point) installed 8-27-2012
Installed newer Tcase from a 2003 11-14-15

003-7.jpg

Saw a rainbow in Colorado so yeah, time for a picture
119.jpg

And here she is, on top of the highest pass road in North America. Careful tire placement a must!!!
041-1.jpg


2-2-2013

Changed "color scheme" of the Dick Cepek DC1 wheels. New Falken Wildpeak AT 31x1050x15

005_zps519396ed.jpg


Then I decided Maroon washer on the wheels would look better

006_zps9145ce92.jpg


003_zpse4691714.jpg


Update 6-6-2013

New bumpers, winch and Pro LED light . Front Bumper from RLC, Skid plate from RCI, rear bumper from Kert307


001-8_zps25438bd5.jpg


002_zps7dd4e30f.jpg


Rear anti sway disconnects

004_zps1b757042.jpg


Update 9-2-2014
A cracked radiator at 70mph led to engine failure. Replaced with a freshened up a bit 80k mile engine starting on page 23

001_zps0a3e1791.jpg


Found another rainbow in Kansas.

008_zpsarhv1lwt.jpg


Join the Elite Explorers for $20 each year.
Elite Explorer members see no advertisements, no banner ads, no double underlined links,.
Add an avatar, upload photo attachments, and more!
.


That a pretty nasty chemical burn.

Need to keep it very clean so it doesn't get infected.

You might want to read a copy of the MSDS for that stuff to see what the neutralizing agent may be and any recommended outer wear.


Join the Elite Explorers for $20 each year.
Elite Explorer members see no advertisements, no banner ads, no double underlined links,.
Add an avatar, upload photo attachments, and more!
.


Help! ???
does anyone know the proper name of the scissor lever which applies the force to the brake shoes? The thing the parking-emergency brake cable pulls on, fits thru a slot in the top of the rear brake housing.

My driver side is seized to the point I can't get it apart to get it out and clean it up good. It takes quite a bit of force with pliers one direction and a screwdriver the other to get some movement out of it. Soaking with pb blaster did little, I have it soaking in trans fluid acetone mix now.

I need to try to get a new one I guess. Can't seem to find it on rockauto. :dunno:


edit. google found em and oriellys is price matching. but wow, still, 32 bux for a couple of levers?

Dorman 924741 Mergency Brake Lever ( Parking Brake Lever) Kit ( some places want a dash, so dorman 924-741)


Ouch. I hope you have some Aloe or Melaleuca Oil for burns.

Chicks did scars, that'll be sexy when it heals.

I did my recent 98 Limited rear last year, the axles, bearings/seals, and the brakes. I used some new hardware, and some of the original components were better used than the new stuff.

This was the first time I ever got the parking brakes to hold, worth having them. I think the trick was using smooth rotors(they were new), and linings, and adjusting them so tight you had to work hard to turn the rotor. These have worked well for me for about 18k so far, on my route.

I've begun on my 99 also, I have the rear brakes from a Crown Vic 03-06 to go on it. New rotors and pads, the only rub will be reworking the parking brake cables I hope.


So, after fighting the stock brake lever stuff and failing to get it out, and, after going to the oriellys for new levers...

I showed my wife what the hangup was. I told her I had to cut the old one out to get the new one in. She grabbed it and pulled it right out!
"what, this thing?" :sawzall::sawzall::censored:
How in the.....

ok then, problem solved.

I got it freed up and will return the replacement thingys since they don't look so hot. You have to press the upper cable arm onto the bottom arm and hope it will swivel afterward. They will not just slip together like the ones I took out.

The part is also listed as being for f150-expedition. They use the same rear axle but I am going to assume they use a different pull angle, because the explorer levers were clearly marked "L", however the matching part from the box used a L upper part and "R" bottom. weird.There were also 2 extra levers in the box. More R's than Ls.


Some emery cloth and brake cleaner works wonders. A little lithium grease and it now swings as good as new.


I got the rear brake line extension installed also. My helper went to walmart, when she returns I'll have her help me bleed the brakes. I used a turkey baster to remove most of the old fluid and topped it off with new so we'll give every brake a few extra squirts to get most of the old stuff out. Don't have a bleeder, but it is in my wish list on Amazon.


The bleeder, Motive brand, don't leave any brake fluid in the lines. I did that and it made the lines brittle. I managed to bleed my rear brakes, but the line broke when I put it away for the day. I need new lines, and the tiny hose clamps, they come with crimped connections.


Grrr!
Had to tear the passenger side back down because it would not fully release. No, I did not remove the lever assembly to clean it like I did the driver side because I thought is was moving. I should have. So, I did, and got bit big time because I broke my spring hook and can't figure out how in the heck to get the outer control spring stretched and in the slot. Tried the coat hanger trick, wrapped several times around a pipe so I could get my foot against the leaf spring mount and pull with my weight.
There was too much wire in the way and the spring would not make the bend around the ledge. You have to have been there to understand. Wifey couldn't shove it with a screwdriver enough to hook, before the coat hanger ran against the outer edge of the brake shoe and stopped it.

And yeah, some kids were riding their bikes right past me when I was trying to talk it into submission. It didn't work but I bet they won't ever walk in my yard.

Another day in emergency brake blis has ended. I think I need help with this, i just don't have the back strength to stretch that dang spring.


It's been ages since I looked at that hard with the axle in place. Is there any room to use Vise Grips? My needle nose model is my favorite drum brake springs tool. I use that to pull any of them into place.


I might have to get a set of those Don.

I have this OEM brand brake spring tool in my arsenal.
oes-25000_ml.jpg


I don't think it will work though as the points are larger than the spring seat slot.

I might have to mess with it some more. Hmmm, Grinder to the tool tips?
The spring hook that worked well for me looked dangerous to use, like a large dental tool, but a pointed hook. It got in there and the spring would just glide off into the slot. sigh....


I never was thrilled with those special brake tools. I've used them at dealerships and often the right tool makes it easy to put a spring on etc. But my Vise Grips I've been using since the 80's, and I've been able to do basically any springs with it. Mine is the medium needle nose, about 7-9" long. I think it's the only one I've owned, the Vise Grips are a premier brand that seem to last forever.


You have the right tool, let me show you how to use it.

that's what she said. I swear. I've heard it over and over thru the years.

OEM 25000 is the perfect tool for this job. No kidding. I had it all the time.

3


In 2003 I was doing the rear brakes on the black mounty, bought some pads and the parts guy said"you're going to want this too, it's only 6 bux" so I said ok thanks!

Got it home, looked it over and threw it in my tool box. At that time the axles were pulled so i didn't need it, it looked complicated, so there it sat.
Forward to doing this job a few times and using a spring hook I had, this tool just sat. I even considered throwing it away, because I would never use it.
My wife, who has been great for helping out here, looked the tool over and said in her imagination it should work.

So,
I literally had a dream last night about using it to reach in, grab the spring and hook it into place. Turns out this it what this tool does! WoW!

I was trying to use it in the wrong fashion, using the hook to slide it to the slot like my old hook did.


My comrades, I shoit you not. This tool is a life saver! ( I am going to take the liberty of editing the first post of theh "how to" with pictures.)

With this tool you reach in from the side you want to pull from, hook the spring and then grab it with the "plier" tooth of the opposing scissor side.
Now the spring cannot slip out. The handle makes it easy to pull the spring into place at the right angle, and with enough of the hook protruding, with the proper reach around to just hook it, and let go.

I literally lit a smoke, took a puff, grabbed the hook and right into place she went.

Pictures attached. Feeling much love for the day now!


This tool iS GM on one end, and Ford on the other. It also quickly connects and disconnects posts mount springs


003.JPG


002.JPG


001.JPG


I've had one of those tools for years and never really figured out how to use it properly.


I've had one of those tools for years and never really figured out how to use it properly.

I know right? And it just looked too cool to throw away. lol


I guess my knowing how to use that tool was one of the payoffs of going to Denver Automotive for their Auto Technician course. ;) It only took me several thousand dollars in tuition to learn that trick.:eek:


Thanks Jon, I too have one of those somewhere, and never got the hang of it. I'll find it and work with it more.


Ok, except the tires it is back together and tested. still need wifes help bleeding the brakes.

One minor snafu.

The emergency, or park brake whichever you prefer, is not fully releasing at the pedal return spring. The passenger side still stops short of fully released, but if I pull the cable right under the door relieving the cable tension a bit, everything slides back where it needs to be. I made a mark right at the slider near the junction of the main and intermediate cable for reference.

So, it is like my cable tension at the pedal is too tight. Is there an adjustment for this? Seems like if it was worn out it would be too loose?

I lubed the cables with spray silicone but to be honest they feel nice and smooth, it is definitely too much tension on the return spring in the pedal, pedal mechanism not fully releasing.
For now if it gets into replacing the pedal--un uhh. I'll reach under and pull the cable if I ever use the e brake for now--


Hmm, I wonder if the parking brake return coil spring ( in the pedal) is just all dirty and needs some luv spray. That is what is feels like.

the opposite of too much slack is going on here, so the too much slack thread is not good to resurrect.


I'd bet on lack of use corrosion, in the cable or pedal mechanism. I'm worried about my vehicles just for that reason, lack of use and the weather.


Join the Elite Explorers for $20 each year.
Elite Explorer members see no advertisements, no banner ads, no double underlined links,.
Add an avatar, upload photo attachments, and more!
.


ok, wait.
the driver side does fully release. Passenger side does not unless i release the pedal spring tension. Why would one fully seat and the other not unless they are off balance.


That isn't right. It is a longer cable but should still be operating in unison with the intermediate cable, which it pulls.
I wonder if the intermeditate cable ( to driver side ebrake) is too loose, and when the driver side ebrake fully seats, the return pressure is cut in half, leaving just the passenger side return springs to pull the cable the final 1/2"

hmmm


Or, could it be the main cable is too tight ( as I was thinking before)

I wonder if there is some sort of "balance adjustment" for the 2 cables.

Moving the attachment point of the intermediate cable to the main cable forward, might just be what is needed for full return spring force from both sides. It would make the driver side cable continue to have tension for another 1/2" which is where my 1/2" mark is

hmmm
tomorrow I need to look this one over and see what can be done.


Back
Top