engineeering
Well-Known Member
- Joined
- July 3, 2014
- Messages
- 202
- Reaction score
- 11
- Year, Model & Trim Level
- 06 explorer xlt 4x4
I figure I should share my success with how I successfully swapped a pump in just under 1.5 hours. Not to mention... installed an access hatch that came in very handy only a few months later (had an unrelated evap tank vent problem that was quickly remedied).
Note: Only the access installation is covered here. Refer to any pump replacement instructional online for the rest... they are plentiful and numerous.
tools req:
tin snips (preferably left & right)
drill (with a depth stopper preferred)
knife
two-sided tape
piece of 1/8 plate or sheet metal
about 15 self-tapping sheet metal screws
chisel
liquid gasket
1-2 hours (including pump install)
caution/disclaimer:
I take no liability. Be safe. Dont drill into your tank. Dont use spark throwing cutting blades because you think it's faster and/or cleaner.
Here it goes...
Take a knife and cut your carpet along the red lines (black line shown for reference distance to plastic guard along door jam)

Peal the carpet back and chisel off the insulation along the future cut lines.

Carefully drill 4 holes at the four corners of your future access panel. NOTE: Do not drill into your tank. Recommend using a stop to limit the dept to about 1" (you have around 2" space to the top of the tank).

Use tin snips and cut out the square. Remove the large rubber grommet and use that large hole to start your cutting. I recommend using new/sharp tin snips... mine were very crappy and the cut shows it. A decent pair will easily cut through this much cleaner if you have a left and right pair. (*you may want to widen your hatch 1-2" to the passenger side to give you more room for the pump removal. This was plenty but it makes it a bit nicer).

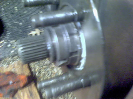
Swap pump or do whatever you need to do with your new access to the top of the tank...
Place a liquid gasket bead around the hatch to make it air-tight.

Cut/paint/pre-drill/place your sheet metal/plate hatch into place.

Use your self-tapping screws and screw your panel down (will be air-tight with the liquid gasket). Place a few strips of some double-sided tape on the top of your panel for your carpet to stick to.

Place the carpet down and spend a few moments to stare at that professional job you just did. Then remind yourself that you just saved yourself lots of money and did the job in half the time the mechanics do it in.

Your vehicle is now equipped with a well hidden access panel!
Hope you enjoyed this "how-to".
Random banter:
I must say... when I finished the job I felt pretty smart - particularly when reminded of how dirty I was after a 7hr fuel pump change in my old 2002
ps. The first time I did a pump swap on an explorer I dropped the tank... I (1) broke a fitting piece on my fuel tank (i left one hose connected and it snapped off when lowering it), (2) spilled a bunch of fuel when I had to remove the fill hose, (3) did the entire job on my back with almost no lighting etc, and (4) stripped a bolt on my transmission support beam trying to lower it to give an inch of extra room to allow the tank to pull out... what a mess. That's why I "went for it" and did the logical thing... ADDED AN ACCESS PANEL!
pss. several weeks later... I began having fill problems to my fuel tank. it kept stopping at about 3/4 tank. Then it got worse and stopped at half tank... I then got a code saying something about evap crap. I knew it had to do with the evap canister entrapped water TSB so I used my new access panel and just installed a vent hose from the top of my fuel tank to just below the gas cap. Worked like a charm and saved me over $1000 in Ford repairs. No codes... and it vents and operates beautifully now")
psss. (May 15/15 update) Had a fuel pump fail just before driving home from a work trip (~7hr drive from home). Was able to walk to a parts store... buy a screwdriver & pump, and swap it in in <30mins. Dang... this access panel just keeps on giving!
Note: Only the access installation is covered here. Refer to any pump replacement instructional online for the rest... they are plentiful and numerous.
tools req:
tin snips (preferably left & right)
drill (with a depth stopper preferred)
knife
two-sided tape
piece of 1/8 plate or sheet metal
about 15 self-tapping sheet metal screws
chisel
liquid gasket
1-2 hours (including pump install)
caution/disclaimer:
I take no liability. Be safe. Dont drill into your tank. Dont use spark throwing cutting blades because you think it's faster and/or cleaner.
Here it goes...
Take a knife and cut your carpet along the red lines (black line shown for reference distance to plastic guard along door jam)
Peal the carpet back and chisel off the insulation along the future cut lines.
Carefully drill 4 holes at the four corners of your future access panel. NOTE: Do not drill into your tank. Recommend using a stop to limit the dept to about 1" (you have around 2" space to the top of the tank).
Use tin snips and cut out the square. Remove the large rubber grommet and use that large hole to start your cutting. I recommend using new/sharp tin snips... mine were very crappy and the cut shows it. A decent pair will easily cut through this much cleaner if you have a left and right pair. (*you may want to widen your hatch 1-2" to the passenger side to give you more room for the pump removal. This was plenty but it makes it a bit nicer).
Swap pump or do whatever you need to do with your new access to the top of the tank...
Place a liquid gasket bead around the hatch to make it air-tight.
Cut/paint/pre-drill/place your sheet metal/plate hatch into place.
Use your self-tapping screws and screw your panel down (will be air-tight with the liquid gasket). Place a few strips of some double-sided tape on the top of your panel for your carpet to stick to.
Place the carpet down and spend a few moments to stare at that professional job you just did. Then remind yourself that you just saved yourself lots of money and did the job in half the time the mechanics do it in.
Your vehicle is now equipped with a well hidden access panel!
Hope you enjoyed this "how-to".
Random banter:
I must say... when I finished the job I felt pretty smart - particularly when reminded of how dirty I was after a 7hr fuel pump change in my old 2002
ps. The first time I did a pump swap on an explorer I dropped the tank... I (1) broke a fitting piece on my fuel tank (i left one hose connected and it snapped off when lowering it), (2) spilled a bunch of fuel when I had to remove the fill hose, (3) did the entire job on my back with almost no lighting etc, and (4) stripped a bolt on my transmission support beam trying to lower it to give an inch of extra room to allow the tank to pull out... what a mess. That's why I "went for it" and did the logical thing... ADDED AN ACCESS PANEL!
pss. several weeks later... I began having fill problems to my fuel tank. it kept stopping at about 3/4 tank. Then it got worse and stopped at half tank... I then got a code saying something about evap crap. I knew it had to do with the evap canister entrapped water TSB so I used my new access panel and just installed a vent hose from the top of my fuel tank to just below the gas cap. Worked like a charm and saved me over $1000 in Ford repairs. No codes... and it vents and operates beautifully now
psss. (May 15/15 update) Had a fuel pump fail just before driving home from a work trip (~7hr drive from home). Was able to walk to a parts store... buy a screwdriver & pump, and swap it in in <30mins. Dang... this access panel just keeps on giving!