D-Ranged | Page 7 | Ford Explorer Forums - Serious Explorations

  • Register Today It's free!

D-Ranged

This is my Ranger. There are many like it, but this one is mine. I'm updating the beginning of the thread with how it progressed. To follow along, you can see some of it here, the rest is on The Ranger Station and Pirate. Just search D-Ranged. This thread isn't much different than what you would see on those forums, but a couple people asked me to post up about it on here too, so here you go. Also, I'm in the process of fixing all the bad links to pictures.


It started life simple. A 1 owner, ultra clean 94 4.0/5speed/4x4. I immediately removed the dear hoof wheels and installed some cheap aluminum ones.

1930455_36617677068_1341_n.jpg


Then a few months later, I put on a small lift, but not the tires... hey, the 31s still had tread and I was a lance corporal that lived in the barracks... cut me slack

1930651_39825857068_7198_n.jpg


tires finally wore out, bought some used 33s and a stupid roll bar thing
2254_68736372068_2762_n.jpg


then i got a free drivetrain out of a FSB, and put it in (god this thing was SCARY to drive)
23734_339555792068_1381516_n.jpg


then i went to Loftis Motorsports in El Cajon, CA to get a SAS done
71643_483239877068_1509265_n.jpg


then I put an 06+ front clip on it
76183_493996297068_6644686_n.jpg


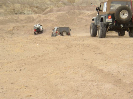
then i put a big ass bumper on it, a winch, added some lockers, and met up the Explorer Forum guys in Truckhaven in 2011.
163490_10150118416772069_8383843_n.jpg


oh yea, and painted it Screamin' Yellow.

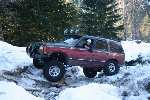
I ran the 35s for a while, even took it to Moab,

217013_10150213232912069_6774290_n.jpg


and when they wore out, I stepped up to a set of 37s
248872_10150265224672069_1489518_n.jpg


added a doubler,
215196_10150326674082069_7630479_n.jpg


and took it to the rubicon. Alone. Don't EVER do that, especially on a trail that 600 miles from home and you drove your rig there
293565_10150362256262069_6302189_n.jpg


Then I moved to Kentucky for school and things went drastically south.
310220_10150416817087069_1847945073_n.jpg


Join the Elite Explorers for $20 each year.
Elite Explorer members see no advertisements, no banner ads, no double underlined links,.
Add an avatar, upload photo attachments, and more!
.


So, like I mentioned in April, I took the truck back to my buddy Jordan up at Coin Jar Off Road in San Marcos. He's done a lot of stuff on this truck, and his pickiness is something I really like. He is kind of set in his ways on some things, but that has turned out pretty good when it comes to this truck.

I say that disclaimer because my original goal with taking the truck back to him was just to have the wedges welded on the smooth tube Dana 44 (one without the cast wedge inner C's) and reuse the rest of the setup I already had other friends make for me.

Well... That didn't happen. Jordan wasn't comfortable putting the new axle in using radius arms with the bushings. He said we could do radius arms like the XJ's run, or we could just do a 3 link. He said he could get it to fit, and knows he could dial in the suspension to what I want with that setup, so I told him to go for it.


He sent me this last week. He doesn't take a lot of "during" pictures, but here it is before he redoes the steering.
396E84AF-E1D4-4933-AD10-2ED6BBB51F50_zpstsbkqlpw.jpg


After taking out the radius arms, he rebuilt the new dana 44 with all yukon parts from Ruff Stuff (Thanks Morgan!), added a new steel diff cover, added a truss, and put the 3rd link directly above the driveshaft. Everything has been cycled with a modified JK driveshaft for mock up, but Adam's Driveshafts will be building my new ones. The only clearance issue was at full bump on both sides, the 3rd link mount barely touches the JK driveshaft. Adam's will be using the TJ sized tubes instead of the JK's, so that won't be a problem once it is mounted.

As you can see, the shocks are spaced a bit off the axle. Even with that height of the mounts, the lower mount is still almost 3" lower than the old setup. This allowed for 1.5" of preload on the shocks, and it is still sitting low in the front. As you can see here:

2D7C5E87-D797-4EB0-BDAC-10A9E948E65B_zpsmwjrfkmt.jpg


So there are still a few more things to do. I also decided to go away from heims on this truck, due to the amount of on-road time I plan to have, and well, heims suck on road. Or at least the ones on my trucks do. I'm sure some of you love that ****, not I. I called up Ruff Stuff again and ordered their Y-link steering kit with a set of their tapered inserts. I also picked up a set of used (very used) knuckles from garage fab out of New York. A set of lifetime warranty ball joints from Orielly's and new warn lockouts were dropped off Sunday and the last bit of parts from Ruff Stuff should be there this week. So that brings you all up to date. And hopefully the last time I'll have to change the front suspension.

things left to do:
- Clearance the engine cage to access the master cylinder better
- Clearance the engine cage to access the blown blower motor resistor
- Clearance the engine cage to fit better around the air intake
- Driveshafts (Hoping for a 2 piece rear so I don't have to move the gas tank. We'll see what Adam's recommends)
- install the new steering setup
- Probably a lot of other little crap, but a whole lot less than it used to be


Join the Elite Explorers for $20 each year.
Elite Explorer members see no advertisements, no banner ads, no double underlined links,.
Add an avatar, upload photo attachments, and more!
.


Love my three link setup. Though I haven't ran a radius arm to compare it to. When I make it back down to San Diego sometime we will have to meet up so I can check it out in person.


Love my three link setup. Though I haven't ran a radius arm to compare it to. When I make it back down to San Diego sometime we will have to meet up so I can check it out in person.

its fine on the road, not so great off-road but not too bad. The Explorer is basically running a radius arm setup on it and it does pretty well. I will be going to a 3 link in it too though.

Biggest thing was fitting everything in there with a V8 in the way. Now the engine and trans are a huge unknown on how well they will do. I hope it will last a couple years.


Went and picked up the truck from Coin Jar Off-Road on Friday. This thing drives totally different. Before it was really darty and just felt scary. Now it feels like a lifted truck without a sway bar. The craftsmanship of Jordan's work is excellent and you can tell he put a lot of time in all he did.

76F4BB45-0EB2-4E89-8769-73FE9D7C712D_zpsr0a70lgl.jpg

3CCA091C-2397-4740-9E1E-E0F3DB50E02A_zpsztrefpci.jpg


000415F6-0567-49EF-BFDE-0579B2C917B2_zps2o1h51zy.jpg


The truck had a lot of shop dust all over it, and after I washed it, most of it was still there so Saturday morning I clayed and waxed it to hopefully keep the clear coat happy out here in the So Cal sun. My dad spent a lot of time and effort on the paint job, so I want it to last as long as possible. (I know you all are gonna make fun of me. lol)

Drove it around probably 10 miles saturday. Gutless is an understatement for this thing. Kind of depressing, but oh well. At least it runs and drives now. Evidently there is a guy out here that has tuned the 5.0 to get some more power out of it. Hopefully that will help it a little. I can't afford to do the LS swap right now. :p

So as of right now, I have a small oil leak where the remote filter mounts, and still need driveshafts both front and rear. Driveshafts will wait, but I want to finish all the little stuff and I'll likely just re-tube my spare shaft while I save up to have the bad ass 2-piece unit built. Truck drives pretty damn good, but I think it could use an alignment. Won't be investing a lot of time on this until the explorer is back together, so I plan on just driving it and getting a feel for it before taking it to the dirt.


You have kind of a Yin and Yang 4X4 thing going with your two vehicles. One is very clean, the other is a total beater. I have tried for years to have both in one vehicle, but the small amount of trail damage I get is slowly winning out. I care less and less after each dent. Still not planning on trying those concrete ditches at Truckhaven anytime soon.


You have kind of a Yin and Yang 4X4 thing going with your two vehicles. One is very clean, the other is a total beater. I have tried for years to have both in one vehicle, but the small amount of trail damage I get is slowly winning out. I care less and less after each dent. Still not planning on trying those concrete ditches at Truckhaven anytime soon.

lol, that's what my fiance says. We call the Ranger our half-price JK. All these bad ass mods on a truck that still gets waxed. This one is built for camping and exploring. No more tight, tough obstacles that could damage the body. That's what I have the Explorer for. I'm sure it will get a few dings and dents, but not trying concrete ditches with this one either. And I probably won't be trying the ditch again in the sploder either. lol


Drove it last night to the local off-road cruise in. Lots of jaheeps and one other cool ass Ford.

503168674-another-solid-axle-ranger-build-img_2289.jpg

503168707-another-solid-axle-ranger-build-img_2290.jpg


The truck lacks in the power department bad, but no CEL was on the dash. Plugged a reader in and found out the bulb was shot. 10 codes came up.

d0f596a21441c16e587aea9e0a47bb66.jpg


Now I get to try playing engine mechanic as I try and figure this **** out. I think 1st is to put the evap canister in from the same model explorer the motor and pcm is from. Then go from there.


Nice looking Ranger! We need to get him out of the shopping malls and onto the trails ;)


The truck lacks in the power department bad, but no CEL was on the dash. Plugged a reader in and found out the bulb was shot. 10 codes came up.

d0f596a21441c16e587aea9e0a47bb66.jpg


Now I get to try playing engine mechanic as I try and figure this **** out. I think 1st is to put the evap canister in from the same model explorer the motor and pcm is from. Then go from there.

I just spent a couple hours reading through your whole thread, excellent work keep it up. My 01 BoostedXPLR Sport is lifted a couple inches and I got slightly larger tires on it but I do wanna lift it another 5-7 inches maybe more, I would have done it by now the only thing holding me back is without the subwoofer in my truck the roof rails just barely rub on my garage door when I pull it in. And I have to remove the arm that connects the garage door motor track to the door so that the door will raise enough to get my truck in. BTW my garage door motor is like 50 yrs old and still works like a champ but I wish I could increase the stop point for when the door opens all the way. When i typed the company name in on google for my garage door motor I couldnt find anything, after an hr I did find a company time line and it showed the company was bought like 10 times over since it had the name that is on my motor lol. But that was the only thing I could find. Ill never change that motor because "they dont build em like they used to".lol

If you need help in diagnosing those codes I can send you the Ford pinpoint tests from the Ford tech site out of the workshop manuals and any wiring diagrams you might need.

With all that suspension work Im surprised you havent invested in any performance mods besides maybe a CAI and exhaust. You should look into a supercharger or a 5.0 stroker also maybe with a supercharger ;)

*Update*- I was able to adjust the stop points on my garage door lol so now I don't have to remove the arm that holds the garage door to get the truck in anymore lol. Plus I made the door close so smoothly now, its just right. Ive actually decided to start building a stroker 4.0 which strokes it out to 4.3. I was gonna swap a 5.0 OHV or 4.6 DOHC but Ive invested to much money and time into my 4.0 to just ditch all the stuff I bought for it. But after I swap in my built motor and built trans I will do a 5-7 inch lift maybe more. But before I can do that I have to replace my rocker panels so that I can put some running boards on it. Id like to install some fold out running boards


If you need help in diagnosing those codes I can send you the Ford pinpoint tests from the Ford tech site out of the workshop manuals and any wiring diagrams you might need.
Hi Devan, thanks for the comments, and best of luck on fitting the larger explorer in the garage! Neither of my trucks fit in mine. As for the help, I would greatly appreciate those tests.

With all that suspension work Im surprised you havent invested in any performance mods besides maybe a CAI and exhaust. You should look into a supercharger or a 5.0 stroker also maybe with a supercharger ;)

I just want it running well in current form before I mess with anything performance wise


Talked to the EFI Guy today about some of the codes. He's going to reflash the ECU to remove all the emission codes. He's also going to flash for the tire size and gearing along with removing the VSS.

He also told me to check the fuel rail on the engine to see if it was an older style or newer style. I didn't remember, so I did his check. Older engines (pre-99) ran a fuel rail return system, whereas newer engines (99-01) ran an in-tank return system. So I checked my fuel lines
6CyHxMA.jpg

wN9LTmA.jpg

Looks like a rail return system, but I still don't know what that 3rd line is for.

Also said the PSI at the rail with engine off, key on should be 39ish (he told me the exact number, but this is close enough for me) PSI. I rented a fuel pressure gauge and the 1st prime was 20 psi, 2nd prime went just over 40, then dropped back to 39ish. 3rd prime went to around 70 then dropped down to 39ish. I didn't test it running. I'll do that tomorrow.
4c7OSpy.jpg


Shipping the ECU out this week, then will get back on it once it gets back. Also ordered some new leaf spring perches. Going to go to the junkyard next weekend to pull a set of 1500 springs. The truck currently has 2500 springs in the rear and while they flex really well, they ride like complete ****.


Dude hes prolly just gonna make it so those evap codes don't set the check engine light off you cant actually get rid of them unless you know how to properly disable the evap monitor within the tune or you fix the problem. That p0443 code is prolly causing the P0453 and P1451 code due to a possible problem with the evap purge valve or the wiring to it and that could also be causing your banks to run rich.

I also just read that your motor is out of a different vehicle. What year is your ranger and what year explorer did your motor and pcm come out of? Most likely the fuel tank and lines and evap setup is different. Id be careful because your tank might be building pressure that is suppose to be released by the evap system and its not being purged properly. But sendin your PCM to somebody to have them disable codes from setting the MIL off is not the answer. And if you really want your tire sizes and gear ratios to be right then youd prolly be better off going to ebay and spending a couple hundred bux on an SCT power programmer and retuning the vehicle tire revs per mile and axle ratios yourself. Prolly cheaper then sending the pcm to EFI GUY. then you could spend a few more hundred bux and buy the SCT advantage 3 software like I have and learn how to change the over 3000 parameters within the vehicle PCM to get it runnin real good.

Don't you want your engine to look like this and be able to tune it and diagnose problems yourself?


time for another update


Well, it still isn't done. The rear end was not square under the truck at ride height. I found out this was due to having one of the leafs in backwards. The truck had 2500 springs on it anyway, so I decided to drop down to a 1500 set of leafs. One day I will likely go with Deaver or National for a set of really nice custom built leafs, but these will do for a while.

1ea624ecbec5e44e71889757feb9e898.jpg


After putting them in, I didn't like having the block a different size than the leaf perch, and it was too tall, so I had a buddy mine ( Limitless Fabrications in Illinois) build me a *****in set of aluminum blocks that are the same length and width of the RuffStuff leaf perches.

LOK3ZVq.jpg


One of the most notable things on the truck was the gas tank was about 1/4" away from the driveshaft. It was about a half inch away from the output shaft yoke on the transfer case. So, I decided it was time to pull the fuel tank assembly out of the truck, and redo all of that ****.

I went with the following:


RCI 15 Gallon Aluminum Fuel Cell

Pierburg 7.21659.72.0 Insulated Electric Fuel Injection Fuel Pump

Aeromotive A1000 Injected Bypass Regulator

Russell Performance 650133 Billet Aluminum 40 Micron Fuel Filter

JEGS Pro-Flo 350 Braided Hose -6AN


I'm going to do -6 from the pump to the fuel rail, and -8 from the tank to the pump. I will also be installing a Holley Hydramat, just ran out of money to order that too. I'll pick it up in the next few weeks and order all the fuel line adapters.


The customer service at Kartek has been outstanding. Since this is my first setup ever using AN fittings and braided hose, I had a ton of questions about adapters and fittings. Tylor has answered all my questions, and is putting together a list of part numbers for all the adapters I will need. Its great to see companies in this industry still helping out the newbies and answering questions rather than being a dick. I'll be using them in the future for sure.


One of the other big hurdles I've been dealing with is a 2 piece driveshaft. I was having a tough time figuring out how I wanted to do this, and finally put it all together. I used 2" .0120 wall square tube as a crossmember for the carrier bearing, because it needs a flat surface for the bushing portion to sit against. Also, there is already a cross member that the factory carrier bearing aligned to, but my drivetrain is hanging way too low to use that, so I had to cut the square tubing to fit to the cross member, because the exhaust prevented me from going any lower
I ended up using some scrap 1" tubing with some sholdered nuts welded in so it was flat
lAWbM9G.jpg

dbgL6e8.jpg

Then I cut the excess off the 1" tubes and capped them off
NUmKznf.jpg

So1KsHz.jpg

Then I built a little mock up drive shaft and put it in. And my welds are still ****, but I'm sure they will hold the **** just fine.
hlNzESq.jpg

Here you can see how I went above the exhaust and welded to the original Ford crossmember.
BMOKJMV.jpg

Last thing I did was build the lower mock up shaft and installed it
qtcH6UH.jpg

Before it was a 53ish inch long 1 piece drive shaft that hung down like a freaking skid plate begging to be destroyed. because it was so long, the diameter of the tube had to be larger as well, so it was seriously like a boat anchor. When I originally ran the 1 piece shaft, I twisted 2 driveshafts in half on the rubicon
In these pictures you can kinda see how low it used to hang
BF0gaAH.jpg

6mkSIgE.jpg

Anyway, now the rear shaft is only 16" long and has a much steeper angle. While this may affect the travel in the rear due to u-joint bind, I don't think it will out travel the shocks, since they are only 10" shocks.


also when I was replaced the rear leaf springs in the truck, I noticed the frame was twisted due to the factory cross member at the very back of the truck, so I added a round 2" crossmember between the rear leaf spring mounts.
604104e4f49e1024a6d1123c236ae1e2.jpg

While this worked by getting the frame rails situated again, it also was ugly as **** and if I ever wanted to mount anything under the back portion of the bed it was useless.
So I decided to change it. First i had to chop off these useless little ears off the back of the frame
cbcSNgr.jpg

URAn2Fk.jpg

Now with more room for activities, I wanted to put this in
YmuP5Ms.jpg

I wanted this new piece to be tough as well as functional because I plan to add a hitch receiver to it, so I picked up 4 feet of 2x3 0.25 wall tubing from the guys out at Competitive Metals. They freaking kick ass with their customer service too, and their selection is awesome. The frame width is only 32", so I should have just bought 3 feet, but it works.
qb3vHoA.jpg

After massaging the frame a little, added some boogers to hold it on and wahlah!
A8AeQHu.jpg

Then I cut out the round tube and am much happier with how this looks.
That pretty much gets yall back up to date. Gotta build the fuel system, redo the steering shaft on the engine bay side, add a front sway bar, redo the rear brakes completely, add bump stops, and rebuild the shocks. Then I can take it to either Driveshaft Pro or Inland Empire Driveline to have real driveshafts built.


Glad to see you working on your rigs. Getting ready for the Truckhaven run? Truck Haven Fall 2018 - Veterans Day Weekend

Any reason you didn't go with a shorter fixed shaft and a longer rear shaft? My buddy Mike's JK rear shaft is about the same length. It works but it wears out U-joints quickly.

I know what you mean about the long rear shafts, mine looked like a barber pole after a Rubicon trip.

Hell yea man, I will bring the Explorer out for that! I'm hoping to have the ranger ready for KOH 2019. We'll see if that happens or not.

as for the fixed vs rear, its the reason you just described with your stripper i mean barber pole story. I am going to jump to a DC yoke at the carrier bearing and everything should work very well. If this truck works as good on the road as a JK, I'll be flippin stoked.


night before last i made my fuel cell straps out of some thin sheet metal.

jjMYisM.jpg


I don't have a break, so I just used my bench vise. the first one I bent one end a little off 90*, so it is a wee bit tweaked, but hell with it. Good enough. I wasn't happy with how flimbsy it is, my mistake for buying too thin of a sheet, so dimple die it is. Started by marking centerline, and cross hatches where i wanted the dimples to lie.

Clpc6Ul.jpg


I offset the vertical straps closer to the bottom to have more surface of the strap at the corner. I dunno if this will help anything, just sounded like a good idea. I'm sure it will be ****, but hell with it.


On the top, I started to do the same thing, but didn't like it, so I went from the center out to the ends measuring every 2.5"

maisjXk.jpg


drilled the holes with 3/4" hole saw and used my press to make all the dimples

22OAnaY.jpg


MffZ1Yy.jpg


You can see in the bottom pic where this is the one that was tweaked a little


2nd one was much better thanks to my little protractor making sure before I bent anything, it was at 90*

gR7cK51.jpg


threw a skim coat over them and called it a night.

9y4tFn3.jpg


I'll be using rivnuts in the bed with allen screws to fasten the cell down and some friction tape on the inside of the straps and bottom of the cell to hopefully keep the metals from rubbing against each other.


A friend of mine is going to come over this weekend and help with the fuel lines since I have no idea what I am doing, and I don't have and DC driveshaft parts to redo the rear shaft or the front shaft, and the fuel tank straps needed another coat of paint, so I started mocking up the rear bumper.


TOHMfhV.jpg


aPwG3AP.jpg


a friend of mine cut these templates out a long time ago, and i never got around to installing them. He sold his ranger a long time ago too, so I finished 1 bumper and installed on another friend's truck, and never finished the one for my truck. When we originally designed them, we wanted a step to the bumper similar to a factory bumper, which is why it sticks out so far. We knew there was going to be a little trimming needed, but not much.


This is what the bumper was originally designed to look like

FZc4F3f.jpg


UWgaM2z.jpg


yq0jONz.jpg


And what it looks like all finished up

Qbf0YtZ.jpg


for my truck, I don't want it to stick out so far, which is why it has taken so long to work on it because i couldn't decide what i wanted. I now have the vision and am going to get it all cut down and fitted up over the next couple of days. I'm going to cut out all the way to the red line below, to really suck the bumper up under the truck. I'm not going to make it any smaller vertically, but i will put a skid plate on the bottom to help it slide over things. Also the license plate will be on a hinge and the hitch will be hidden behind it.


UMCiVAo.jpg


Join the Elite Explorers for $20 each year.
Elite Explorer members see no advertisements, no banner ads, no double underlined links,.
Add an avatar, upload photo attachments, and more!
.


Cool, looking forward to seeing you at Truckhaven.

I was looking through the pictures and thinking "I hope he's not planning on the bumper sticking out that far." Then, I kept scrolling down and saw the rest of the pictures. Nice.


Back
Top