01 Ford Explorer Audio Build Log | Ford Explorer Forums - Serious Explorations

  • Register Today It's free!

01 Ford Explorer Audio Build Log

Figured I'd bring my build log on my 01 explorer over here from the audio forums. Right now it's sort of in one piece, but I swap things out quite often in it. Currently working on the suspension and should have some updates eventually. Hopefully someone finds some of the stuff I've done to it cool/over the top.

Note: Not setup to look as pretty or professional as the Malibu, as I realized after building that what a PITA it is to swap things in and out once everything is pretty.

There will probably be a lot of sarcasm in this log from me, so feel free to join in.

Figured I'd bring my build log over from Ca/caco/smd/MAF and add all the updates considering I haven't done any updating in a while, so here goez nothing:

In the Beginning There Was Crap

Started working on the truck back in Novemeber of 2012. Had ****ty weather and no garage time to get things super clean, so everything was pretty rushed to get a working system installed before the bad weather hit and I lost working in the garage to the folks cars.

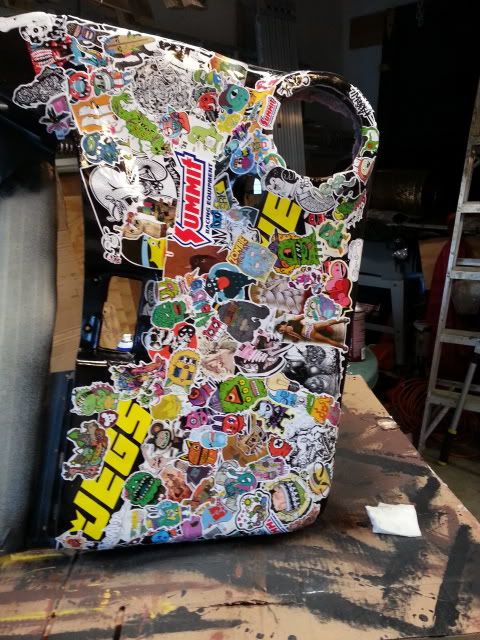
Here's my ol ***** next to my new *****

20130308_164118_zps4c2a7c5f.jpg

Ran crap power wire through it (Soundquest 1/0 and some 4ga Knu CCA), then bought some equipment:
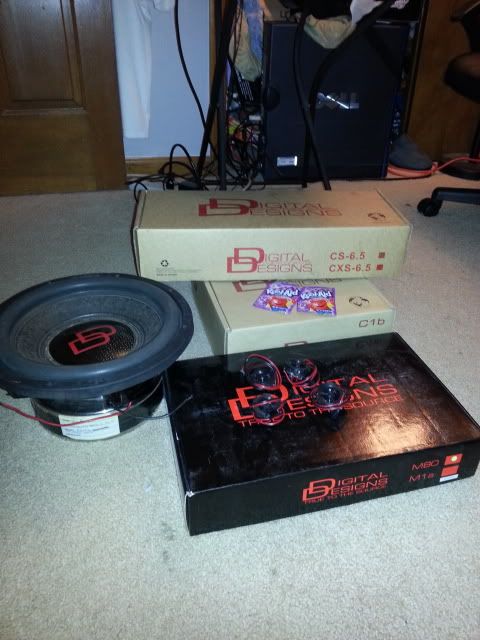
20121123_154509_zps4cb83b39.jpg


OG Equipment:
-DD M80
-DD 9012
-DD CS 6.5

Had Dustin Camb design and build a temp box until I had time to mess around with stuff in the spring

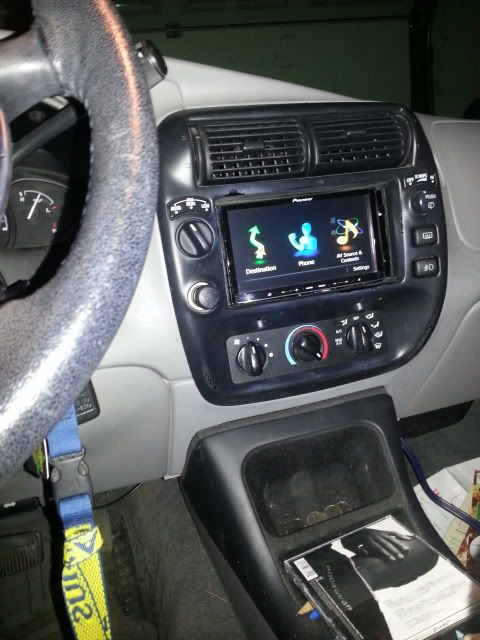
Also around this time (now December 2012), I came across a great deal on a z120, so I bought that and installed it as well (explorer dash is about .5” of trim too large around the radio bezel to fit a double din, so I shaved it down)

20121203_222050_zps5d072d55.jpg


Trimmed it out and got it in (that's what she said):

20121204_200524_zps31f3c8a5.jpg


20121204_232410_zpsde0a21db.jpg


Deadened the whole car with this GT MAT sound deading stuff- not the greatest, but it was cheap for the daily/winter beater and 100+ sq ft for 100 bucks will sway a man.

20121124_202909_zps0e4cf518.jpg


20121126_211549_zpsaea6a65d.jpg


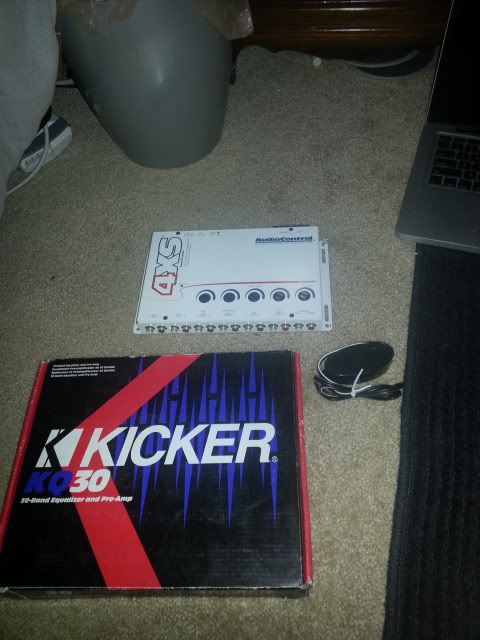
Bought some other small stuff for it too like a Kicker EQ that I never ended up using and an HC 2400 from a friend

20121129_190142_zpsa828eb69.jpg


20121223_043747_zpse23429f5.jpg


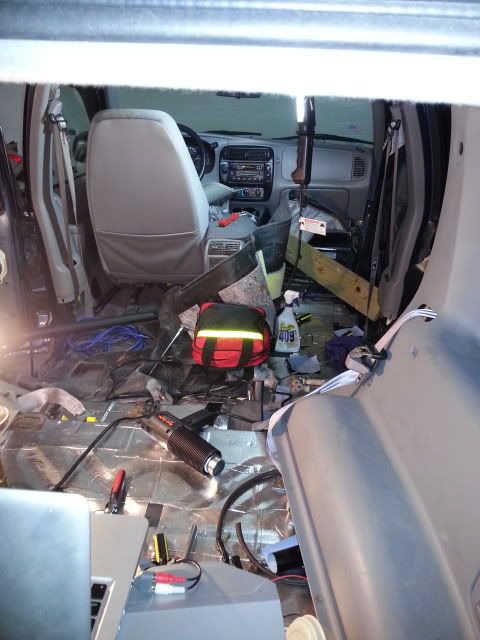
So from there, I didn't have any time to work on it until later in 2013, so the back looked like ass and nothing was stolen:

20121225_224150_zps33cc2ec3.jpg


Join the Elite Explorers for $20 each year.
Elite Explorer members see no advertisements, no banner ads, no double underlined links,.
Add an avatar, upload photo attachments, and more!
.


Spring 2013 came around and I got my car back and started taking the truck apart again. First a picture of my car that I have since lost all interest in:

20130422_151443_zps26d9f558.jpg


Onward to the truck stuff:

So over winter, I got lazy because I had no work space and needed some speaker rings really bad and didn't have a jig or a decent router. I cheaped out and bought these POS abs plastic pods that really suck, but they did the job. WOULD NOT RECOMMEND THESE BY ANY MEANS. Much better to snag a router, wait for decent weather, and make them yourself. Seriously. These things suck. You'll see why later.

FB_IMG_13604436912025424_zps0053ae26.jpg


The explorer doors were kind of annoying because they have this lame arse pocket right where I wanted the speakers. So I cut the pocket out and caulked the pods to em

20130311_194748_zps726ccda5.jpg


Wrapped them in some fleece from Walmart and got to glassing on them (I went up so far on the door to cover up those OEM speaker grills in case you’re wondering- this was my first time glassing doors, so I decided to glass almost the whole panel, which when I look back on, was a complete waste of time to do and I could have fixed them going a different route). I plan to buy new panels and redo the whole thing eventually, but until then, this is what I'm messing with:

20130316_212945_zpsb28cd597.jpg


A butt ton of glassing and body filling later the doors started to take shape:

20130516_214928_zps668f9c60.jpg


20130531_174216_zps7f78c187.jpg


And then it was time to re test fit the doors to make sure they didn’t warp with all the glass and filler

20130605_190916_zps6ff7ed48.jpg


Sooo after all of that I plasti dipped the whole doors, got out my super 77 glue and went to town on finishing them

20130605_150643_zps38b6653e.jpg


Andddd here’s how they turned out before the clear coating. Once again, wouldn't suggest sticker bombing doors that see extreme temps with cheap clear. Stickers are falling off left and right at this point. Need to fix, but no time to do so.

Explorer doors are annoying. Had to drill into the driver's side and make myself a new hole to get the speaker wire in there. Here's some pics and some deadener on the doors:

thedarnwiringharness_zps5f2002ab.jpg


20130813_194929_zpsbf871469.jpg


20130811_165259_zps93cb61b6.jpg


20130813_194850_zps635c8014.jpg


Finished Clearing them and installing them:

Decided I didn't really like the Cs6.5s and the xovers were lame. Only got these crap ones that were for the T2 Tweets and not passive for the 6.5s and the tweets. Not a big deal as I can cross at the amp, but something just made me feel like the T2 xovers were crap (they were):

20130815_155042_zps6a19d310.jpg


So I decided to start taking things out of the malibu. Took the HSK 165s and xovers out of the trunk and installed them in the doors:

20130816_153306_zps49c4c0c7.jpg


Then I noticed the speaker wasn't moving at all once I had it on the door and realized it was fully excurted. Was pissed. Here's after I pushed it in.

20130816_194329_zpsb37f8aa3.jpg


23889972.jpg


Bummed and angry about the whole thing.

Eventually deiced to say fug it. Scraped the idea of doing a passive setup and went back to the idea of active. I'm to the point of putting the last screw in the mid to the door and BAM, my hand slips, screw driver punctures right through the surround in my brand new cs 6.5 mid. First time doing this, but scuffs will come up later on with my luck on another piece of equipment.


It's here:

20130817_151914_zps434255b9.jpg


20130817_151802_zpsbb8e2835.jpg


20130615_204011_zps787e4061.jpg


**** was mint

THOUGHT I had finished clearing them, when in reality, I was just getting really sick of the stickers eating up the clear I was spraying on them.

Long story short the super hot temps over summer and the not completely cleared stickers didn't go too well, so they're all ####ed up atm and some are fringing up, others are just completely ####ed and the doors need to be redone for various reasons that I'm getting to after I get through all these old builds.


Piss break before next post


BC: (2) 18" Audio Technix Strato Build


Sale on old AT gear and I thought, shoot, I've got room for some 18s, still looking to do a budget build, and want to be cool. Hit up Buck (you can find him on the audio forumx if you need something. Believe he's still doing work) for a box design:


2audiotechnixstrato18s4thorderwallxray_zpsa68e6fca.png


Got the Subs in. Had to buy them used and the guy only had D2s.

20130612_144132_zps9de31a14.jpg


Also retired the M80 amp and bought an M1c

20130118_162724_zpsf8ff1d92.jpg


Got 7 Sheets of MDF for some retarded reason. Came in handy down the line.

20130617_123148_zpsfa7b9476.jpg


and then

20130617_131351_zpsfa902004.jpg


and then

20130619_164446_zpsa44ded16.jpg


and then and then and then and then


I love beam compasses ftw perfect for drawing big ol circles. Not so much for cutting them, so they're kind of pointless.


20130619_150722_zpse9082525.jpg


20130619_214138_zps85140b19.jpg


"Bro, does your box even lift?"

20130623_202241_zpscee51a08.jpg


Gettin circle jiggy wit it (na na na na na na na nana na na na na nana)

20130624_214708_zpsf2ba5928.jpg


20130624_214715_zps91f21d51.jpg


20130624_214702_zpsc4d2ff79.jpg


20130625_175909_zps4c5b39b1.jpg


Just because I took the time to take a million pictures of this box for some reason

20130625_204746_zps99bbc861.jpg


20130625_204724_zps621117ad.jpg


**** is boring to copy and paste yo.

20130626_231751_zps3f717cd9.jpg


20130626_231741_zps172ed73b.jpg


20130626_231817_zps3e9b4aa9.jpg


Took me like 6 weeks to build this thing I feel like.

20130627_161815_zpsef5a18bd.jpg


20130627_171632_zps236f0284.jpg


20130627_171653_zps9a66a64a.jpg


20130628_000653_zpsaf393e37.jpg


20130628_000631_zps22ce44f5.jpg


20130628_000707_zps31605e9b.jpg


Holy **** I took a lot of pictures.

20130628_215808_zps2d8cb3a6.jpg


Had to fix the front piece a little where the port is from getting saw happy. Little bit of body filler here and there over some screws and also back tracing to some screws inside the box that i missed. I didn't bother to get the ones on the front piece, due to the fact that when I'm finished, you won't see them.

20130628_215819_zps43ecc2f1.jpg


Also filled the 2x2- wasn't going to be a nice looking brace without it

20130628_215829_zps26929cf7.jpg


20130628_215840_zpsbbdac0d8.jpg


Here's some **** I used on the box. Probably should have held off:

20130628_221500_zps179b954b.jpg

more silicone sealant for inside the box, some matte clear to test on the box when I'm finished and also found some

20130628_220031_zps0573e64d.jpg


This pictures seriously doesn't matter, just keep scrolling

20130629_153132_zpsd9414cb4.jpg


Finished up the body filler on the 2x2 support. Turned out decent- would have been better if I spent another half hour on it but meh just a 2x2

20130629_153122_zps21959c61.jpg


Couldn't decide on a port color. Cool. here's me wasting more paint.

20130630_013228_zps651abfa1.jpg


It's finally together. And it didn't want to go in. Had to remove all the panels in the back to get it in there

20130630_181434_zps08eb090d.jpg


20130630_223235_zps5e6e32f0.jpg


Here's me being lazy and not disconnecting the rear battery.

20130630_223215_zps2ee92249.jpg


20130630_223229_zpsbdb1501a.jpg


Thing was like pushing out a big ol poop. Or trying to fit it into my (now ex) gf.

20130630_223223_zpsf22c6384.jpg


Here's where I decorated it in Pokemon cards. they fell off after 2 days of intense heat and once again, NOT ENOUGH GOD DAMN CHEAP CLEAR. seats wouldn't lock into place because the box was too big.

20130630_230359_zpsc7527169.jpg


20130630_230433_zpsabdd9f5f.jpg


I've got some vids somewhere of this thing playing. Honestly was not impressed. wired to 2 ohms and it sucked. Wired to .5 and it still sucked. Too much box rise and not enough power or something. Whatever it was, I was pissed when it wasn't that great. Not to mention the amount of weight that was in the back of the truck. Even with new shackles, the truck was leeeeaning. Hated it. Said forget it and got sick of it after about 15 days. I'm not a 4th order kind of guy.


Here's me tearing the box apart. I saved the wood for later use.

20130805_235526_zpsdfe0b32d.jpg


20130805_235611_zpsc03dbaaa.jpg


BC: 15" M1 Lvl 5 Build

Traded the DD M80 and some cash for the Lvl 5. It's a D2 15" M1

20130730_193247_zpsd38369aa.jpg


Had Dustin aka pro rabbit design (he's gone from designing, so you won't be able to get at him unless you live down south) me a box this time around.

View attachment 9544

And Here's me building it

20130805_235449_zpsbf023540.jpg


20130805_235505_zpsab49b215.jpg


20130807_000008_zps63df8765.jpg


Sprayed the port with primer- said I wasn't sure if I was going to leave it that way, but I did.

20130807_193207_zps01e687f1.jpg


20130807_202143_zpsa804c8a4.jpg


20130808_020511_zpse3dc1ffd.jpg


20130808_020557_zpscee855cd.jpg


Never ended up putting the second baffle on the box because I got lazy.

20130809_183854_zpsc93cae52.jpg


Moved the box towards the tailgate and it got louder. Here's some wire spaghetti (I fix this eventually)

20130813_195000_zpscee9a949.jpg


20130813_195018_zps474c4b6c.jpg


BC: AT Stratos Build Pt 2

Back in Sept of 2013, I wanted to get rid of the stratos, but nobody would buy them locally without a box to go with them. Got Tony (don't even know what he goes by on the ca forums. maybe Tonycl or something) to design a slot port box for them and built it reused as much of the 4th as I could to build it because nobody would pay extra for me to build a new box:

20130906_223622_zps9b3a976e.jpg


20130907_003011_zps181870bf.jpg


20130907_150229_zpse7f8dfdd.jpg


Test fitting the top baffle- I should have gone about .25" more towards the ends with the baffle cutout, but I'm not going to waste any wood I don't need to for a box that I'm not sure if I'm keeping. The subs fit in there, they're just super close/baskets basically were just about touching.

20130907_165849_zpscf14d17d.jpg

Used 4" worth of stacked wood to get the port and front level and even for 4 inches of port throughout


20130907_171223_zps54d1e9ba.jpg


20130907_184907_zps9a91c27b.jpg


20130908_114816_zps63f66ce0.jpg


20130908_123341_zps51825d28.jpg


Loved the way the subs played when they were wired to .5. Sounded phenomenal for what I had paid for them. Decided to put the lvl5 on CL and it wouldn't sell for whatever reason. Eventually it got to the point where I had to get rid of the 9012, lvl5 or the stratos (taking up too much room in the garage and house- a constant problem I have due to stockpiling audio).

Only got a serious buyer on the stratos and wanted to give me the price I paid for them, so I couldn't refuse. There was a long story behind how the kid I sold them to almost blew them before he bought them due to him not understanding how to properly wire subs. Not going to go there because it didn't happen, but I'm sure he cause some slight damage doing what he did. Not sure where they went or if they're even still in his possession, but I'm going to bet they aren't.


The Beginning of 2014/SIZE]

So that was up until about October/November of my build. Since then:

Picked these up. The leads are messed up and some day I'm going to get them reconed and put into the explorer (I lied, but 2 of them are fixed)

20131001_193442_zpsevfmd3lk.jpg


My stock alt started taking a dump right after I sold the stratos (we're talking chilling between 11.9 and 11.5 without any audio hooked up). Immediately made this purchase:

20131118_170220_zps6bonwghx.jpg


20131118_172438_zpsqfpq8kxc.jpg


It's dope. Here's what it looks like installed. Cleanest thing under that hood.

20131125_161628_zpsljgneufs.jpg


I also upgraded all the wire under the hood finally to the DIYMA oversized 1/0 wire I purchased wayyyy back when they had that sale.

20131125_161619_zpskjqvoarg.jpg


Always chilling above 14.2 now and it's amazing.

I think it's time to update this on things that HELD UP my build. I've had A LOT of issues with this vehicle and rust. it has not been my friend. My dad at some point tried to fix things on it with globs and globs of Body Filler (anyone who's friends with me on FB knows about this and there's been some great jokes at his automobile fixing techniques). Any who, here's the super fudged tailgate I've had to deal with (literally the whole bottom is straight body filler and some chicken wire):

20131023_182646_zps8cgouzei.jpg


Truck then got to the point where it was rusting right through and wouldn't even lock (yep can even unlock the window with ease and possibly some tetanus)

20131216_082645_zpstkmmksdc.jpg


The "Ford" way to fix it

20131222_153642_zpspzup7w2v.jpg


The other major issue was the rear driver's side fender. completely rusted away thanks to the winters we have here and the salt. Here's after I removed my dad's mess of straight bondo. This is when I officially booted him from the project.

20131105_155843_zps3rlvw1ni.jpg


I've got pictures of what it used to look like, and it was BAD. Didn't even look like a fender at all. There's also some more rust in that picture...

20131105_192431_zpsgjclg91m.jpg


Yum. So me being me, I Wanted to have everything fixed the correct way with torching off all the bad and welding on some new sheet metal, but I don't have the tools, nor is the truck worth that kind of money at this point to fix it that way, so I fixed it as best I could with a ton of fiberglassing and cleaning it up with a small amount of bondo. My dad saw what I was doing and Tried to help, but he doesn't understand the concept of "a little bit of bondo goes a long way" SO here's what it looked like AFTER I sanded off all the bondo he slapped on it when I was out running errands one day.

20131119_203738_zpsytvsuc0t.jpg


At some point in time I got it to a finished quality, primed it and dipped it and never took any pictures of all the rust i had taken off the rest of the truck. Bottom of the doors were beginning to accumulate some rust at the bottom, so I sanded it off, bondo'd, primed, and dipped:

20131128_042544_zps97a2h2hu.jpg


End result:

20131203_154345_zpsa6hcoght.jpg


I dipped a bunch of other things on the explorer, but I don't have any pictures of it in this post. Continue on. Will have to take some pictures once the temp goes to 32 again aka not until later this week.

I also purchased a new tailgate back in November 2013 that has been sitting in the garage. Kind of pissed because I bought it off ebay, was told by the yard I bought it from that it was in AA condition aka best of the best with no minor defects and fully functional, but it arrived with a huge scratch/dent combo on one side. It looks better than what I had on there thought:

20131229_164431_zpsek1campa.jpg


Have the whole tailgate dipped blacked, not because it looks good, but because it keep all the salt and moisture off the paint aka no rusted away tailgate after a few winters. Need to get pictures of this as well.


January 2014 Stuff

Audio Update:

So still haven't had the M3 8s fixed (this will literally take me a whole year to accomplish), which means...

20131027_173100_zps0a7n7mrv.jpg


Lvl 5 went back in.

Also decided I really wasn't feeling the CS 6.5s. I was having some major issues with alt whine because I didn't have a nice single speaker wire that could be ran into a passive crossover that would splice the frequencies for the woofer and the tweet (aka one +/- line in to wf +/- and tw +/-) and as you know about the previous run in with the doors, I couldn't fit another run of it in. So I had to basically cut into the factory speaker wire between the door and the HU to get the tweets amped.

Any-who, it sucked and I couldn't stand the amount of feedback I was getting from the way I had things.

Decided to get these:

20131016_163903_zpsrv4zbwty.jpg


They're sexy

20131016_192525_zpsrxebycbi.jpg


I also got some more power for them too...

20131017_132151_zpsvajtkuvd.jpg


150x2 @ 1-4ohms is a beautiful thing. I love this amp and would totally switch over to more JL slash or HD series given the chance to.

Wasn't even going to attempt to screw these into the doors without added support (AKA why you never buy those abs plastic POS things from ebay). Originally I had some ghetto pieces of mdf blocks holding them in, but they sucked and the holes also needed to be cut a little bigger

20131020_155231_zpspri3qtsj.jpg


20131020_173208_zpsjl2kc0ap.jpg


Made these, which I should have done from the beginning, but didn't have a proper router and jig setup to do so, but it's fixed so it's all good for now.

SO originally the plan was to do a direct swap from the DD comps to the JBLs. Of course nothing is that easy though. The mids fit in the door with a little cutting, but the mounts for the tweeters were another story. the T2 mounts were larger than the JBL's aka they just fell right through the panel's cutout when I went to test fit them. So no go there. Have to leave the tweets in the door to keep them sealed up too.

Decided to just leave the T2s in and run them, figure something out with the JBLs later on down the line and just get everything back to playing. This didn't last long.

HATED the passive crossovers. Compared to how I had the DDs ran active (minus the alt whine), the crossovers felt like they were extremely limiting in the bandwidth freq.

On top of that, the T2 tweets were also distorting on higher frequencies due to being able to handle the power they were getting. I didn't want them in there regardless, so this was just getting to the straw that broke the camels back point...


At this point, I decided to just say forget it- going back to to active with a vengeance. Plan was to move the tweets because A) I couldn't get a nice run of wire into the door and B) there are better places to put them.

Thought it might also be a good idea, considering the surplus on 2 channel amps I had and an AudioControl 4XS that I bought back in 2011 that i've never used, to buy some mid range drivers for that added bandwidth (first time having dedicated midrange speakers in a car). After reading a ton of reviews on diyma, I decided to buy a pair of Fountek fr88ex drivers- they had great reviews and were within my price range.

Onto the pictures:

The very FIRST thing I did was test out that all the amps worked and that my plan would work.
20131211_213450_zpsoctfgyiz.jpg


Plan was:
JBL Mids > JL 300/2
JBL Tweets > DD C1b
Fountek Full Range drivers > Alpine 3542


20131212_143820_zpstwlvfxfz.jpg


Here are the founteks and the mdf flush mounted rings I made for them


Here's the crappy a pillars I have to work with- they're super limited in size/space (especially on the driver's side) and I wanted to mount them in a way where I wouldn't block any of my vision

20131214_224541_zpszzqp1ju2.jpg


Also should mention due to the limited amount of space, the drivers would be best mounted on axis. It was a good choice.

A LOT OF FRUSTRATION went into this part of the build. Trying to angle, hot glue, test to see if the FR driver was going to fit between the pillar and this stupid piece of metal that was in the way, and make sure that everything was Goldie Locks took FOREVER. I spent about 4 hours trying to get everything right, then tearing everything down, redoing, cutting more of the pillar away, rinse and repeat. Eventually I got the angles down correctly and decided they were as good as they could get.

20131214_223604_zpsvsjrytga.jpg


Originally started them up high and then gradually made them go lower. also had to cut away some of the pillar so that they would look alright once they were wrapped up and glassed.

20131214_223744_zpsinucd1wm.jpg


Believe they were too close to the windshield here, so I had to pull them off and redo things AGAIN.

Frustration made me skip a lot of the next few steps (i.e. the finished angles, wrapping and so on). So here's what they looked liek after a coat of resin and hardener

Looked like loose B-hole. I know. Keep reading on.

20131216_223242_zpsr7t38in9.jpg


20131216_223328_zpsucw9i9hx.jpg


Went back after this, chopped into them. Made some cuts to glass over and basically give them a better shape. Idk why I only have pictures of the driver's side unfinished. Thought I took some of the passenger side, but I guess not....


After some more layers of glass and stuff, I got to the filler stage...once again, thought I took more pictures than I did, but I didn't. Here's the first coat on them

20131222_035645_zpsqqdn2ujl.jpg


and here's after a few hours of sanding...

20131225_033252_zpsohtcvewr.jpg


Decided that I Wanted to wrap these in some nice vinyl, but that funds were tight on supplies and I want to buy an upholstery pneumatic stapler before I wrap them. Until then, it's plasti dip and stickers with A LOT of clear this time around. Went with matte clear and used a ton of it. A year later, and I still haven't wrapped them. Even with a ton of clear, the stickers decided to quit.

Finished-ish product

20140103_200158_zpssniu975k.jpg


20140103_202346_zps4bbaaqmc.jpg


20140103_202406_zpsfifhhepg.jpg


20140103_202537_zpszl4encac.jpg


They look like they're mounted awkwardly with angles, but I assure you that they are on axis, aimed correctly, and sound Amazing. By far the largest difference in everything that I've done to the explorer was doing this. All my music sounds rich and full now instead of bland/flat. Makes me appreciate the country and dub a little more (yeah opposite ends of the spectrum, but I listen to both in my explorer every day I drive it).

I love it so much that I take it out in blizzards to drive slow and listen to my tunes. I think this is where I'm moving more to an SQ based system 4lyfe build and I'm going to be moving out of trying to just be loud aka I'm probably going to have the Malibu when I pull it out of storage.

Next update: Getting everything tidy and getting rid of Spaghetti that is my backseat/cargo area.


So let's see...have a ton of spaghetti in the back of explorer..so many wires that have yet to be sized down for the final install...

Made this all up in sketchup- took the dimensions out so that it's easier to look at. If anyone wants to do the exact same rack setup or mock up the old one hit me up and I can email you the .skp's with all the dimensions.

Here's the inside where the HC2400 has a place to stay instead of lounging in the cargo area

insidenodimensions_zpsaedf1c8f.jpg


and the outside

Amprackfullnodimensions_zps180745fa.jpg


that front part that protrudes keeps all the wires hidden when the seats are folded down. also keeps everything nice and neat.

Changed a few things brace wise and added in more bracing in a few spots from the images as well

Onward to building:

20140113_000653_zpsm6m0wvvm.jpg


Never trust the dimensions of a battery without measuring it. had to use a few scrap pieces of wood to fix this problem, but was actually a good thing so that getting to the battery was a lot easier.

20140113_162306_zpsotfuzn1n.jpg


Sides are on. Stopped taking pictures until I had the DD, Alpine and fuse holders mounted. That part slides in and out (after I loosen 4 screws) to make life easy if I need to take it apart:

20140114_021202_zpsopcof1th.jpg


Next thing was drilling a ton of holes so I could run all the wires through it

20140115_020834_zpsyjqcmblz.jpg


Dem wires

20140115_020854_zpsfffwug0c.jpg


I've got more pictures of all this, but I don't think they have any point and I'm trying to keep it to ~10 pics per post so I can fit them on the sites that limit it to that...I'm at 7 so far i believe.

Anndddddd the tops on, amps mounted. this took FOREVER to do. Mostly because I didn't bother to remove the lvl5 to wire things up from the back:

20140115_060931_zpsdrzlipwi.jpg


20140115_061037_zpsfxqgj9b5.jpg


I HAZ REAR SEATING IN A VEHICLE AGAIN

20140115_145238_zpsi9fvicnn.jpg


Oh also picked up one of these and my life is so much better. Old Lead Acid was also taking a dump.

20140117_225301_zpsnhslk5di.jpg


As promised, I tried to get pictures of the truck, but she is dirrrtyy (so much salt that the front looks like I dipped it above the bumper). I've got all the plastic trim dipped in grey now, but I don't think you can tell. Tailgate is all black so the rust will keep off of it. Once there's a nice day to wash her off, I'll get clean pictures.

20140121_163001_zpsho3cnxvd.jpg


20140121_163050_zpsrt5pv7n4.jpg


Next thing to do: make some trim panels for around the sub box and add another baffle to make the sub flush mounted or swap out the lvl5 for the m3 8s (nope lied about this still), and get a little cargo area back- still haven't made a final decision on this, but I'm going to at least get them in there (once again, lying). I'm pretty pleased with where I am. Sounds great, have minimal alt whine (only have a slight slight amount through the founteks that you can hear if the volume is at 1-2 and I think it's just a crap pair of rcas causing it).

loljk I'm going to switch things up again.


Onward to March 2014:

Finally found a trade offer I liked that was local to me for the lvl 5. Guy was pretty chill- rebuilds amps and just put a BC5500 into his sentra, so I actually got to hear something with a little power to it in this weather. Gonna miss the sub, but I'd rather have a bigger amp than a big sub on little to no power. Plus it's cheaper to sell and ship the M1c when it comes time to get rid of it:

20140310_125851_zpskasfeekr.jpg


Definitely more power than what I need, but this will be the perfect amount to get the explorer super loud if I feel that itch. So here's the list in the order of where this is headed next:

TEMP setup:
May or may not leave the M1c in- currently fits on the amp rack
9012 is going back in for the millionth time, BUT there's going to be a new box built for it hopefully within the next week (weather permitting)

Things that need to be done:
-Rebuild the amp rack so that the zx will fit
-Sell the M1c and 9012 to someone as a combo deal
-Get the m3 8s fixed from the profits and build a new box
-Decide on a DSP finally


9012 is getting Quasi 6th'd come Friday thanks to Buck. Gotta wait for this dumb winter storm to pass for the next two days...

eydd9012series6th2001explorerinternals_zps9b0f2369.png


In case you're wondering what a quasi 6th order is, it's basically a ported box inside of a ported box. Certain subs have T/S parameters for this setup, but most are 4th order friendly (sealed box inside of a ported box). Reason for doing them is to try and get louder and sometimes broaden/flatten out the response range so the box is X db'z loud on every frequency.


Got all my wood cut during the day to start the new enclosure, but didn't start building until late.

20140315_005242_zpspviowunc.jpg


20140315_013404_zpswp2ujpj5.jpg


Pulled a stupid move and routed the baffles before screwing/gluing them together, but luckily, they weren't off by much.

20140315_015236_zpsn6vht9uj.jpg


20140315_015139_zpsrhrmnu8e.jpg


Dem 45z (already popped a few in the enclosure before this)

20140315_023103_zpsxec4flje.jpg


20140315_023111_zps0gvhpqgq.jpg


20140315_033638_zpsi8xstz5c.jpg


20140315_033621_zpsdbvmmrgn.jpg


Only had one big issue putting this thing together...

20140315_192329_zps07efzjq7.jpg


Talk about WARPED That's what you get when you let wood chill for 7 months though...any who, this of course was the piece I was going to make removable, but I had to put the top on to straighten things out. Back to the pictures.

whipping up some TBII and saw dust to seal things up...
20140316_004506_zpswt2iq0wy.jpg


Sealing ish

20140316_004607_zpsbcri5zp9.jpg


Sub is in

20140316_012541_zpscbawzs6s.jpg


20140316_012552_zpsq0i0s5za.jpg


DAT ASS

20140316_012732_zpsyxcteszl.jpg


Ass4dayz
20140316_012739_zps34ebm70s.jpg


Dem bolt terms

20140316_025223_zpshqlalppr.jpg


Aaand everything together.

20140316_050247_zps0x8qlfmc.jpg


Andddd she's in. I've only had about 20 minutes total to mess around with it, but I'm really digging this setup for a single 12 off 1200ish watts. Gets loud and sounds nice.

20140316_165652_zpsklnj4mra.jpg


Internals

20140316_184242_zpsagaepgze.jpg


20140316_184219_zpsvrsimamj.jpg


Would love to see how it sounds with 2k to it, but that's not going to happen unless I sell/trade the kicker for something else. this is great until I fix the 8s. Gotta look at the T/S for those still, but more than likely I'm going to put them in a 4th or 6th order.

Tried to get a picture of the exterior of the truck when it's clean, but couldn't get a good angle, so yolo for now.

20140316_184327_zpssfsr6d7i.jpg


I actually really miss this setup the most. Had a really good range of playing and it got decently loud for a winter setup.


Join the Elite Explorers for $20 each year.
Elite Explorer members see no advertisements, no banner ads, no double underlined links,.
Add an avatar, upload photo attachments, and more!
.


Finally had a buyer for some of my equipment (DD sub ito ebay with bidders, Kicker Eq to ebay) and also traded my M1c for a new toy

So anyways, whenever I sell something, I always like to have a good 30-40 minute video of it working and getting packaged up before I send it out. With the M1c out in Cali now, I had to toss the 2500 I traded the lvl5 for. Don't really have the time to build a new amp rack or any beauty panels atm for the amp, sooo I tossed this together in 7 minutes today with some spare wood I had laying around:

zx2500quickinstall_zpsd64a4ee7.jpg


It isn't pretty, but I just want a working video of the DD playing in case I have a buyer who clips the crap out of it or wires things up wrong (after selling the AT Stratos to that kid who had no idea how to wire from a .5 to 2 ohm load, I don't trust any mfer who I'm selling equipment to).

It's one tight ass fit in the back right now. Good thing I only need to have it like this for a day, because I could see that amp getting very warm on a hot day with little to no ventilation...

zx2500quickinstall2_zps58bb0e54.jpg


Oh and I also picked up my main bitch from storage.

mainb_zps47158003.jpg


Back
Top