How to: - 1 SOHC V6 Engine Removal Procedure | Page 2 | Ford Explorer Forums - Serious Explorations

  • Register Today It's free!

How to: 1 SOHC V6 Engine Removal Procedure

Prefix for threads which are instructional.
21 Starter motor removal

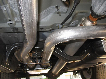
Note: Do not disconnect the electrical connections to the starter motor.

Using a pry bar separate the starter motor wiring loom bracket from the block as shown below.
LoomMnt.jpg

Remove the nut (10mm) that attaches the starter motor loom support bracket to the motor mount bracket as identified by the red arrow in the photo below.
LoomMntU.jpg

The nut is accessible from under the vehicle.
Remove nut (13mm) attaching ground strap to starter motor mounting stud and move strap end out of the way.
Remove stud (13mm) at bottom of starter.
Support weight of starter and remove bolt (13mm) at top of starter.
Place starter out of the way (on top of frame rail) and tie in position to avoid straining cables.


Join the Elite Explorers for $20 each year.
Elite Explorer members see no advertisements, no banner ads, no double underlined links,.
Add an avatar, upload photo attachments, and more!
.


22 Torque converter/flexplate disconnect

Slowly rotate the engine clockwise using the crankshaft harmonic balancer retaining bolt (19mm) until a torque converter stud/flexplate nut (14mm) is visible thru the removed starter motor opening.
Mark the end of the stud and the flexplate as shown below for future reassembly.
WiteOut.jpg

Prevent the balancer retaining bolt from rotating as shown below while removing the flexplate nut.
Clutch.jpg

Rotate the balancer retaining bolt 90 degrees clockwise and remove another flexplate nut.
Repeat the process until all 4 flexplate nuts are removed.


23 Exhaust manifold/down pipe disconnect

Notes: It is helpful to soak the bolts that fasten the exhaust manifold outlets to the down pipes with rust solvent the day before attempting removal.
The use of an air impact wrench will greatly simplify the task.
If not using an air impact wrench support the exhaust system with a jack to prevent twisting when removing bolts.
It is important to use a wobble extension to keep the removal socket squarely on the head of the bolt.

Remove the 2 bolts (13mm) attaching the left down pipe to the exhaust manifold.
Remove the 2 bolts (13mm) attaching the right down pipe to the exhaust manifold.


24 Transmission support

Support the transmission with a jack using a block of wood between the transmission and jack to prevent damage as shown below.
TransSpt.jpg


Note: I used a scissor jack since I didn’t have a transmission jack and didn’t want the transmission to move for a long time. I placed concrete blocks under the jack for stability.


26 Engine disconnect

Notes: There are several methods to access the transmission-to-engine bolts. One method is to work thru the wheel wells. A second method is to work in the engine compartment and reach between the rear of the engine and the firewall. A third method is to remove the floor panel between the driver and passenger positions and work thru the opening. A fourth method is to work under the vehicle just aft of the rear of the transmission using long (3 feet) extensions with one or more wobble joints as shown below.
Extensn.jpg

There is a wobble joint at the green arrow. A second wobble joint is needed at the blue arrow to loosen the top two bolts.

Remove the 4 motor mount thru-bolt nuts (18mm).
Remove the 4 upper transmission-to-engine bolts (13mm).
Lift the engine ½ inch.
Raise the transmission jack until it supports some of the engine/transmission weight.
Remove the 6 (3 on each side) engine motor mount support plate bolts (13mm) and set the support plates aside.
Remove the 4 lower transmission-to-engine bolts (13mm).
Roll the crane with engine forward an inch to improve access to the rear of the engine.
The spacer plate shown below may fall off the engine-to-transmission guide bushings identified with the red arrows.
Plate.jpg

Confirm that the torque converter is separated from the flexplate.
Reach thru the left wheel well and disconnect the electrical connector at the rear of the engine shown below.
RearCnx.jpg

Reach thru the right wheel well and disconnect the two electrical connectors at the rear of the engine shown below.
RightBlt.jpg


27 Engine extraction

Make sure that nothing is still connected between the engine and the rest of the vehicle.
Carefully move the engine forward until the ignition coil pack is clear of the windshield wiper motor.
Make sure the ATF lines support bracket is not binding against the block.
Carefully hoist the engine out of the engine compartment.
If you used a hydraulic transmission jack support the transmission with a chain, pipe or jack stand.


pulling a 4.0l Sohc engine

Excellent. Everything I need to know. When I saw the picture of your PS pump it had the pulley on and I didn't know it had to come off to get the pump out. live and learn. Thank's again for all the very useful and concise info.


Power steering pump

Excellent. Everything I need to know. When I saw the picture of your PS pump it had the pulley on and I didn't know it had to come off to get the pump out. live and learn. Thank's again for all the very useful and concise info.

Actually, I was able to remove the power steering pump without removing the pulley. However, I wasn't able to reinstall the pump with the pulley. It was really tough to loosen the pulley bolts with nothing to hold the pump in place. That's why I say in the procedure to remove the pulley.


Nice write up!

Another alternative is to cheat like I did and cut the core and fenter supports out. :crazy:


Make sure that nothing is still connected between the engine and the rest of the vehicle.
Carefully move the engine forward until the ignition coil pack is clear of the windshield wiper motor.
Make sure the ATF lines support bracket is not binding against the block.
Carefully hoist the engine out of the engine compartment.
If you used a hydraulic transmission jack support the transmission with a chain, pipe or jack stand.

What I need to know now is where to attach the lifting chains. I could work it out but it is so much easier to ask someone who knows.


Nice write-up. What is the cost for a worn out engine from salvage? I think that I would rather rebuild the worn out engine and then swap it into the ex.


What I need to know now is where to attach the lifting chains. I could work it out but it is so much easier to ask someone who knows.

IDK what everybody else has done but I had a empty boss on both sides by the manifolds. Some spare rear driveshaft bolts I had threaded right in.


Rebuild new or old

Nice write-up. What is the cost for a worn out engine from salvage? I think that I would rather rebuild the worn out engine and then swap it into the ex.

In my case my motor doesn't run so I will`redo mine.


13 mm vs 15mm

Notes: It is helpful to soak the bolts that fasten the exhaust manifold outlets to the down pipes with rust solvent the day before attempting removal.
The use of an air impact wrench will greatly simplify the task.
If not using an air impact wrench support the exhaust system with a jack to prevent twisting when removing bolts.
It is important to use a wobble extension to keep the removal socket squarely on the head of the bolt.

Remove the 2 bolts (13mm) attaching the left down pipe to the exhaust manifold.
Remove the 2 bolts (13mm) attaching the right down pipe to the exhaust manifold.

The driver's side was a snap.
The passenger side was not so easy.
It is still there.
All I got was a broken UV (wobble) socket and a mouthful of dirt.
Also my bolts were 15 mm not 13.
Different year?


different bolts

The driver's side was a snap.
The passenger side was not so easy.
It is still there.
All I got was a broken UV (wobble) socket and a mouthful of dirt.
Also my bolts were 15 mm not 13.
Different year?

The upper passenger side bolt is the one that I rounded the corners on and ended up having to cut off with a Dremel cutting wheel. I didn't have a wobble to use at the time. If you end up cutting it off, leave as much of the threaded shaft as possible. I was able to remove mine later with two nuts tightened against each other.

Did your bolts have the smaller diameter rounded end that is typical for exhaust type bolts? Maybe yours are not stock.

The bolts look like they are stock.
They have the semi-tapered end like any I have seen.
When I have a problem I just ask my roomie how do you do this and he does it.
How did you do the upper starter bolt?
It's easy to see from underneath but not from the top.
I have trouble with my right hand and my left isn't much better.


Join the Elite Explorers for $20 each year.
Elite Explorer members see no advertisements, no banner ads, no double underlined links,.
Add an avatar, upload photo attachments, and more!
.


Extension

The bolts look like they are stock.
They have the semi-tapered end like any I have seen.
When I have a problem I just ask my roomie how do you do this and he does it.
How did you do the upper starter bolt?
It's easy to see from underneath but not from the top.
I have trouble with my right hand and my left isn't much better.

I used a ratchet drive with an extension a little longer than the starter motor. I never saw the bolt until it was extracted.


Back
Top