2003 Ford Ranger 16V 2.3L. P2004 error code. | Ford Explorer Forums - Serious Explorations

  • Register Today It's free!

2003 Ford Ranger 16V 2.3L. P2004 error code.

rstagl

New Member
Joined
April 12, 2011
Messages
1
Reaction score
0
City, State
Ohio
Year, Model & Trim Level
2003 Ford Raner
I'm getting a P2004 OBDII code from Check engine diagnositics. Can someone advise on this engine 2.3Liter 16Valve where the valve is located and how to test or check the Valve open condition


Join the Elite Explorers for $20 each year.
Elite Explorer members see no advertisements, no banner ads, no double underlined links,.
Add an avatar, upload photo attachments, and more!
.


welcome


Intake Manifold Runner Control

Okay everyone, I've been getting a code P2004 for a few months now.

I drive a 2003 Ford Ranger 2.3 liter.

Every time I erase the code it comes back within a quarter mile of driving.

I looked everywhere on the internet to show exactly where this part was located to no avail...

I drove to my local dealership and they pointed it out to me right away along with the vacuum lines that just fell off the module...

The module is made of metal and plastic with one (1) electrical connectors on the bottom and on the back and two (2) vacuum lines connected by a plastic connector on the front of the module connected to the IMRC by crimped metal tabs on the metal housing of the module...

The metal component of the IMRC has rusted considerably and the plastic housing that the vacuum lines connect to were crimped to the metal housing.

So, when the metal housing rusted away the crimped metal holding the plastic part that the vacuum lines connect to failed and fell off.

Below is an actual photo of the rusted part and the vacuum lines that fell off.

The metal crimped areas are circled in red...

CLICK IMAGE FOR LARGER IMAGE
small-C360_2011-05-04%2017-58-55-b.jpg
.

So, I'm posting these images to hopefully help others looking for this part.

I've circled the part in red in the images below.

Cost was 127.00 + 8.58 in taxes

Total 135.58

Should only take a whole 5 to 10 minutes to replace.

CLICK IMAGE FOR LARGER IMAGE
small-scan0001-a.jpg
.

CLICK IMAGE FOR LARGER IMAGE
small-scan0002.jpg
.

Hopefully this post helps someone...

The images above will stay for as long as I own my website where they are located...

(Since I cannot upload the images here...)


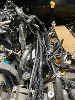
Here is an updated image after I replaced the IMRC.

Took me all but 5 minutes to do this.

CLICK IMAGE FOR LARGER IMAGE
small-C360_2011-05-06%2011-11-55.jpg
.

AND upon further inspection of the old part and the new part, the plastic piece where the vacuum hoses were attached was NOT held on by crimped metal tabs. The crimped metal tabs were holding on the metal end which held the plastic piece in place. The plastic piece that the vacuum hoses were attached to was broke at the top and bottom. (The only places it could break.) Very bad design in my opinion.

In my opinion the cause for the plastic piece to fail was because of the rust. The rust expanded and caused the plastic to fail and break from stress.

Here is two images of the old rusted, broken IMRC after removal.

You can clearly see in the images below where the plastic failed and broke. Circled in red.

CLICK IMAGE FOR LARGER IMAGE
small-C360_2011-05-06%2011-28-50.jpg
.

You can also see how the rust built up and expanded and obviously caused the part to fail.

CLICK IMAGE FOR LARGER IMAGE
small-C360_2011-05-06%2011-29-12.jpg
.

C360_2011-05-0611-29-12.jpg


This was one of the easiest fixes I have ever had to do on this truck.

Here is how I did it.

1. Disconnected the negative cable from the battery.
+
- 8mm bolt on my 2003 Ford Ranger
- Losen slightly, twist and pull the negative cable off.

2. Removed the 8mm bolt from the IMRC.
+
- The bolt was slightly rusted but I was easily able to
- force the 8mm socket on and remove the bolt from the plastic
- intake manifold.

3. Unplugged the electrical connector from the old IMRC.
+
- Gently so as to not break the tab off the electrical
- connector, pull the tab outward with your fingernail or
- a small screwdriver and pull gently on the plug not
- the wires.

4. Unplugged the vacuum hoses from the plastic on the IMRC.
+
- Gently twist and pull the vacuum hoses off the IMRC one
- by one. Pull the front one off first then the lower.
- It is very important to remember which hose is which.
- Thoroughly inspect the vacuum hoses for cracks and breaks.

I reversed this procedure to install the new IMRC.

Too easy...


Here is what some of the dealerships said when I called and asked them for an estimate of how much it would cost to have my IMRC put on my truck. Nothing else just labor on installing the IMRC. I was specific.

One dealership in Kent, Ohio named Klaben Ford told me on the phone about 1 hour labor, approx. $120 USD

Another dealership in Cuyahoga Falls, Ohio named Spitzer Ford told me 2.8 hours labor, approx. $240 USD. They said they would have to remove the plenum/manifold to replace the IMRC. Then they said they would have to re-program the computer as well. He said he does it all the time and has done many... LOL I've never done this before and I did it in my driveway in 5 minutes. Didn't have to remove the plenum. Didn't have to re-program the computer. The check engine light went out as soon as I started the truck. Truck runs like new now. Smooth. Beautiful.

Another dealership in Tallmadge, Ohio named Park Ford told me 1.5 to 2 hours labor, approx. $146.

A few points to remember...

1. I'm not an ASE certified mechanic...

2. I don't have a big shop or all the expensive tools like the mechanics at the dealerships.

3. I don't have a book telling me how to do the job.

4. I don't work on vehicles for a living.

5. I don't claim to be an expert or a professional auto mechanic

6. I have cheap Craftsman tools, not MAC or SNAP ON.

Just because these so called experts have a uniform with their names embroidered on them and buy expensive tools, doesn't mean they are truthful, professionals who just want to help you. They are, in actuality, ASE certified con artists. 90% of the time they will make you believe you need more work than you actually need and that the job will take a lot longer than it actually should.

Don't get me wrong, just because you learned something on the internet doesn't mean you're an expert and it doesn't mean the mechanic doesn't know what they're talking about. However, just because the shop foreman tells you something doesn't mean he is telling you the truth either. They're out to make money and that is the prime mover of their struggle, the root of all evil. MONEY. Remember that...

Do your homework. Call around. Get estimates. Talk to the mechanics. Read a book. Educate yourself, it won't hurt...


Help....P2004

I have a P2004 code and i have changed the coil, plugs, wires.... nothing has helped!! It sputters and has no power. i can not get above 50 mile per hour. Plus i am now getting very bad gas mileage...


I got the P2004 code the other day, and looked on this site to find the culprit. Thanks folks! My IMRC also has broken plastic near where it attaches or is housed by the metal. That would create a vacuum leak, and thus the "stuck open" code. No way I want to pay $130 for this $2 part, so I removed it to my laboratory (kitchen table) where I surgically applied RTV to the broken perimeter. Vacuum lines are temporarily plugged, and truck runs just fine. Idle does seem a bit low and maybe a bit choppy. I have not had it above 30 mph yet so I don't know if anything else will be affected while I wait 24 hrs for the RTV to cure, and put the IMRC back on. I'll report back if the fix works.

Hgehring: You replaced the wrong parts for the code you have. P2004 relates to only one tiny part.


Update: I put the sealed part back on, reset the code by removing the neg batt cable, and then started it back up. It runs the same as before, so maybe the part has failed internally. In the absence of a change in performance, or gas mileage, I am not going to do anything more about this.


Back
Top