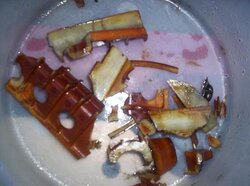
Got a local customer with an Explorer who came to the shop with a noise coming from the front cover. As I suspected the timing chain guide on the pass side was broken completely and both movable guides were worn through, right down to the tensioner. Attached is some pics.....
-
Performance Upgrades - Maintenance - Modifications - Problem Solving - Off-Road - Street Trucks.
Covering the Explorer, ST, Sport, Lincoln Aviator, Sport Trac,
Mercury Mountaineer, Mazda Navajo, Ford Ranger, Mazda Pickups, and the Aerostar.
Featuring H.I. - Human Intelligence.
Register Today It's free!
You are using an out of date browser. It may not display this or other websites correctly.
You should upgrade or use an alternative browser.
You should upgrade or use an alternative browser.
4.6L Explorer engine timing chain ooops!
- Thread starter jah81592
- Start date
Elite Explorer members see no advertisements, no banner ads, no double underlined links,.
Add an avatar, upload photo attachments, and more!.
Pontisteve
Well-Known Member
- Joined
- August 30, 2008
- Messages
- 510
- Reaction score
- 11
- City, State
- Florida
- Year, Model & Trim Level
- 03 Eddie Bauer 4WD V8
Pontisteve, this is off topic but you have a lot of experience and may know the answer. Are the oval dimensions for a Mach 1 twin throttle body the same as a Lightning oval even though the throttle plates are different diameters? I want to know if a Lightning inlet tube with fit on a Mach 1 throttle body before I purchase one.
I don't know offhand. But let me say this, there is a difference here in approach.
Superchargers are really good at forcing air into a motor, but not worth a crap at sucking air in. The name of the game with modifying supercharged air inlets is to basically make everything HUGE. Huge air filter, huge inlet pipe, huge throttle body. This unrestricts the blower.
Not true with a naturally aspirated motor. Those inlets need to be more consistent throughout. Generally a quality and consistent, yet relatively much smaller, inlet piping/MAF is desireable. The stock 4v throttle bodies are large, and won't net you much gain, unless you have a roots blower on the car.
All the cars can benefit from a larger air filter. The 96-up cars don't really benefit much from a larger MAF, if any. The stock 80mm is quite adequate. Even changing air filters can have a leanout effect on the MAF, as much as 10%, and should be considered carefully before using.
FYI, If you ever need conical air filters, let me know. I've got a nice quality source on those for a lot less than K&N, and I swear they're a better filter.
Elite Explorer members see no advertisements, no banner ads, no double underlined links,.
Add an avatar, upload photo attachments, and more!.
2000StreetRod
Moderator Emeritus
- Joined
- May 26, 2009
- Messages
- 10,597
- Reaction score
- 334
- City, State
- Greenville, SC
- Year, Model & Trim Level
- 00 Sport FI, 03 Ltd V8
not for gain
My objective in using the Lightning air inlet is to avoid fabricating an intake tube from a 2002 Explorer air filter enclosure to a Mach 1 throttle body.

It has the correct general shape but don't know if it will clamp on to the throttle body.

My objective in using the Lightning air inlet is to avoid fabricating an intake tube from a 2002 Explorer air filter enclosure to a Mach 1 throttle body.
It has the correct general shape but don't know if it will clamp on to the throttle body.
kwandrey
Member
- Joined
- November 17, 2014
- Messages
- 10
- Reaction score
- 0
- City, State
- Southern Pines NC
- Year, Model & Trim Level
- 2003 Ford Explorer
Fixed guide damage
Didn't get as far as I wanted today on this, had a heck of a time getting the RT valve cover off with the hard AC lines taking up space at firewall. Loosened the hard lines mount at the fender well and was able to force it out with out damaging anything . May need another trick to get it back on with the gasket intact.
I was able to feel an extremely loose chain RT side and a large hunk of the fixed upper guide that is all plastic. (not like the metal backed one in Pontisteve's pictures of his motor) the laying on the chain. It seems to be big enough to just float around in there 3-4 inches long or so est, tried to grab it and pull it out but its got some obstructions on both ends maybe better it did ... UG to think I was driving it earlier today that way.
Next challenges to pull the PWR steering pump back (hoping I don't need to pull the pulley but might) and get the Harmonic balancer off, get that timing cover off and see whats up.
- Joined
- March 16, 2013
- Messages
- 4,261
- Reaction score
- 232
- City, State
- Woodstock, GA
- Year, Model & Trim Level
- 04 Ford Explorer 4.6l
The passenger valve cover is easier to remove if you remove the coils first.
The PS pulley must come off. Note, the removal tool scoured the pulley mounting surface on mine during removal and it would not go back on. New pulley was cheap.
To remove the pump, you do not need to undo the lines or drain any fluid. First remove the two bolts that have clear access. Then loosen the bolt that is blocked by the PS hose. Once this bolt is loose, hold the PS pump by hand (keeping its weight off the bolt) and you can use your fingers to continue loosing this bolt. Just keep moving the pump away from the engine and the PS line will never be in the way.
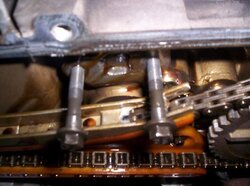
When your putting the chain guides back, before you mount the new tensioners, make sure you have the same amount of chain links between the timing marks on the crank and cam pulley on both sides of the chain.
The PS pulley must come off. Note, the removal tool scoured the pulley mounting surface on mine during removal and it would not go back on. New pulley was cheap.
To remove the pump, you do not need to undo the lines or drain any fluid. First remove the two bolts that have clear access. Then loosen the bolt that is blocked by the PS hose. Once this bolt is loose, hold the PS pump by hand (keeping its weight off the bolt) and you can use your fingers to continue loosing this bolt. Just keep moving the pump away from the engine and the PS line will never be in the way.
When your putting the chain guides back, before you mount the new tensioners, make sure you have the same amount of chain links between the timing marks on the crank and cam pulley on both sides of the chain.
kwandrey
Member
- Joined
- November 17, 2014
- Messages
- 10
- Reaction score
- 0
- City, State
- Southern Pines NC
- Year, Model & Trim Level
- 2003 Ford Explorer
03 Explorer 4.6 144K miles - Broken Chain Guides, Worn tensioners
Timing guide and tensioner damage report .
(Right side was our target side since it was rattling) My Mechanic buddy helped me pin point the noise using a long 3 ft screwdriver. Press against spots on the block, heads and timing cover with ear to the other end. It was very evident the noise was from the Rt timing cover, louder just below the cam sprocket.

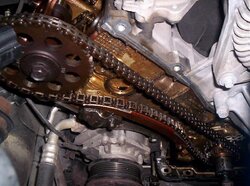
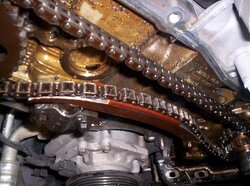
This all looks about like I saw in the first post only guides not as broken. Even the pulse disk markings and inside of timing cover chain had similar marks indicating the chain was bouncing all around, but had not jumped timing based on chain link counts (and it seemed to run good). Also interesting to note the darker color on insides of RT side timing cover and cam area on the head. Ours looked the same, Rt side darker in color, Lt side very clean looking. Not sure if it was the way that RT bank was running with the cracked guides affecting timing or some oil starvation on that side. Or the way the chains may sling oil due to the motors rotation, (CW facing the front of the motor). The LT side was much cleaner inside looking not tinted brown/ black at all. But all the timing wear was near identical only somewhat more on RT bank.
RT, Upper fixed guide in 2 pieces both mounts for it broken so they were both loose and floating laying mainly on the the chain but large to be trapped from moving to far in directions of chain.
As Found Damages:
RT Lower Guide Worn through
RT tensioner Worn through to piston, Piston was NOT collapsible seems seized in full Up position. Found seal failure on backside mounting due to warped surface allowing the soft urethane/silicone like seal to give way.


As you can see mine above looks about the same as in my earlier post (The earlier image I grabbed off Youtube -2008 F150 5.4)
https://www.youtube.com/watch?v=HEYNnJtmlUI
LT side
Lower fixed tensioner Broken it two, One piece of the Lower Guide still attached at mount near the crank. 2nd piece long with mount broken out this section just laid flat, and gravity left it sitting away from the chain so likely wasn't rattling around as much to hear it.
LT Tensioner Guide worn through
Lt Tensioner worn through to piston - was collapsible with normal spring tension
The rear seal was intact but can see evidence that it looks like it wanted to migrate out as if oil pressure was pushing it outward .


Almost had it back together last night, The fixed Guides I picked up did have the metal support bar and 3 mounting holes so feel better about that considering seeing how the all plastic guides failed.


Also compared and used the earlier tensioners, ran a very thin smear of Permatex #2 (not silicone but sticky brown black case sealant) on the sealing face may not be necessary since both surfaces are machined flat.
The Chain link counting was needed as we were on time, but installing tensiners it jumped 2 links on crank end , so needed to do the careful counting. Not including the link on the sprocket marks its 28 face links per side (between the datum links on the sprocket marks).
Almost buttoned it up last night until my son got ahead of me and pressed the power steering pulley on backwards. Man that is a tight press fit. Now not having a hub to pull the sprocket off We will need to cut it off. Tried 3 Jaw and 2 Jaw pullers on base of sprocket spokes but it only wanted to bend the pulley. There was room to drop the pump and lines out the bottom without removing the lines so we will cut it off here. So If you have a helper play attention to that step!!
Timing guide and tensioner damage report .
(Right side was our target side since it was rattling) My Mechanic buddy helped me pin point the noise using a long 3 ft screwdriver. Press against spots on the block, heads and timing cover with ear to the other end. It was very evident the noise was from the Rt timing cover, louder just below the cam sprocket.
This all looks about like I saw in the first post only guides not as broken. Even the pulse disk markings and inside of timing cover chain had similar marks indicating the chain was bouncing all around, but had not jumped timing based on chain link counts (and it seemed to run good). Also interesting to note the darker color on insides of RT side timing cover and cam area on the head. Ours looked the same, Rt side darker in color, Lt side very clean looking. Not sure if it was the way that RT bank was running with the cracked guides affecting timing or some oil starvation on that side. Or the way the chains may sling oil due to the motors rotation, (CW facing the front of the motor). The LT side was much cleaner inside looking not tinted brown/ black at all. But all the timing wear was near identical only somewhat more on RT bank.
RT, Upper fixed guide in 2 pieces both mounts for it broken so they were both loose and floating laying mainly on the the chain but large to be trapped from moving to far in directions of chain.
As Found Damages:
RT Lower Guide Worn through
RT tensioner Worn through to piston, Piston was NOT collapsible seems seized in full Up position. Found seal failure on backside mounting due to warped surface allowing the soft urethane/silicone like seal to give way.
As you can see mine above looks about the same as in my earlier post (The earlier image I grabbed off Youtube -2008 F150 5.4)
https://www.youtube.com/watch?v=HEYNnJtmlUI
LT side
Lower fixed tensioner Broken it two, One piece of the Lower Guide still attached at mount near the crank. 2nd piece long with mount broken out this section just laid flat, and gravity left it sitting away from the chain so likely wasn't rattling around as much to hear it.
LT Tensioner Guide worn through
Lt Tensioner worn through to piston - was collapsible with normal spring tension
The rear seal was intact but can see evidence that it looks like it wanted to migrate out as if oil pressure was pushing it outward .
Almost had it back together last night, The fixed Guides I picked up did have the metal support bar and 3 mounting holes so feel better about that considering seeing how the all plastic guides failed.
Also compared and used the earlier tensioners, ran a very thin smear of Permatex #2 (not silicone but sticky brown black case sealant) on the sealing face may not be necessary since both surfaces are machined flat.
The Chain link counting was needed as we were on time, but installing tensiners it jumped 2 links on crank end , so needed to do the careful counting. Not including the link on the sprocket marks its 28 face links per side (between the datum links on the sprocket marks).
Almost buttoned it up last night until my son got ahead of me and pressed the power steering pulley on backwards. Man that is a tight press fit. Now not having a hub to pull the sprocket off We will need to cut it off. Tried 3 Jaw and 2 Jaw pullers on base of sprocket spokes but it only wanted to bend the pulley. There was room to drop the pump and lines out the bottom without removing the lines so we will cut it off here. So If you have a helper play attention to that step!!
Jobe
Member
- Joined
- April 23, 2007
- Messages
- 18
- Reaction score
- 0
- City, State
- NJ
- Year, Model & Trim Level
- 03 XLT 4.6
In the middle of this job myself. All my parts look like all these others. Funny thing is I only heard an occasional noise almost sounded like a spark knock or heat shield rattling. And only happened at light load and around 2000 rpm. I was really surprised to see how bad they where. Truck has 153k and has always had Motorcraft filters and Moble1 5w20 synthetic every 3 to 4k since I've owned it. Bought it with 30k and previous owner had service done at the Ford dealer as it was a lease turn in. Seems to me these parts are only good for about 150k under the best conditions. I think there may be people driving around w bad guides and aren't aware of it until there is a catastrophic failure
Pontisteve
Well-Known Member
- Joined
- August 30, 2008
- Messages
- 510
- Reaction score
- 11
- City, State
- Florida
- Year, Model & Trim Level
- 03 Eddie Bauer 4WD V8
Thats alarming. I have the same truck with 153k. Since I bought it at 80k, it has had a noise that sounds just like a catalytic converter heat shield rattle. I checked it closely, and even tapped on the shields with a rubber mallet. Nothing. Pretty sure it's in the Trans or converter. Hasn't gotten much worse in all these years. Seems to go away when the converter locks up. I figured it was something with the converter internally.
Mine is noise free at idle, rattles underneath under light acceleration. Quiet at WOT. And quiet once the converter locks up. Does this match yours?
Mine is noise free at idle, rattles underneath under light acceleration. Quiet at WOT. And quiet once the converter locks up. Does this match yours?
Pontisteve
Well-Known Member
- Joined
- August 30, 2008
- Messages
- 510
- Reaction score
- 11
- City, State
- Florida
- Year, Model & Trim Level
- 03 Eddie Bauer 4WD V8
Upload pics of what you find before any disassembly.
kwandrey
Member
- Joined
- November 17, 2014
- Messages
- 10
- Reaction score
- 0
- City, State
- Southern Pines NC
- Year, Model & Trim Level
- 2003 Ford Explorer
150
I think the 140/ 150 K milestone is the key on these. You can stretch it but look at all of the as found images and decide. Likely Guides are worn to about to the rail backing and they can run somewhat.
Do the engine doctor/listen examination. Run a long screwdriver or extension or broom stick on the FT timing cover in different spots with your ear to it. Rattling at idle or some variant of that is the chain is slapping and may be throwing the loose tensioner parts around that cannot drop through, all due to the guides worn through and tensioners being maxed out . Mine also sounded quite loud below the motor Like an oil pump problem and it was likely just the slack side of chain trying to get lined up with the driver crank sprocket and or hitting sides of the pulse disk ( see the images of the pulse disk in 1st post). This would be more applicable on RT side and likely where it starts raising attention and since that disk is at RT Forward most chain Vs left that is back and away.
Suspect there is some time before timing jumps and if it did it would it would be at the small crank sprockets. Under acceleration and load the tensioned side, Upper on RT Lower on LT will do as designed and the opposite will be shaking and floating so it may be unnoticeable. At Idle and slightly above the cams springs and loading on them seems to allow more backlash on the normally tensioned side of the chain and or the loose normally tensioned opposite side. When the old plastic guides break that is what may be what we hear most.
As I mentioned the new O-Riley fixed guides had metal backers VS the all plastic and I would try and stay away from the all plastic fixed guides. I also backdated our 2003 to use the earlier metal tensioners to eliminate the composite warpage and designed in mounting face seal fail and have the metal ratcheting device as a fail safe if nothing more.
K.
Jobe
Member
- Joined
- April 23, 2007
- Messages
- 18
- Reaction score
- 0
- City, State
- NJ
- Year, Model & Trim Level
- 03 XLT 4.6
Just finished up truck runs much better at low rpm. Hopefully my gas mileage will come back was only getting 12. I used be able to get 19 on the highway if I babied it. Its a big job for sure it took me 12 hrs but overall not bad if you pay attention. I just replaced the guides and tensioners because the chain and sprockets looked good. I didn't need to use any special tools for the timing that way. I just rotated the engine to check that the timing marks all lined up before I messed with the guides. I then took a couple of zip ties and used them to keep the chains tight when I took the guides and tensioners off so I knew the chains couldn't fall off the sprockets. I was able to see that the guide on the drivers side was broken just by pulling the valve cover off and looking down. It was much worse than I expected when I pulled the front cover. Passenger side guide was in 2 pieces and the tensioner arm was wore right through and actually started wearing into the tensioner pin. I'm really surprised that it was not making more noise and it appeared to be running great. There was no noise at idle only under light accel in the lower gears and would go away with higher RPM or more throttle never heard anything. I decided to pull it apart not because of the noise but because I took a hard look at my oil filter and saw a metallic look in the oil inside the filter.
2000StreetRod
Moderator Emeritus
- Joined
- May 26, 2009
- Messages
- 10,597
- Reaction score
- 334
- City, State
- Greenville, SC
- Year, Model & Trim Level
- 00 Sport FI, 03 Ltd V8
Aviator timing chain components
The timing chain guides on my DOHC V8 out of a 2003 Aviator are all metal reinforced and the chain contact surfaces are only slightly worn.

The engine has the cast metal, ratchet style tensioners. My 2004 Aviator shop manual shows the tensioner piston being compressed in a vice with no mention of releasing the ratchet mechanism so I suspect the timing chain components have been replaced. I don't know how many miles were on the vehicle odometer when the engine was pulled. I intend to reuse the timing components. My 2002 Explorer shop manual shows the tensioner being compressed in a vice while using a pick to release the ratchet. Ford Racing's M-6004-A464 4.6L 4V AL Timing Kit Installation Instructions show either type of tensioner being installed. I would be unhappy if I purchased their kit and it came with the composite tensioners.
The timing chain guides on my DOHC V8 out of a 2003 Aviator are all metal reinforced and the chain contact surfaces are only slightly worn.
The engine has the cast metal, ratchet style tensioners. My 2004 Aviator shop manual shows the tensioner piston being compressed in a vice with no mention of releasing the ratchet mechanism so I suspect the timing chain components have been replaced. I don't know how many miles were on the vehicle odometer when the engine was pulled. I intend to reuse the timing components. My 2002 Explorer shop manual shows the tensioner being compressed in a vice while using a pick to release the ratchet. Ford Racing's M-6004-A464 4.6L 4V AL Timing Kit Installation Instructions show either type of tensioner being installed. I would be unhappy if I purchased their kit and it came with the composite tensioners.
- Joined
- March 16, 2013
- Messages
- 4,261
- Reaction score
- 232
- City, State
- Woodstock, GA
- Year, Model & Trim Level
- 04 Ford Explorer 4.6l
[MENTION=111113]2000StreetRod[/MENTION], how much did you end up paying for the motor? I've been looking for a wrecked Aviator vs getting an engine from a yard. Wrecked Aviator $1k - $2k. Probably closer to 2. Engine from a yard $1600.
2000StreetRod
Moderator Emeritus
- Joined
- May 26, 2009
- Messages
- 10,597
- Reaction score
- 334
- City, State
- Greenville, SC
- Year, Model & Trim Level
- 00 Sport FI, 03 Ltd V8
lower end knock
I paid $300 for the long block that was replaced due to a tune-up shop diagnosed lower end knock. I've pulled the heads and the valves look pretty good. The cylinders are not scored and there is virtually no top of the cylinder ridge build up. Next I'll remove the pistons and rods and check them and the bearings. See the following threads for more details: Next project vehicle?, DOHC 4.6L V8 build
I paid $300 for the long block that was replaced due to a tune-up shop diagnosed lower end knock. I've pulled the heads and the valves look pretty good. The cylinders are not scored and there is virtually no top of the cylinder ridge build up. Next I'll remove the pistons and rods and check them and the bearings. See the following threads for more details: Next project vehicle?, DOHC 4.6L V8 build
mtthompson777
Member
- Joined
- January 2, 2015
- Messages
- 11
- Reaction score
- 0
- City, State
- Metro Detroit
- Year, Model & Trim Level
- 2004 Mountaineer 4.6
Hello all,
I just found this site and just read this entire thread. What an awesome site with a lot of knowledgable people helping out DIY guys like me. I've got a 2004 Mountaineer 4.6 with 135K. I took the passenger valve cover off yesterday and it's a loose chain. I was wondering if I would be capable of fixing it myself. After reading all of your posts, I'm confident that I can and plan to start very soon. Of course it had to happen in January in Detroit. My 1 1/2 car garage is basically a wood shop so I'll be doing it outside. I just ordered a service manual and plan to only replace guides, tensioners and tension arms. I'm sure I'll be hittin you guys up soon for help. I will be taking pics along the way.
I just found this site and just read this entire thread. What an awesome site with a lot of knowledgable people helping out DIY guys like me. I've got a 2004 Mountaineer 4.6 with 135K. I took the passenger valve cover off yesterday and it's a loose chain. I was wondering if I would be capable of fixing it myself. After reading all of your posts, I'm confident that I can and plan to start very soon. Of course it had to happen in January in Detroit. My 1 1/2 car garage is basically a wood shop so I'll be doing it outside. I just ordered a service manual and plan to only replace guides, tensioners and tension arms. I'm sure I'll be hittin you guys up soon for help. I will be taking pics along the way.
mtthompson777
Member
- Joined
- January 2, 2015
- Messages
- 11
- Reaction score
- 0
- City, State
- Metro Detroit
- Year, Model & Trim Level
- 2004 Mountaineer 4.6
Pontisteve
Well-Known Member
- Joined
- August 30, 2008
- Messages
- 510
- Reaction score
- 11
- City, State
- Florida
- Year, Model & Trim Level
- 03 Eddie Bauer 4WD V8
Yeah, that's not bad. Some suggestions: Might want to degrease the engine as much as possible before you start. Blow water and dirt out of the spark plug galleys with compressed air and a long air nozzle. Try not to blast dirt in your own face. Don't forget to use the silicone dab on the crank keyway. Take pictures as you disassemble. Use new valve cover and timing cover gaskets. Don't forget to put dabs of silicone to the surfaces shown... oil pan, cylinder head, and valve cover joints. Be patient when taking things apart, especially plastic electrical connectors. Don't try to force anything, or it will break. Be prepared to buy some special tools... Crank remover/installer, possibly power steering pulley remover/installer, fan clutch wrenches, fuel line disconnect tools, and a few other odds and ends.
If the timing is off, you may have to move the cams to get them to line back up. You'll need a 2v cam timing tool kit (Ebay, Amazon for about $100). Nothing will be as clean as the video shows, and keeping dirt out of the engine is more difficult. I use Pro brand Non-Acid Wheel Cleaner (wheelie clean) mixed about 5:1 with water in a squirt bottle, and add a couple drops of dawn. Best degreaser ever. Without pressure several applications may be necessary. Spray everywhere, let sit a few minutes, spray off. It's got aluminum heads, so don't go to the pressure washer with a hot engine!
While you have everything apart, it's not a bad time to put some fresh Motorcraft spark plugs in it, along with coil boot/spring kits. Bosch makes a nice set, available at Advance Auto individually. The boot/spring kit is basically a modern version of plug wires. Replacing these around 130k helps prevent the coils from going bad, along with new plugs every 60k or so.
mtthompson777
Member
- Joined
- January 2, 2015
- Messages
- 11
- Reaction score
- 0
- City, State
- Metro Detroit
- Year, Model & Trim Level
- 2004 Mountaineer 4.6
Ok, will do. Will I need the cam timing tool if I don't plan to replace the chains? Also I found this series of 3 videos detailing the job on a 2003 4.6.
https://www.youtube.com/watch?v=oLtNZbTwMtc
https://www.youtube.com/watch?v=oLtNZbTwMtc
- Joined
- March 16, 2013
- Messages
- 4,261
- Reaction score
- 232
- City, State
- Woodstock, GA
- Year, Model & Trim Level
- 04 Ford Explorer 4.6l
Ok, will do. Will I need the cam timing tool if I don't plan to replace the chains? Also I found this series of 3 videos detailing the job on a 2003 4.6.
https://www.youtube.com/watch?v=oLtNZbTwMtc
There is no can tool for the 2002-2005 4.6l 2v. You can pick up the crank tool though.
The way the cams are addressed, is by removing the cam followers.
To get around this, if you have a helper available, you can do two things.
1. Put a heavy duty zip tie around the chain just below the cam gear. (This will maintain tension on the chain, preventing the cam from skipping links and rotating. The zip tie will want to slip down tough.)
2. Have someone physically hold the cam gear, preventing it from rotating.
dieselscout80
Active Member
- Joined
- July 8, 2011
- Messages
- 88
- Reaction score
- 0
- Year, Model & Trim Level
- 2003 Ford Explorer 4.6
There is no can tool for the 2002-2005 4.6l 2v. You can pick up the crank tool though.
The way the cams are addressed, is by removing the cam followers.
To get around this, if you have a helper available, you can do two things.
1. Put a heavy duty zip tie around the chain just below the cam gear. (This will maintain tension on the chain, preventing the cam from skipping links and rotating. The zip tie will want to slip down tough.)
2. Have someone physically hold the cam gear, preventing it from rotating.
Could a person make a cam holder tool our of steel?
Elite Explorer members see no advertisements, no banner ads, no double underlined links,.
Add an avatar, upload photo attachments, and more!.
mtthompson777
Member
- Joined
- January 2, 2015
- Messages
- 11
- Reaction score
- 0
- City, State
- Metro Detroit
- Year, Model & Trim Level
- 2004 Mountaineer 4.6
Ok, I've got the timing cover off. I've only broken a fuel injector clip so I'm happy with that. I found the passenger tensioner completely collapsed but popped back up after messing with it and it seems both sides are very weak. Guides and tension arms are intact but will be replaced. I'm trying to determine if the chains have jumped but cannot see any indicators on either chain. How can I determine if the chain has jumped?
Featured images


Featured images
Similar Threads
- Replies
- 160
- Views
- 181,427
- Replies
- 17
- Views
- 36,676
- Replies
- 4
- Views
- 2,064