How to: - 5R55E Valve Body Rebuild Diary | Page 6 | Ford Explorer Forums - Serious Explorations

  • Register Today It's free!

How to: 5R55E Valve Body Rebuild Diary

Prefix for threads which are instructional.
Thanks for the welcome. I was kind of on the fence on the boost valve after reading Glacier's comments, so not finding it is not a big deal to me. Thanks for the tip, that is a good idea as to keeping the bolts in order. I also plan on taking a lot of pictures. I will start looking for the manual you suggested and see what I can find and the price. If I find a good deal, I will post it.

Did I list all of the parts that I need? I am going to double check the TSB to make sure that I got everything. Are any additional gaskets needed or are they included with the kits that I have already listed?

Thanks for the help!!


Join the Elite Explorers for $20 each year.
Elite Explorer members see no advertisements, no banner ads, no double underlined links,.
Add an avatar, upload photo attachments, and more!
.


I found the manual here for $16.50 (Makco as you suggested):
http://www.bulkpart.com/
They also had the Superior kit for $31.18, which is a little more than I had found elsewhere, but by the time you pay shipping twice, breaks even.


Did I list all of the parts that I need?......Are any additional gaskets needed or are they included with the kits that I have already listed?
Kaiser, the only extra part that I installed was the EPC solenoid. I had a 2-3 shift flare, and it was cured with the installation of all the parts. The trouble is, I don't know which part or mod fixed the flare, since I installed all of them at once......? Regardless, if you have a flare, I'd include a new EPC. They're about $110, so it's up to you.

On your model, the separator plate gaskets will be bonded to the plate, so they're 'included' so to speak. Looks like you've listed everything that's needed.

You can't beat Bulkparts and FordPartsNetwork. Great suppliers & low pricing. I'm amazed at how quickly both these places ship.

ROE


Thanks for all of the help, ROE. One last thing, anyone know of a good way to install a drain plug into this pan? I do not have access to a welder, so I would need one of another type.


If you visit an Autozone or other popular auto parts store, in the oil section they usually have a display of replacement oil pan plugs. On that board is one that installs into a 1/2 inch drilled hole to create an entirely new plug. They cost like $5. Drill a half inch hole, deburr and install and "voila". Instant drain plug. No welding required.

Here is a picture of one:

15286Dscn5302.jpg


and here is the "exploded" view of the parts.... pretty self explanatory:

15286Dscn5300.jpg


( I knew I had uploaded one or two at some point.... whether they got posted I wasn't sure....I checked my gallery and voila... geeze I have 1500 pix uploaded! I should be able to find one of damn near anything <lol>)


For any bolt in drain plug, be sure to use locktite, and some RTV wouldn't hurt around the seals. I have had one leak, even installed properly. Regards,


Excellent advice, and remember, deburr your hole! And back up the drill bit as you drill it... a chunk of 2x4 is good....but Don's advice is excellent (as usual).


I had one leak as well once. Follow Don's advice about sealing it. :)


I HAVE a 1996 ford explorer i replace all 4 shift solenoid and now it won't go in rev or drive . the on way i can move it is to go in d2 or d3...i have a 4.0


how about a dictionary? that might help us understand that just a little bit there ron7910

oh and umm the engine type 5.0 or 4.0 sohc ohv type thing will help also. :eek:

then the all mighty glacier can help you


I think I might be able to help here. (Though a separate thread might be a better place). Ron E-mailed me.... the following (slightly polished - we're not all born typists)

"PLEASE HELP ..........I have a 96 ford explorer. The o/d light was flashing and the check engine light was on. When I pulled codes I found I have a code p0751 and p0756. [Both codes relate to shift solenoid failure]. So I replaced all 4 shift solenoids! When i got though with that job, I could not make the Explorer move in Drive or OD or reverse. [We now know from here it will move in manual 2 and 3] The truck was at least driveable before I replaced the solenoids. WHAT HAPPENED do you think?"

To begin, I am quite confident he has the 5R55 or 4R55, not the 4R70W. Solenoid count etc.... we'll see if I am correct. But with that assumption:

First of all those 2 codes relate to different shift solenoids. I have to wonder the liklihood in the normal world of multiple failures like that. We know from another thread that the wiring harness can fail and give all kinds of odd codes. So, the original code situation would have me wanting to test the solenoids, and then the wiring harness. Replacing the solenoids is the brute force way of testing them, and expensive, but hey... you at least know you got working(?) solenoids. [Not my recommended appoach however - replacing instead of testing. Wanna sell the old ones (smile)]

So you get it back together and bang... worse than when you started. I am not sure what all you did to remove the solenoids, whether you got the filter out, removed the VB or what? My current thought is that you have either have some form of hydraulic leak, or a blown harness (is my best guess, not knowing more, subject to revision and change as I learn more). If you removed the VB did you use BRAND NEW gaskets? Reusing gaskets on a VB is an invitation to disaster, especially this transmission! Let us know a little more, maybe even start a new thread with your question? We will try and help you.


wow

fyi i ordered the parts tho ugh the site sponser ford parts network and saved 25 or bucks.. think about it before you buy

edited for typo's


Update:

Dealer just finished installing the 3-22-10 TSB. $425 because I have 4WD? Parts were plate, boost valve, filter and fluid.The rest was labor. If you have the time and skills, save some money and do it yourself. Me, I didn't have enough time and we have a roadtrip to Indiana coming up.


I have received the manual and shift kit from Makco (got here the next day!! Granted, it is only from Dallas to Houston). After re-reading this post as well as looking through the manual, I had another couple of questions. I plan on doing all of this work at 60k miles. Should I replace the EPC solenoid while I am doing all of this work? I am not having any shift flare problems right now, but really don't want to have to bother with dropping the valve body again (which I assume would mean the installation of a new separator plate as the gaskets are bonded to it) in the future. Also, in looking at the manual, as I am going to have to remove the reverse servo cover, is there a gasket that needs to be replaced there? Looking at Macko's site, they list the gasket for the 4R44E/55E, but not the 5R55E. Although, if I wind up making another order to get the solenoid ($114 at Makco, but I have not checked Ford Parts as of yet), I will likely order it, anyway. Any thoughts?


"Should I replace the EPC solenoid?" That's a judgment call. I do not claim enough experience to give you valuable insights into that. Torrie at FordParts has OEM for $112. It would be prophylactic, "might" save you trouble in the future, and at the same time yours may go another 60K. If you ask me would I? I'd hem and haw, but in the end, I think I would.

I've never had to remove a 5R55E valve body from a casse as yet, so I do not know about that low reverse servo cover... the old ones can generally be reused in a pinch on the A4LD's - they were metalized kind of like exhaust gasket gaskets.


Looking at Macko's site, they list the gasket for the 4R44E/55E, but not the 5R55E.
I would have to assume the gaskets are the same, but don't know from firsthand experience. Since it was in good condition, I reused my old reverse servo cover gasket with no ill effects. I don't think there's a lot of pressure on that side of the servo.....You could easily make a gasket from a sheet of gasket material, if you had to.

As to the EPC, I replaced mine because of the 2-3 flare. I wanted to fix that gremlin in the worst way, so I took the 'shotgun' approach and replaced everything that I possibly could. By the way, IIRC it can be replaced without dropping the valve body again, since it's held in by the solenoid bracket.

Bottom line, working underneath vehicles is not my favorite pastime anymore, so I'd replace it as insurance for that.... :D Also, the EPC gets more wear than the others, since it's constantly dithering.


I completed the Ford factory update (new separator plate, new solenoid bracket and the "install kit"). I also installed the majority of the Superior kit (more on that later) along with a new filter, pan gasket and installed a drain plug. I am only going to go through the steps before and after the valve body mods as Glacier has covered that pretty well and his pics show a nice clean valve body :) .

Here are the special tools / supplies used:
Superior shift kit
Ford mod parts (refer to an earlier post of mine for what I bought and how
much it cost)
-Note: my separator plate came with bonded gaskets
Torx T-30 bit
3/8” drive torque wrench (must have a range of 70 to 135 in-lbs)
Drill bits up to 1/2"
-Note: bits for Superior kit are included with the kit
Drain plug kit from auto parts store (less than $5)
About 7 quarts of ATF (Mobil 1 for me)
I highly recommend getting the ATSG service manual as it covers just about everything, especially the tightening sequence for the valve body (which
these trannies are sensitive to, from my understanding). It is fairly inexpensive and came in handy. I ordered it from Makco along with the Superior kit.

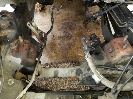
Here is what I started with. The heat shield next to the cat will have to be removed (in the left side of the pic below).
1.jpg


There are two clips and a 10mm nut (the nut is up above the upper clip shown in the pic). The nut has to be removed by feel as it is not visible from below.
2.jpg


Here it is removed:
heatsheild.jpg


Getting this thing on and off was nearly the hardest part of the whole thing!! It has to be rotated and snaked forward through the exhaust as well as some hardlines to get it out.

I put down a big catch pan (or a “cookie sheet” as my wife calls it) with an oil catch pan on top of that. Next the pan was removed. I left all but 3 bolts in (one at one end, two on the other) and slowly loosened the one until it was removed. I took my time draining as to avoid an ATF shower (I still smell like ATF as it is). After the pan was removed, I completely cleaned the inside of it. Make sure that you get most of the gunk off of the magnet.

Here is what we have now:
3.jpg


Note the pawls and the shifter detent spring (spring loaded roller) on the left side. There is a post that engages the spool valve that translates the gearshift position to the spool valve, in turn to the valve body. Note the reverse servo cover in the upper right. I reused the servo cover gasket as it was still in pretty good shape. The black plastic piece running across the valve body is the wire loom guide.

When you reinstall the valve body, you will need to make sure that the post engages the spool as shown here:
spool.jpg


While I waited for things to drain a little, I went ahead and drilled out the two orifices called out in the Superior kit.

This is the hole that is drilled out to 0.062”:
hole1.jpg


Here is the one drilled out to 0.086”:
hole2.jpg


I used a pocket screwdriver as a pointer as I couldn’t find my BBQ skewers :D I noticed that when I used a low drill bit speed, there was a lot less deburring to do.

Then, I removed the wiring connectors from the solenoids as well as the wire loom guide. Next comes the fun part (and yet another ATF shower). Remove the bolts (23 vb bolts, 4 reverse servo bolts and one for the shifter detent spring). I took ROE’s advice a made a template for the bolts, and was big help on the reinstallation.

Here is the removed VB:
vb.jpg


As you can see, there are a couple of places where the sep plate gasket blew out.

One by the 4 solenoids:
sol.jpg


The other by the reverse servo:
rev.jpg


I checked the resistance of the solenoids as Glacier did and here is what I found:
SSA,SSB,SSC,CSS: 22-48 ohms spec (mine were 26.4 ohms)
EPC: 3.1-5.7 ohms spec (mine was 4.7 ohms)
TCC: 8.9-16 ohms spec (mine was 10.4 ohms)

As Glacier has done an excellent job detailing the VB mods, I will not cover them. I completed the entire Ford service kit. I only did about half of the Superior kit. I did not do the following: replace the coast clutch valve retaining plug (I couldn’t get it apart using several different techniques, and the instructions as well as Glacier’s experience admit it is difficult to disassemble), the thermo blocker (I don’t think it is needed in Houston), the PressureRiser or intermediate return spring. I did not do the intermediate return spring due to access and lack of special tools (although I am sure there are a couple of “back pocket” methods available). The servo has to be compressed to get a snap ring out to get it apart. This also happens to be in very close proximity to the cat (refer to the pics above regarding the heat shield, these servos are what is shielded), creating the access problem.

The spring goes inside the intermediate servo, which you can just barely see just past the edge of the pan in the pic below. The upper one is the intermediate and the lower one is the overdrive servo:
int.jpg


After the mod kit and shift kit are installed, assembly is the reverse of disassembly with the following exceptions:
-Torque and torquing pattern on VB and reverse servo
-Torque on pan bolts

I did install a drain plug, using the location suggested by Brain in his Frankentranny post. I would recommend drilling the hole out in multiple stages to the 0.5” that is called for. I put a little silicone on both sides of the Teflon washer as well as some John Deere Rigid Form-in-place gasket maker (not a lot different than red Loctite) on the threads. I tightened it to about 15 ft-lbs.

Start to finish probably took me about 6 hours (at a pretty leisurely pace, with several trips out from under the truck to the tool box and back, a long lunch, etc.). If anyone wants any more info or has questions, let me know. Besides, I am sure that there is something I forgot to mention.


Great addition! I can't stress enough the importance on reassembly to make sure you get the manual valve hooked up - your pictures show that clearly.


I have to do this soon. Chris, would my Ford manual cover the torquing sequence?

Kaiser, were you able to pull the pan without pulling the drive shaft or the exhaust?

George


Join the Elite Explorers for $20 each year.
Elite Explorer members see no advertisements, no banner ads, no double underlined links,.
Add an avatar, upload photo attachments, and more!
.


Back
Top