-
Performance Upgrades - Maintenance - Modifications - Problem Solving - Off-Road - Street Trucks.
Covering the Explorer, ST, Sport, Lincoln Aviator, Sport Trac,
Mercury Mountaineer, Mazda Navajo, Ford Ranger, Mazda Pickups, and the Aerostar.
Featuring H.I. - Human Intelligence.
Register Today It's free!
- Forums
- Generation Specific Forums
- 1991 - 1994 Explorer Ranger Navajo 1st Generation
- Modified 1991-1994 Explorers
You are using an out of date browser. It may not display this or other websites correctly.
You should upgrade or use an alternative browser.
You should upgrade or use an alternative browser.
Elite Explorer members see no advertisements, no banner ads, no double underlined links,.
Add an avatar, upload photo attachments, and more!.
5spdman
Elite Explorer
- Joined
- December 2, 2009
- Messages
- 784
- Reaction score
- 129
- City, State
- Stryker, OH
- Year, Model & Trim Level
- 91 Explorer XLT
Ok, so while waiting for paint to "cure", I'm thinking this weekend, or more likely next weekend, I may go into Flagstaff and scrap the ol' Sport, and while I'm there, also pick up a new rear end. At this point, it's more feasible with funding and availability that I'll be running 31's and from my research, 3.73 will be just fine and also more feasible. I WAS able to locate a 4.10 front pumpkin in Farmington, NM, but $400 plus the 3 hour drive was out of the question. So the plan at the moment for my next move: remove front pumpkin from the Sport, and if it's good, swap it into the XLT, remove the 3.55 rear from the XLT and pick up a '95 or newer 3.73LS at the U-Pick-It, order new spring perches and finish the new luggage rack.
Slow and steady really makes me impatient and anxious!
Slow and steady really makes me impatient and anxious!
mr cribb
US Army Retired
- Joined
- December 16, 2010
- Messages
- 2,343
- Reaction score
- 85
- City, State
- Naylor, MO
- Year, Model & Trim Level
- 98 Z71, 89 stepside
I'm guessing that the sport has an electric transfer case?
I did some figuring on the gears, and 3.81 gears is for the 31's. The 4.10 is for 33's so you can see that the 3.73's are close enough for the 31's.
I did some figuring on the gears, and 3.81 gears is for the 31's. The 4.10 is for 33's so you can see that the 3.73's are close enough for the 31's.
5spdman
Elite Explorer
- Joined
- December 2, 2009
- Messages
- 784
- Reaction score
- 129
- City, State
- Stryker, OH
- Year, Model & Trim Level
- 91 Explorer XLT
I'm guessing that the sport has an electric transfer case?
I did some figuring on the gears, and 3.81 gears is for the 31's. The 4.10 is for 33's so you can see that the 3.73's are close enough for the 31's.
Thanks for the math!! I do wish I could go 4.10 or more, but 3.73 will do just fine for now.....and yes, electric t-case in the Sport as well.
Well I ended up getting the tape all peeled away today and a few parts back on the front. UNFORTUNATELY, a bit of the blue paint was pulled up with the tape, so I'll have to spot treat those areas. Going into town tomorrow possibly and will pick up some wax and a buffer along with a handful of other things to take care of an finish up this slick paint job Edgar just got.
Finally got it out of the shop and into the sunlight to see how it looks....I have to say, I'm not done with it, and I absolutely love it already!
I ended up putting the headlights, grille and bumper back on, but may take the bumper back off for a little while I apply some wax.
Meanwhile, as I have Edgar out of the shop, I'm taking this opportunity to do some grinding and welding for the new luggage rack.
It doesn't look like much at the moment, and I've got a bit more work to do on it, but I believe the end product will be really nice! It'll be shorter, sit lower, be more sturdy, longer and wider than the previous one.
I will continue to update as I progress, and hopefully it will be sooner than later!
5spdman
Elite Explorer
- Joined
- December 2, 2009
- Messages
- 784
- Reaction score
- 129
- City, State
- Stryker, OH
- Year, Model & Trim Level
- 91 Explorer XLT
Well I've been debating this for a while, but I've decided to take the challenge of installing a new rear axle, updating the exhaust, and installing the lift kit before I travel home to Ohio for Christmas. Got to work today putting Edgar up on jack stands and beginning the removal process of parts...unfortunately, I didn't get much sleep last night and ended up taking a 4 hour nap after jacking, supporting, and removing the tires, but I think I got quite a bit done this evening.
First step was lifting and supporting the truck (obviously.)

Next was removing parts here and there...


Time to replace some exhaust components anyway...

That's the way I left him tonight....back at it in the morning! Hoping by tomorrow evening I'll have the rear axle out, front TTB torn into, and the exhaust wye taken out (scored one for free that wasn't cut and welded.) I'll also be taking the front pumpkin out of the old explorer (3.73) and hoping it's in good shape so it will be one less part I have to buy. I should probably start cleaning up the shop so I can work efficiently in there and use the work benches when needed....also the jack broke so I'll need to fix that too....long day ahead!
First step was lifting and supporting the truck (obviously.)
Next was removing parts here and there...
Time to replace some exhaust components anyway...
That's the way I left him tonight....back at it in the morning! Hoping by tomorrow evening I'll have the rear axle out, front TTB torn into, and the exhaust wye taken out (scored one for free that wasn't cut and welded.) I'll also be taking the front pumpkin out of the old explorer (3.73) and hoping it's in good shape so it will be one less part I have to buy. I should probably start cleaning up the shop so I can work efficiently in there and use the work benches when needed....also the jack broke so I'll need to fix that too....long day ahead!
5spdman
Elite Explorer
- Joined
- December 2, 2009
- Messages
- 784
- Reaction score
- 129
- City, State
- Stryker, OH
- Year, Model & Trim Level
- 91 Explorer XLT
Snuck in some work today (it wasn't a day off) and finished up removing the rear axle and suspension. Left the shop last night with one bolt I for the life of me could not get out of the leaf spring and had to cut it out...I called it quits when the grinder ran out of juice (18v battery powered DeWalt that drained both available batteries.)


Went ahead and started wire brushing the chassis and giving it some Rustoleum primer and black satin paint...next will be the TTB and the rest of the brackets, but I'll hold off til the weekend on those...
Went ahead and started wire brushing the chassis and giving it some Rustoleum primer and black satin paint...next will be the TTB and the rest of the brackets, but I'll hold off til the weekend on those...
5spdman
Elite Explorer
- Joined
- December 2, 2009
- Messages
- 784
- Reaction score
- 129
- City, State
- Stryker, OH
- Year, Model & Trim Level
- 91 Explorer XLT
I've gotten quite a bit of work done since my last post, but my camera died and I can't seem to find the battery charger for it....but either way;
Chassis is all wire brushed and painted, drop brackets are installed, 3.73 front diff from my 93 Sport has been pulled and cleaned up, beams, radius arms, RA mounts and diff bolts cleaned and painted, rear lights and front signal lights tinted, pin stripe applied, and exhaust from manifolds to the rear removed. Rear axle spring perches have also been ordered and should be here sometime this week in time to start the SOA conversion.
This week, dock washer spacers will be made and painted, exhaust beginning to be put together, the front is getting put back together (minus brake lines), door trim cleaned and mounted, tire gate reinstalled and the leaking valve cover gaskets replaced.
The sport is getting scrapped this coming weekend to get a few more bucks (will be tough to see it go), and a 3.73LS rear axle and springs from a 2nd Gen pulled at the yard. Process will then begin in cleaning it all up, welding on the new perches, paint and installation.
Pictures to come after I find the battery charger for my camera....
5spdman
Elite Explorer
- Joined
- December 2, 2009
- Messages
- 784
- Reaction score
- 129
- City, State
- Stryker, OH
- Year, Model & Trim Level
- 91 Explorer XLT
As I promised, here are some pics!


Beams back in tomorrow afternoon, along with RA's, springs, spacers, shocks, and then wiring in some relays for the fog and driving lights....
Beams back in tomorrow afternoon, along with RA's, springs, spacers, shocks, and then wiring in some relays for the fog and driving lights....
5spdman
Elite Explorer
- Joined
- December 2, 2009
- Messages
- 784
- Reaction score
- 129
- City, State
- Stryker, OH
- Year, Model & Trim Level
- 91 Explorer XLT
I'd say I got quite a bit done tonight! Tire gate is fully installed once again, carpeted my sub enclosure, beams are back on, and springs and shocks are mounted too!


Next steps this week; pull the pitman arm and replace, replace steering linkages, acquire new rear from JY and install...still looking into brake lines as well. Found a company that can custom make them for me 8" longer than stock and it'd only be $70....still weighing options, but it looks like I'll be reaching that goal of having it finished before the holidays!
Next steps this week; pull the pitman arm and replace, replace steering linkages, acquire new rear from JY and install...still looking into brake lines as well. Found a company that can custom make them for me 8" longer than stock and it'd only be $70....still weighing options, but it looks like I'll be reaching that goal of having it finished before the holidays!
5spdman
Elite Explorer
- Joined
- December 2, 2009
- Messages
- 784
- Reaction score
- 129
- City, State
- Stryker, OH
- Year, Model & Trim Level
- 91 Explorer XLT
Ended up scrapping the ol' Sport and using the rear end from the XLT to pick up a new rear end from the junk yard last week...tough to see it go, but having taken all the parts from it that I could think of, it was just taking up space.....and I ended up not having to pay a thing for the new axle (in a sense.) So, having the entire week off from school for Thanksgiving, you'd think that I would get a lot accomplished on the truck.....not so!! Had a group here from Michigan helping re-roof the school and the house I'm in (they did an AWESOME job), and my girlfriend decided to show up and surprise me this week!!
HOWEVER, we ended up having a "wrench date" tonight and started tearing into the new rear axle.
Got the springs along with this rear end. 3.73ls geared 8.8 from a 1995 XLT with control trac.
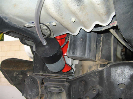
Guessing this is from the junk yard so they can drain fluids...real crappy way to do so. Thinking that I may be able to weld in a drain plug from RuffStuff, but I'm afraid it's a little too close to the ring.
Took the cover off and had my better half clean out the rear diff while I ground down the new Barne's 4wd anti-wrap spring perches and got the springs and shackles mounted up onto the truck.
All cleaned up and ready for a bit of welding, some paint, and a little bit of work...
Didn't notice the lug bolt missing when I found the axle, and further examination uncovered that the pads for the parking brakes really aren't in too great of shape...
Pay very close attention to the next two photos and hopefully I can get some help on this one:
I'm fairly new to this whole world of axle work, but it seems to me that the axle shafts shouldn't move in and out. The second photo shows apart from the first that the right shaft actually moves in and out of the diff at least a 1/16"...and the same thing happens with the left shaft as well. Is this normal? doesn't seem right to me, but I've been wrong about stuff before.....hoping that I didn't "get the shaft" in my haste to have a new axle before the yard closed.
- Joined
- June 24, 2003
- Messages
- 3,895
- Reaction score
- 102
- City, State
- Newcastle Wa
- Year, Model & Trim Level
- White 94 Limited
- Callsign
- KG7PKQ
It is normal. That's how you remove the load off teh E clip to get the axle shaft out. Anything more than 1/16" might not be.
dkchrist
Explorer Addict
- Joined
- August 13, 2006
- Messages
- 1,337
- Reaction score
- 1
- City, State
- Fayetteville, AR
- Year, Model & Trim Level
- 93 XLT 4DR
Factory Spec is .005 to .030" of end float with the center pin installed. I know that when I installed my ARB on my last truck they sent several thicknesses of C-clip just for this reason.
5spdman
Elite Explorer
- Joined
- December 2, 2009
- Messages
- 784
- Reaction score
- 129
- City, State
- Stryker, OH
- Year, Model & Trim Level
- 91 Explorer XLT
Factory Spec is .005 to .030" of end float with the center pin installed. I know that when I installed my ARB on my last truck they sent several thicknesses of C-clip just for this reason.
Thanks for that info....sure helps!

5spdman
Elite Explorer
- Joined
- December 2, 2009
- Messages
- 784
- Reaction score
- 129
- City, State
- Stryker, OH
- Year, Model & Trim Level
- 91 Explorer XLT
Thanks guys! Girlfriend flew back to Ohio today, so now it's either stay home and be boring with the dog, or work on the truck.....
Got the new spring perches welded on tonight, go back later to replace the spring center pins and work on that darn luggage rack...tomorrow I'll go ahead and give it some paint, put in that front drive shaft and maybe do some wiring. It's coming down to the last little bits, but I still have a ways to go yet.....
Got the new spring perches welded on tonight, go back later to replace the spring center pins and work on that darn luggage rack...tomorrow I'll go ahead and give it some paint, put in that front drive shaft and maybe do some wiring. It's coming down to the last little bits, but I still have a ways to go yet.....
Elite Explorer members see no advertisements, no banner ads, no double underlined links,.
Add an avatar, upload photo attachments, and more!.
Featured images


Featured images
Similar Threads
- Replies
- 41
- Views
- 7,272
- Replies
- 10
- Views
- 1,649