V8BoatBuilder
Transplanted Bostonian
- Joined
- November 4, 2002
- Messages
- 3,411
- Reaction score
- 8
- City, State
- East Brunswick, NJ
- Year, Model & Trim Level
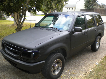
- 97 Mountaineer V8 4x4
To complete the lift, the rear needed to be raised about 1.5" to match the front. A single Explorer Procom 13120 Add-a-leaf, ordered from Summit Racing did the job nicely. After installation, the final lift of my truck including TT, AAL, Shackles, and 31x10.5" tires puts the apex of the fenderwells at about 35 3/4" from the ground. I started with the fenderwells at around 32-33" from the ground with no lift and 235/75R15s. The ride is excellent with EE swaybars, Rancho 9000x shocks on all four corners and the Spring modifications. I currently have the rear Ranchos set on "1" and the fronts on "3."
Add-a-Leaf Install Writeup
Parts/Tools Required
1. Explorer Pro-Comp Single Add-a-leaf, P/N 13120
2. Two grade 8 machine bolts, 2.5" long x 3/8", hex head. Nuts to go with them. These will be used for new spring center pins. (The bolts/pins included with the Procomp kit are too narrow and too long.)
3. 18mm Deep drive socket.
4. Air Impact and cut-off setup
5. Lots of PBBlaster
6. Two c-clamps
7. Basic wrenches, etc
Procedure
1. Jack up rear of truck, place jackstands as high as they can go right infront of rear spring hangers.
2. Remove wheels. Spray everything with PB blaster.
3. Disconnect the shock absorbers at the bottom, let them hang.
4. Remove e-brake cable retainer from passenger side u-bolt/shock mount.
5. Use an 18mm deep drive socket in your impact gun to remove the u-bolt nuts. Remove the shock mounts from under the springs. The axle will hang from the swaybar, and the springs will sag much lower than the axle. Be careful.
6. With the rear axle hanging by the swaybar, place a jack under the center of the differential, and jack the axle up. Place some jackstands underneith it, and disconnect the swaybar. BE CAREFUL OF THE HYDRAULIC BRAKE LINE. It is very easy to drop the axle too far and stretch the rubber hose.

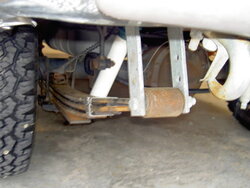
7. Remove the bolt holding the rear of the leaf spring to the bottom of the shackle. Lower the spring to the floor.

8. Place a c-clamp on either side of the leaf spring center pin.
9. Grind off the head on the leaf spring center pin and remove. You won't be able to undo this one. Trust me. Once the head is off, punch out the bolt.

10. Slowly undo the c-clamps and release tension on the leaf pack.
11. Insert the AAL above the overload spring, and below the last leaf. Insert the new center pin bolt and use the two c-clamps to re-compress the leaf pack.

12. Tighten and center the center pin. 3/8" is the maximum you can fit through the center hole on the AAL, but is slightly narrower than the metric bolt removed from the lead pack.
13. Remove C-clamps, and reattach the leaf pack to the shackle.
14. Using two hydraulic jacks, raise the spring to meet the axle, and lower the axle to meet the spring. Again, be careful of the brakeline. The center pin bolt head should fit in the recess in the leaf perch on the axle.

15. Re-install u-bolts and shock mounts. Sequentially tighten the u-bolt nuts so that the length is even on all four legs. Torque these puppies down with the impact gun.
16. Reattach the shock absorber, and the swaybar. Reattach wheels, and lower.

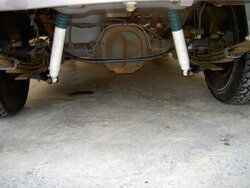
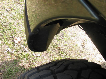
Swaybar Mounting bolt
My lower shock mounts were VERY rusty, and with them removed I used this as an opportunity to wirebrush and grind them down. I painted them with 2 coats of Rustoleum primer, and 3 coats of black Rustoleam Paint.

Repainted Shock mounts
Sticky at the top.... please please
Add-a-Leaf Install Writeup
Parts/Tools Required
1. Explorer Pro-Comp Single Add-a-leaf, P/N 13120
2. Two grade 8 machine bolts, 2.5" long x 3/8", hex head. Nuts to go with them. These will be used for new spring center pins. (The bolts/pins included with the Procomp kit are too narrow and too long.)
3. 18mm Deep drive socket.
4. Air Impact and cut-off setup
5. Lots of PBBlaster
6. Two c-clamps
7. Basic wrenches, etc
Procedure
1. Jack up rear of truck, place jackstands as high as they can go right infront of rear spring hangers.
2. Remove wheels. Spray everything with PB blaster.
3. Disconnect the shock absorbers at the bottom, let them hang.
4. Remove e-brake cable retainer from passenger side u-bolt/shock mount.
5. Use an 18mm deep drive socket in your impact gun
to remove the u-bolt nuts. Remove the shock mounts from under the springs. The axle will hang from the swaybar, and the springs will sag much lower than the axle. Be careful. 6. With the rear axle hanging by the swaybar, place a jack under the center of the differential, and jack the axle up. Place some jackstands underneith it, and disconnect the swaybar. BE CAREFUL OF THE HYDRAULIC BRAKE LINE. It is very easy to drop the axle too far and stretch the rubber hose.
7. Remove the bolt holding the rear of the leaf spring to the bottom of the shackle. Lower the spring to the floor.
8. Place a c-clamp on either side of the leaf spring center pin.
9. Grind off the head on the leaf spring center pin and remove. You won't be able to undo this one. Trust me. Once the head is off, punch out the bolt.
10. Slowly undo the c-clamps and release tension on the leaf pack.
11. Insert the AAL above the overload spring, and below the last leaf. Insert the new center pin bolt and use the two c-clamps to re-compress the leaf pack.
12. Tighten and center the center pin. 3/8" is the maximum you can fit through the center hole on the AAL, but is slightly narrower than the metric bolt removed from the lead pack.
13. Remove C-clamps, and reattach the leaf pack to the shackle.
14. Using two hydraulic jacks, raise the spring to meet the axle, and lower the axle to meet the spring. Again, be careful of the brakeline. The center pin bolt head should fit in the recess in the leaf perch on the axle.
15. Re-install u-bolts and shock mounts. Sequentially tighten the u-bolt nuts so that the length is even on all four legs. Torque these puppies down with the impact gun.
16. Reattach the shock absorber, and the swaybar. Reattach wheels, and lower.
Swaybar Mounting bolt
My lower shock mounts were VERY rusty, and with them removed I used this as an opportunity to wirebrush and grind them down. I painted them with 2 coats of Rustoleum primer, and 3 coats of black Rustoleam Paint.
Repainted Shock mounts
Sticky at the top.... please please