Air Conditioner Evaporator Removal | Ford Explorer Forums - Serious Explorations

  • Register Today It's free!

Air Conditioner Evaporator Removal

BigBlueBiotch

Member
Joined
February 1, 2004
Messages
43
Reaction score
0
City, State
Moscow, ID
Year, Model & Trim Level
1994 Ex Sport
OK, here's my problem. My air conditioner is dead. All of my coolant keeps leaking out. I tried to buy one of those bottles of leak stop, but it only worked for a couple months. After a visit with my mechanic (and $50 later) he told me that my evaporator (on the firewall?) appears to be leaking. Now I know I could have him fix it but that seems a bit expensive for something that is just an unnecessary convenience. I should be able to do it myself.

My question is this: My Haynes book gives me vague (to say the least) instructions about evaporator removal. Has anyone done this? If so could they offer me some advice? I suppose the best case would be if there was a writeup somewhere. I messed around a little bit today and determined that the lower line into the evaporator will be a major pain in the butt. Any incite would be greatly appreciated.

Second question: Once it's out, is their any possibility of having it repaired? I'm the type of person who believes in duct tape and chewing gum. A friend mentioned that I might be able to take it to a radiator shop and have them plug the hole. Napa quoted me $120 for a new one.

Thanks in advance for your help.
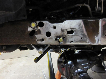


Join the Elite Explorers for $20 each year.
Elite Explorer members see no advertisements, no banner ads, no double underlined links,.
Add an avatar, upload photo attachments, and more!
.


First off.... diagnosis of an "evaporator leak" absent a sniffer confirmation is a tough call in ayone's book. Before I replaced it I would want something more definitive. THAT is not a high probability leak point. Can it, sure... but is THAT what you have? What did he do to tell you that? Accumulator leak or Compressor seals rank MUCH higher!


I'm pretty sure he used a "sniffer". He had a little wand that he was poking around my engine compartment while filling it with 134a. He said he wasn't positive that It was the evaporator. If it wasn't, it's extremely close to the box on the firewall. It definitely wasn't either the compressor or the condenser. I don't really know enough about AC to rule out an Accumulator leak (or know what an Accumulator is for that matter).

Thanks


The accumulator is the cylinder back near the firewall. The earlier ones has insulation on them that caused them to rust out. On Explorers that would be my first place to check!! peel away any insulation if there is any and look for signs of rust. Usually when I suspect an evaporator I am putting the sniffer in the vents INSIDE the car. I'd completely eliminate the Accumulator as the culprit before I went to the evaporator, based on what I hear you telling me. Do a search on A/C. I think V8Boatbuilder posted a nice thread with pics of his rebuild, including replacing the accumulator, if I recall correctly.


Good call Glacier on V6BoatBuilder's thread. I was just looking thru it yesterday looking at his oil pressure gauge mod info. I was so impressed with his write-ups I found myself reading about all his mods. Anyway 'hats off' to V8BoatBuilder ........here's his thread:

Dead Link Removed

You will find his AC write-up on page 2.

Keep up the good work V8 and thanks for the excellent write-ups.

Lee


AC Pipe sheared off at the evap core!

I guess it took me long enough to get back (I just spent the last week in Moab :)). Today I ripped out the Accumulator and pulled off it's foam blanket. Turns out it was in perfect shape. When I was poking around I gave the upper pipe that goes into the evaporator a gentle tug and it came out in my hand. Apparently it sheared off right at the evap core! I won't even venture a guess as to why. Bright side is I don't need to go looking for a pinhole leak.

I have the whole assembly sitting on my workbench at the moment. Believe me, getting the darn thing out was no easy task. Out of curiosity I pulled out the expansion orifice. The screen is partly clogged with a little black gunk. It looks like the stuff you get when a really old radiator hose decomposes. Is this a sign of impending doom somewhere else in the system? That would really be a kicker if I needed a new compressor too.

P.S. Thanks for the link to V8BoatBuilder's write-ups. I spent the better part of an hour reading all of them!


Sadly the black gunk in the usual case is referred to as the "black death" - there is a possibility that an o-ring breakdown somewhere somehow could be what you see, but that's highly unlikely.

Black death necessitates a complete system flush, and often the condensor cannot be satisfactorily flushed and must be replaced. Compressor replacement (that's where the failure is occurring) and new accumulator and complete line flush. Sometimes the line with the little can (muffler) will need to be replaced as well. Sounds like you are in the early incipient failure mode, and might head off a bigger (read more expensive)problem by taking the bull by the horns now.

(ps. I am still leery of the diagnosis of an evaporator leak, btw)


Black death ey? Sounds downright disastrous. I might end up living with my current AC system (power windows). Hell I'm in Montana, what do I need AC for?

I'm not sure I understand. Might flushing the system fix things, or is it definite that I need a new compressor etc.? Is a complete system flush an expensive proposition? I guess anything is cheap in comparison to a new compressor....

As far as the evaporator is concerned, I'm fairly sure that is the problem. The pipe wasn't attached to the radiator(?) part anymore. The tig welds were completely busted all the way around. There was probably a 1/32 of an inch for gas to leak out, more as the engine moved. I certainly didn't break it off. I may have had to wrestle with the thing and use a hammer (just kiddin') to get it out, but I surely didn't do enough to shear an inch & 1/2 of tig weld.

The accumulator wasn't even rusty. All shiny black (after I took off the foam). I would even venture a guess that it is fairly new. Nothing like v8BB's, no flourescent dye or rust. It's possible that the previous owners changed it and in the process broke the pipe??? They were fairly incompetent: original plugs/wires, original fluids minus cc oil, and they managed to lose the jack and tire iron. Thanx for your help.


Hey, I am just home from Flathead Lake.... the flush is not difficult.... you disconnect everything and flush with an air cannister filled with flushing fluid. Cost for tools, maybe $45-50. Fluid etc, $20. IF it is the black death, it is the compressor self destructing. Catch it early and you can pobably flush and resuse the condensor... catc t l;ate and usually the condensor cannot be cleaned. IF you plan to replace the evap anyway, this is a good time to redo the compressor and the accumulator, and maybe convert to 134a. I'll be happy to try and guide you thru it. YOU will need acess to a vacuum pump and gauge set though.


Flathead lake ey? Sweet! That's just 3 (2 the way I drive) hours away from me. I was actually on my way up there last summer when I decided once and for all to fix my AC.

I think I will just have my mechanic do the flush. I figure the money I spend on tools that I will never use again can't be cheaper than paying someone else to do it. If I do that, should I put everything back together? It sounds like it might be better to leave the orifice out and the hoses disconnected. I was also hoping that maybe I could re-use the accumulator. Like I said earlier it looks BRAND new. It sounds from your previous statements that that is a bad idea. I was really hoping to keep this under a couple hundred bucks if at all possible.

I'm going to talk to my mechanic tomorrow, see how much it will cost. It can't be much. He owes me a favor. I drug his son's truck out of a ditch. Either way, it might be cool if you did a write-up on flushing the AC anyway. If you have time. I'm sure there are people who will want to do that in the future. If you do that, I could do a write-up on removing the fan/evap box. I'm getting darn good at disassembling that side of the engine. Just a thought. Thanks again.


Forget paying someone else! He was going to charge me up the @$$. If your offer still stands, I would love your assistance.


Ok... to start off with can you get a manifold set and a vacuum pump for use? You will need these for charging purpose. I will assume you are going to convert the system to 134a. You'll need to get a flush gun (I can direct you to a place that sells them - and you will need an air compressor. I am going to recommend that you replace the A/C compressor, the accumulator and the expansion valve (minimum recommendation, for now). Condensor will depend of if you can flush it and get clean flush out. If not, it gets tossed too. If the condensor cannot be cleaned, I'm also recommending you replace the return line, the one with the little muffler can on it. Sounds like you plan to replace the evaporator. So, you COULD possibly end up virtually replacing each and every part of the system in this process. Parts, oil and refrigerant will be $500 to $600 minimum is my guess.

Even if you are not up to the actual recharge, you can do all the mechanical work leading up to it and then take it to someone and still save money. If you haven't looked at it, here is a thread on the recharging process:

http://www.explorerforum.com/forums/showthread.php?t=84675

In the "Useful Threads" forum there is a thread on Converting to 134a. Check these out.


$500-$600. I guess I'm sticking with power windows.

I'm stuck here. The guy at Napa told me that my level of black gunk was nothing to worry about, the compressor may be going out, but I still have years left in it. His recommendation was to flush and ignore. Not that I trust him any farther than I can throw him..... But $160 sounds a heck of a lot better than $600. Either way. I'm going up to a wrecking yard tomorrow to see if I can get a new compressor. I already replaced the evap etc.

Recharging is no biggie. I've done that before. I even have the tools (failed attempt with leak stop). I just don't know how to flush it. My job is easier because it is already 134a. First year they came from the factory that way.


Well, flush the condenser and see if it cleans up. Since you already have the evap installed, if the condensor comes up good then it's just a Compressor $225 or so, and the accumulator ($40 or so). Junkyard compressors are NOT a wise idea in my opinion. Get new.


AC Checklist

  • New compressor - $250, check.
  • New accumulator - $50, check.
  • New evaporator - $130, check.
  • New orifice - $8
  • 9oz of AC oil - $12, check.
  • 2 lbs of r134a - $.70 an oz, check
  • vacume pump - 12 pack of beer + friend, check
  • ac guage set - 12 pack of beer + friend, check
  • scraped knuckles, banged head, library of curse words, and a nasty exhaust manifold burn, check
  • Cardboard box and shopping cart for life begging on the street - $free, check.
I may be broke but at least I'm cool!

How do I go about flushing?


I didn't see a flush gun on that list. (Or a conversion kit with R-134a fittings an green O-rings - but THAT we will discuss later). The good news is that it's not as expensive as the rest of it. The bad news is you need one. Here's a link:

http://www.acsource.com/index.asp?PageAction=VIEWPROD&ProdID=137

You will need at least quart of flush (about $15) and something to catch it in. I also find an assortment of various diameter clear tubing about 18 inches each is handy.

Remove the accumulator, the old compressor, expansion valve, unhook the condensor lines, and disconnect any firewall fittings. Pour the flush into the gun cup - about 1/2 to 2/3rd full max. Hook up the air. We will start with the lines. Find the start and end of the line back to the accumulator. Put a clear hose on the exit end and place it in a clean container.... blow flush thru it. (with the expansion valve out, you may have to do this in 2 steps) Do this until it is clean. Do this with each line. The line from the firewall back to the compressor has a little can on it. It is a muffler. may be easier to do this line out of the car so you can get all the flush out. I sometimes have been known to use rubing alcohol on hard to clean lines, and follow up with flush again. If it isn't clean after 3 or 4 tries, replace it. Moment of truth, the condensor. Flush it, either direction, if you can get clean flush out of it, you're IN. If not, after 5 or 6 tries...sigh... it's toast. Do not cut the corner here and say oh well, it is "clean enough". Using clean dry air blow everything out that you can. Now you are flushed. Next step, reassembly, and oil added during this phase.


So, I figured I'd post and let everyone know how it went. It's been almost a month now and my AC still works perfectly. Flushing ended up being fairly easy. Flushing/evacuating/refilling took about two hours. The hard part was installing the new evaporator. That took 6 hours plus. If anyone else has the misfortune of having to replace the evap core I can offer the following advice:

#1 Get a Haynes book. It's directions are mostly correct.

#2 When the book says to remove four bolts holding the assembly to the firewall, it actually means the nuts attached to the 1.5 inch posts coming out of the firewall. You will need long sockets to get them out. One is inside the car. You just have to remove the carpeted piece that covers the heater core. Two are right on top in the engine compartment. One of those is between the blower motor and the evap box, the other is next to the distributer. The last nut is WAY on the bottom at what looks to be an impossible location. Relax, if you go under the car and reach around the radius arm and frame rail you can easily get to it.

#3 Remove everything in the vicinity of the evap box. Haynes doesn't mention this, but it's nearly impossible to get the evaporator out if you don't remove the two heater hoses. It also makes things a lot easier if you use duct tape (or something less ghetto) to hold back the vacuum lines, wiring harnesses and various hoses. I have a KKM intake so I didn't have to worry about air box, but I can imagine it would have to go too.

#4 Once you get the darn thing out, replacing the evaporator is simple. Something like 18 bolts hold the halves together. The new one just drops in.

#5 Install the orifice while the evaporator is out of the car. When you install it, lube it up with some AC Ester oil. It will slide in more easily. Don't let the oil touch your skin. It itches like a son of a !!!!!

#6 When you received the new evaporator, It should have come with some nifty little disposable plastic pipe caps. After you install the orifice put them back on. You really don't want to accidentally get engine gunk inside when you reinstall.

#7 I found that the easiest way to install the evap box is to slide it in as close to the distributer as you can at a 45 degree angle. You can then move it left while at the same time tilting it upward. The post that goes into the cabin should just drop into place.

#7 Putting the evap box back in is a pain no matter how you go about it. Don't get frustrated and force it in. The little pipes running out are fragile and break off easily. I accidentally bent one.

#8 Now you flush, evacuate, and fill according to Glacier991's directions. While you have the hoses apart its a good idea to replace all of the O rings.


I was lucky because when we flushed my compressor it came clean after 1 or 2 blasts. If you have metal fragments in the orifice you are toast no matter what. According to what I've heard, A small amount of black gunk is normal. In my case the screen on the orifice was about 90% clean. If I'd had the money I would have replaced the compressor too. The jury is still out on whether my fix will stand the test of time.


Price breakdown:

  • $50.00 -- New accumulator
  • $130.00 --New evaporator
  • $8.00 -- New orifice
  • $12.00 -- 9oz of AC Ester oil
  • $24.00 -- 1.8 lbs of r134a @ $13 a lb
  • $32.00 -- Flush gun
  • $17.00 -- 1 qt flush fluid
  • $10.00 -- New heater hoses
  • $5.00 -- AC O-rings
  • $5.00 -- Beer for friend lending tools
  • $1.00 -- Bandaids for scraped knuckles

Total: $294.00


Now THERE is the kind of Forum user I LOVE to help! Thanks for the update... you in turn helped a bunch of others folks by taking the time!!! Great update post!


Join the Elite Explorers for $20 each year.
Elite Explorer members see no advertisements, no banner ads, no double underlined links,.
Add an avatar, upload photo attachments, and more!
.


just wanted to say thanks for the writeup. i know it's an old thread, but thanks for the follow up. i found it via search and it helped me out :chug:


Back
Top