Completed Project - Brandon's mild 4.0 OHV build | Page 23 | Ford Explorer Forums - Serious Explorations

  • Register Today It's free!

Completed Project Brandon's mild 4.0 OHV build

Use this prefix for completed projects that are not "How to" articles or threads asking for help.
So, as of 5 hours ago Ronin8002, or James' built OHV block became mine; and with the stea.. I mean deal I got and all the extra goodies he threw in, he seemed a little too happy to get rid of this thing :shifty_ey... lol! But WOW this thing is in good shape! As a christmas gift from my parents, I've been given the opportunity to really dig into an engine like I've always wanted to do. I've watched and assisted a couple chevy 350 builds over the past few months but have never done anything by myself.. so here goes nothin!

The Meat (James' Block):
- 1995 block bored .030 over and torque honed
- Keith Black Hypereutectic 1995 Style Pistons (staying around 9:1)
- Total Seal piston rings
- Clevite bearings
- Stock Water pump/timing cover (awesome shape!)
- Stock Fuel Rail
- SOHC Oil pump/pan - to strengthen up the bottom end
-- Possible port/polish on the lower intake, we'll see when I get there

The Goodies:
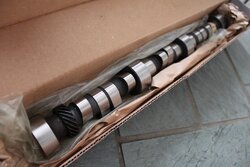
- Comp Cams 49-422-8 Cam
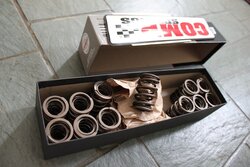
- Comp Cams 988-12 dual valve springs
- 95tm heads with minor porting/polishing

(on the way, supposedly 11/28/10)
- SI sev2027 and sev2028 valves
- Delta Cam rockers
and pushrods will come later down the road when properly measured

I'm going to keep a diary as things progress on the motor, once I get all the parts in it really should start coming together quickly. I'm down for any type of constructive criticism you have, if you don't like the way I'm doing something PLEASE let me know, as this will be my true first solo go at an engine! JD4242 has really given me a lot of direction when it comes to the 4.0, by reading through his posts in the forums I'm still baffled by the amount of knowledge he has of these things. So, many thanks to you JD!

First order of business, I need help tracking down a full gasket kit, reasonably priced as the budget is dwindling down, I hear an ebay seller has them for around $130??, as well as new head stud/bolts. I'm not feeling ARP's $400 set of head bolts/studs. Does anyone have any suggestions or leads on either?

Thanks for lookin! Here's a couple of teaser pics! Pics of the motor when I get it all unpackaged and on a stand.

-Brandon
 

Attachments

  • IMG_0007.JPG
    IMG_0007.JPG
    91.8 KB · Views: 6,268
  • IMG_0009.JPG
    IMG_0009.JPG
    76.1 KB · Views: 6,669


Join the Elite Explorers for $20 each year.
Elite Explorer members see no advertisements, no banner ads, no double underlined links,.
Add an avatar, upload photo attachments, and more!
.


Upon further reinspection, I WAS leaking oil on the driver's side gasket, looks to be as if the valve covers were bent a bit due to torquing them down too much. Looks like I under estimated my incredible strength!! I went ahead and CAREFULLY and BRILLIANTLY laid down a pure RTV gasket.

So far I'm back up to the fuel rail, I'm going to put it back in and button up the intake, get a picture and come inside for a bit before I start it up. I don't know how long this RTV type stuff takes to set a gasket.
 

Attachments

  • IMG_1365.JPG
    IMG_1365.JPG
    71 KB · Views: 580
  • IMG_1367.JPG
    IMG_1367.JPG
    146.2 KB · Views: 592
  • IMG_1366.JPG
    IMG_1366.JPG
    146.2 KB · Views: 593


Join the Elite Explorers for $20 each year.
Elite Explorer members see no advertisements, no banner ads, no double underlined links,.
Add an avatar, upload photo attachments, and more!
.


Okay, so it's all said and done.

- No more P0340 CEL
- No More P0113 CEL (I hope, all I could do was make wire extensions for the connector)
- New Valve Cover Gaskets
- Redid the Injectors and FPR, 1 new O-Ring on #4 cause it was smashed to crap, used vaseline in hopes to better seat them.
- Redid most the vacuum tree using the factory rubber grommets and some fish tank .177" tubing

Probably forgot a couple other things.. write down 9 more hours on the project minus 30mins for eating here and there. Uggh!! lol

I primed the engine a few times to pressurize the fuel system to see if I still had leaks.. didn't see any but I'm still keeping my fingers crossed for tomorrow morning's startup and test drive!!!


Did you not put the little metal rings in the valve cover gasket? I dont see them.hopefully you got it all fixed!


Little metal rings?

I never saw any in the gasket kit, didn't have any when I took apart the old motor.. Maybe it's a first gen thing? :dunno:

I think I know what your talking about though; they're like little 1/4" lookin spacers that go around the bolt in between the valve cover and head? I never had any lol


The wings help keep you from bending the the valve cover. I took a set off one of the X's I helped strip and used them on the Van which didn't come with those.

BUT,

Some gaskets come with "rings" around the bolt holes so you can't over torque the bolts and break the gasket. I've only seen those "rings" on some of the cork or cork/rubber gaskets.

~Mark

EDIT: I guess I'm typing slow this cold morning.. ya beat me to it. .


Yea what all of them said.pretty sure its not just a first gen thing and that goes for both things!!


BAD NEWS, the RTV gasket held for all of about 5 minutes then passenger side blew out and pissed oil everywhere.

GOOD NEWS is the fuel problem is completely fixed; she ran 100% better than before!

I'll be going with a Fel-Pro rubber type gasket this time. I reaaaally hope this is the last time I have to take a part the top end of the engine again..


You shouldnt need too pull anything to get just the valve covers off.get one with the rings!! Haha


The gasket should not have blown out so quickly--I wonder if the pcv is venting well?

Also
You will find the aquarium tubing will collapse when warm, which will "clog" the vacuum flow. I tried it also--;)


<snip>
You will find the aquarium tubing will collapse when warm, which will "clog" the vacuum flow. I tried it also--;)

So, I'm not the only one to try that cheaper tubing to save some money (had it lying around) to only have it bite me in the arse..

~Mark


I am not that surprised that the RTV didn't hold. The valve cover and cylinder head mating surfaces are smooth and don't have a channel or anything for the RTV to sit in...it probably got all squeezed out from between them when you tightened down the valve covers and didn't make a good seal anymore.

Glad you got the fuel thing worked out. Once you get some good valve cover gaskets on there she'll probably be good to go from there on out.


You shouldnt need too pull anything to get just the valve covers off.get one with the rings!! Haha

Can you elaborate? Remember the driver's side I've got the EGR tube all wrapped up around it, and in order to get that beast off I've got to AT LEAST take out the dipstick and move it?

The gasket should not have blown out so quickly--I wonder if the pcv is venting well?

Also
You will find the aquarium tubing will collapse when warm, which will "clog" the vacuum flow. I tried it also--;)

I was actually thinking that tubing scenario might happen when I was putting it together..

How can I got about checking the PCV, it's relatively new :/. I should be able to blow in the bottom end and it should free flow correct?


O yea darn egr i forgot!!


Join the Elite Explorers for $20 each year.
Elite Explorer members see no advertisements, no banner ads, no double underlined links,.
Add an avatar, upload photo attachments, and more!
.


Also, I've still got my A/C compressor/lines/harness all hooked up..

Remember, not all of us are as cool as you JD!! :p:


Back
Top