Cam position sensor | Ford Explorer Forums - Serious Explorations

  • Register Today It's free!

Cam position sensor

backfrmcolorado

Well-Known Member
Joined
February 21, 2010
Messages
552
Reaction score
0
City, State
Commerce Twp, MI
Year, Model & Trim Level
'94 Eddie B explod*****
just wondering... om my 94 x ive been told that there is a camshaft position sensor. not sure where to look or even if i do have one. ive been told that VIN X dosent have cam pos sensor and others say it does. what is true. im getting a chirpin noise under the hood and that what people have told me what the cause was.
i do have a CEL light on but no readabel codes. that could tell me whats going on thinking it might lead to problem fixin.
NAPA told me it was behind the coilpack and intake. dont see anything.


Join the Elite Explorers for $20 each year.
Elite Explorer members see no advertisements, no banner ads, no double underlined links,.
Add an avatar, upload photo attachments, and more!
.


Yes you have a cam sensor!!

Trust me, it's there... I went through this problem big time,
It is located behind the intake manifold just slightly to the pass. side from center. It is approx. where the distributor would be if it were an old
chevy v-8. It is very hard to get at, I removed my upper intake
(I have an X-vin. 1994) to make it easier, dont know if it helped but new
gaskets never hurt. There are two screws that hold the top part (the electrical) of the sensor to the rest of it, use a mirror and very bright lights to help see it. I got the part from a pick and pull yard cheap, and only changed the electrical part of the sensor. The chirping went away and the
check engine lite stayed off. If you change the entire sensor you are in for a
real treat as it takes a special tool to line eveything back up etc.., info is
very hard to find on this matter. That is my long-winded version;
Your results may vary!!! PM me if you want,


I have a chirping noise that has been happening for the last 3 years. It happens only during cold weather and when you are going above 50 mph. It can especially be heard above 60 mph. It doesn't come on until after you have been driving about 5-10 miles on the interstate. The funny thing is when you are going those high speeds and you move the shifter into neutral it stops or sounds like it slows down, then comes back on when put back in drive. Now, I've removed the belt and checked the pulleys. I replace the idler pulley and the tensioner/pulley recently. I followed the thread on removing your fan belt and running the engine and it can't be heard. Since it is happening at high speeds I believe it must be this camshaft position sensor. It sounds like it is close to the firewall in the engine compartment. I have had wheel bearings replaced and the front end checked out by a very reputable shop.

I would really appreciate some feedback here. If it is the cam shaft sensor, I would like some more details if anybody has on pics, etc. Sounds like other gen 1's have had this problem. Thank you.


CMP, aka Cam synchronizer, aka Cam Position Sensor

I too have the "chirp" On the to-do list.

The Chilton manual # 26688 has the best right up for this. (AutoZone)

If you replace the sensor only, No alignment is necessary.

However if the sensor has not failed electrically but is "chirping" it is the drive unit that is worn. It will run at least 40,000 miles like this. Ask me how I know.

The alignment tool can't be used unless the motor is pulled any how. (you can't get your head in there to see through the window.)

A volt meter is the solution. It's really pretty simple. The whole procedure is only two paragraphs.


NOTES: Couple tips they don't include:

Remove the spark plugs so you can easily turn the engine.

Remove the fan and radiator so you can clearly see the crank balancer, and get at it to turn the engine.

I tried to take a pic of the manual to post up but you just can't read it.. Sorry

The manual is totally worth the $20


So, does the whole unit need to be changed ? or just the electrical end ? So, if the whole unit has to be replaced, that means you have to pull the complete engine ? Please advise.


No, it's doable without pull'n the motor. You do not have to pull the intake either.

You can pull the Sensor only and wiggle the shaft to see if it's got a lot of slop.

Up/down play should be minimal say 40 thousandths.

If you swap in the new sensor and you still have the chirp then you get to do it again.

It's a pretty (easy) job it's just difficult to get at the thing.

If you are familiar with old school distributors, it is mounted the same way.

It has a "U" shaped clip with one bolt.

It also drives the oil pump so when you drop it in you have to fiddle with the cam gear to get it dropped in just like a distributor.

And just like a distributor take note of it's position before you pull it. Better yet snap a picture!

NOTE: Get the engine in the "set up" position before you remove it and do not turn the engine until it is back in place!

Here it is: As you can see it even looks like a distributor and works about the same.

This picture is great because it shows it in the correct position. i.e. notice the electrical connection is pointed at the firewall. when dropping it in you want the connector at 90* to the block. It will end up slightly turned as you can see here after it is adjusted.
camsensor_zps30d05751.jpg


A distributor wrench will make the day go better. :thumbsup:

do2_zps6dc57b14.jpg


GET A BUD TO HELP YOU REMOVE THE HOOD! NOT GONNA DO THIS WITH THE HOOD ON.

Mark the hood hinges with a sharpie so you can get it back on without all the fuss of realigning it.


No gett'n around it though you are going to have to do the volt meter method to get it timed right.

Chilton manual #26688

Oh another TIP:

Make "paper clip" probes for your test points and secure them in the plug before you reassemble. Then use alligator clips to get a hold of them after it's plugged in to the CMP.

When done pull out the paper clips.

Something like this:

back-probed-sensor_zps7b7c1530.jpg


So as you may gather, it Really is just like changing a distributor;

Same method;

Make sure the crank is set to the correct timing position.

Note where the distributor or CMP is currently positioned.

Install the new.

Set the dwell.

Cake.

Except for the whole tight space thing.


Remove the windshield washer hose and the wire loom bracket and the wiper motor access panel and the left bank spark plug wires for some more Knuckle room.

Label the plug wires!

1994FordExplorerengine1_zps5904d9d4.jpg


A Little more helpful stuff;

Question; How do you measure the 34mm on a round balancer:

Answer: Don't.

Measure and cut a piece of electrical tape (white would be better)

and stick it to the balancer to get the required 26* ATDC (After top dead center)

NOTE: All timing references are TDC number 1 cylinder compression stroke. (as always)

IMG_20140126_120506_zpsf5a08518.jpg


IMG_20140126_121231_zpsf174f309.jpg


Alignment tool explained:

With a traditional distributor you can remove the cap and grab the rotor. This way you can hold the rotor keeping it pointed at number 1

The tool is only use to provide something to grip to turn the sensor rotor while dropping the drive unit in. (keeping it pointed at number 1 so-to-speak)

The Original CMP's don't have a window in the top of the cap nor do "some" of the replacements. (Tool required). Not really. You could remove the cap and "guess" drop it in and verify, if you miss repeat until successful. (Again just like a distributor)

Some replacements DO have the "window" making your guess more educated.

The trick here is that you have to guess "practice" setting the position looking through the sight glass on top and then getting it all the way in without moving it out of range.

Ever drop a distributor only to discover that you can't get the timing right because the vacuum advance hits the fire wall or something else?

The same thing is going on here. If you don't get the orientation right you will not be able to turn it far enough to get the timing set. DUE TO THE LACK OF SPACE.

Otherwise you could stab it in any old way and just turn it till you find the voltage drop and lock it down.

Visuals:

Igntiming-distributor_zps12df9dd3.jpg
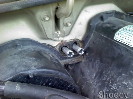
Notice here that the distributor is all the way in and he's got the rotor pointed at the mark he made earier.

Same concept with the CMP. As the cam gear slides in it will turn the rotor a bit because it is a helical gear.

So you may have to repeat the process a couple times to get it in.

The "windowed" ones also have a mark for the actual electronic alignment but you really need verify this with the volt meter. Unless you like 10 miles per gallon.

And just like a distributor if you are way off you get spark at the wrong time and backfire out the carb.

Same thing here but were talking fuel injection timing instead of spark.

If your Waaaay off it will spray fuel at the wrong time firing the injectors too early or to late.


I hope this is all clear enough to be of help.

:D :salute:


Thanks for all the info FR. I haven't looked at a distributor since my 83 Rabbit GTI, which thankfully had electronic ignition, but still had a rotor and a dist cap. After reviewing your great instructions, I thought I would do it myself, but, you mentioned hood removal as a must. I don't have any help, so I have taken my ex to a very reputable shop. He knew exactly the problem and had my call Advance to get the sensor and the gear pump drive as he called the lower piece. He also is going to scope the engine. The mileage is still way down (15-17, used to be 20-22) even after replacing plugs and wires. It may be the O2 sensor. Again, thanks for your help on this cam position issue. Everybody focuses around the fan belt area, ie, pulleys etc, but the chirping mentioned on this forum was what raised the flag for me. I would say this affected a lot of ex's.


I suppose you could do it with the hood on, but it would be much more gymnastic.


Bad news - The Advance shop ordered the sensor and the gear pump parts for an '02. I found out from other retailers that the 93 ex comes as one piece. I saw that you can order the Dorman pt# 689-110 from Amazon for about $134. I checked the Bosch part but it appears to be for a Mazda B3000 or later year Ex.


Here's a pic a the A1 Cardone unit;

You'll notice it is identical to the Bosch;

You are not going to find one that looks identical to the original, (like the one in the above pic of the back of the engine) except Dorman overstock of that design; JUNK, they are discontinued in favor of the 95' model, which is the correct replacement.

We just don't have a choice, except the Bone Yard; but the newer design is better and is a direct fit. Only "visible" difference is the 90* bend in the connector, and the view glass on top.

If you compare the electrical connection they are the same; (obviously important) The angled connector and the view glass makes the whole thing a lot easier to deal with.

30S2605-01_zps9ea27c00.jpg


Again;

the word on the street is that the Dorman ones do not last much beyond 1 year and you'll be doing it again.

The Dorman 689-110 is the 95' design so there is no difference from Bosch, A1 Cardone, and Dorman; ;; ;;;

EXCEPT QUALITY.

# 1 Bosch, They are the original equipment manufacturer for this part.

# 2 A1 Cardone, Good quality and offer both reman and new.

# 3 Dorman, Made in China *&*%*


Join the Elite Explorers for $20 each year.
Elite Explorer members see no advertisements, no banner ads, no double underlined links,.
Add an avatar, upload photo attachments, and more!
.


Well, unfortunately, there were no part numbers I could find for the Bosch or the A1 Cardone. I did find out that the Dorman does have a lifetime warranty on it. Plus, I am not going to be driving more than a few thousand miles per year on my ex at this point. I'll post after the fix.


Back
Top