Boy, can I say something about this issue. I’ve towed three trailers up the AlCan with mine. The long tow generates a lot of heat in that corner of the engine compartment and seems to kill these. Each time I’ve ended up with a cracked exhaust manifold. Every time I replaced it, it was with a Dorman. The good news is; Autozone always honored the warranty. The bad news is; the Dorman isn’t any better than the OEM and needed to be replaced every time and it’s not fun.
The third Dorman was leaking at the time I galled a piston at 195k. I lucked out and found a low miles 98 Merc engine for $600. It came with cast iron headers and runs great, even better IMHO. I truly believe the difference is in the cast iron headers. Just ran down the AlCan again this week with no issues. The cast are cheap, easy to find and worth it!
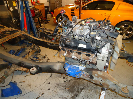
Removing the EGR tube is a real PITA. Yours is definitely split. I used a sawzall to cut the tube in half then removed the old header. To reinstall I rigged up a tool using a crows-foot open-end socked attachment attached to a long bolt with jam nuts that I could turn from above the engine. A 1/16 turn open end wrench won’t turn enough down below to flip the wrench for another turn. The header R&R is a LOT easier if you pull the wheel off and remove the fenderwell liner.
Be sure to use anti-seize on the header and exhaust flange bolts and EGR connection when you put them back in. Also use a high quality gasket. I’ve used Fel-Pro and Mr. Gasket with great results. Use emory cloth on a small flat board to remove any rust from the mating surface of the head beforehand. Snug and tighten the bolts sequentially working from the center of the header and work your way left and right towards the front and rear of the head as you go a step at a time like you would with wheel lugs. Can’t recall the torque setting exactly, believe it was 22-25 ft-lbs. I’m sure someone here can get you that number.
Finally, be certain those plug wires have good heat shielding and don’t rest anywhere on the header when you’re done or you’ll have a new set of problems
Good luck, hope this helps!
Okay, I have an update after pulling an 8,100lb trailer up the AlCan to Fairbanks from Oregon via Spokane:
First, let me say I wouldn’t ever recommend pulling a trailer this heavy with a stock Ex! I was most certainly over the CVWR by a few thousand pounds, something the Canadian Border folks promptly noticed and sent me directly to speak with the RCMP (Royal Canadian Mounted Police) as I entered Canada. I was able to convince them to let me proceed but not until a good bit of delay and grief.
Since I had to go through Spokane my route took me over several steep mountain passes northbound and the old 5.0L was breathing HARD. Although I was taking it as easy as possible, things get extremely hot around the exhaust manifolds, red hot. The ambient temps at some of my stops were -20F and after two long days of towing the sound of the old familiar exhaust leak(s) returned. Upon inspection, three of the EM bolts had backed out about 1/8” or more and one was missing altogether! I torqued them all back down to 35 ft-lbs thinking any more than that and I’ll have a broken stud to deal with. I’m thinking the extremes in temps allowed for these bolts to work their way out
aided by my use of anti-seize compound... I had extra bolts and gaskets with me and replaced things along the road. Not fun...but at least I had learned my lesson from before.
I also ended up replacing 12 plug wires along the way as they failed from the heat (Belden brand). I carry extras of those too.
I didn’t have time to remove and inspect the EM’s once I arrived in the north as I had to get things in storage and catch a southbound plane.
I’m wondering if anyone else has had a similar experience using anti-seize on these bolts and has anyone found a better brand of heat resistant plug wire?
I have a set of OBX headers that’ll be going on when I install my new 320 HP engine next fall when I return to AK and am wondering if these are going to hurt or improve the heat situation under the hood. Maybe I should wrap them with ceramic tape before installing them?
Has anyone tried improving air flow in this tight engine compartment with any success? (I was running with the fender well liner flaps removed too)
Thanks for any advice in advance. I’m returning to Antarctica for 7 months in a few days and if I don’t reply quickly it’s because the internet situation there sucks....
")