How to: 2002 Explorer rear wheel bearing replacement (pictures) | Page 4 | Ford Explorer Forums - Serious Explorations

  • Register Today It's free!

How to: 2002 Explorer rear wheel bearing replacement (pictures)

Splined Shaft

Hubs11.jpg

This is a great picture, shows the snap ring we've been talking about (recessed into the knuckle, holding in the bearing).

As for your "jackstands" wow do you have a deathwish....

Mike


Join the Elite Explorers for $20 each year.
Elite Explorer members see no advertisements, no banner ads, no double underlined links,.
Add an avatar, upload photo attachments, and more!
.


Thanks for the post! Passenger side took me two weeks of anti-seize and back/forth to work to try to figure out how to get out the upper control arm post. The CHISEL was the eureka moment.

Driver's side went much more quickly - about 2 hours of disassembly and working the chisel, 2 hours f-ing around with the bearing retaining ring, another hour pressing out and in and f-ing around with the new retaining ring, and about an hour to reinstall.

Had to come on the web site to find the axle hub nut torque spec.


Is this typical on a 2004 Explorer?


Seems to be typical on all Explorers, once you get enough mileage on them. I had to replace them on my 94 as well.

Mike


A BIG Thank you !! i had trouble with the upper arm coming off i ended removing everything else and turning the whole knuckel around to pry the damn thing off. i took the assembly to work and had the hub and bearing pressed off and on at work time to go home and reinstall. Thanks again this post helped me out alot also.:thumbsup: :)


Fun, aren't they? ;)

Mike


2002 XLT Rear Wheel Bearing R&R Tutorial

Tyler;
Thanks so much for your detailed instructions. I think I am going to have to replace both rear wheel bearings. Without your details I would have no hope. Thanks again.
Jfay


Gents, I had the same noise that everyone keeps refering to, so I went down to the hobby shop here on my base and decided to try to figure it out. Guess what it was? haha. Definately the driver side rear bearing. Now I am trying to order it on discountautoparts.com but I don't know which bearing it is. I didn't get all the way down to the bearing earlier (we figured out it was the bearing via the sound the hub made when rotated) so I don't know what it looks like. If any of you gentllemen could help me out it would be greatly appreciated.


I shall.........

I am going to be taking on this same project myself this Sunday. I have the bearing, and the auto hobby shop I am visiting should have the rest, but do I need to replace the hub? Do you think the messed up bearing might have damaged it at all? I'm new to this so please help me out.


I tackled this job on my 02 the other day. Working by myself, it took about two hours to get the drivers side apart. It would have gone much quicker but I wasted a lot of time trying to remove a stuck rotor. I thought the parking brake shoes were holding it, but it turned out it was just frozen to the hub. After removing the knuckle from the vehicle, I just pounded on the hub where it protrudes through the rotor and it popped right off. I wasn't too worried about being gentle as I was putting in new hub/bearing assemblies and new brakes. The passenger side went much easier and I had it off it a little over an hour. Took the knuckles to the shop and had the bearing/hub assemblies pressed out and the new ones in. It took about 4 hours to get it all back together. I wasted a lot of time screwing around with getting the parking brakes adjusted, or I would have been done sooner. I was dreading this job after reading all the posts on here talking about what a ***** it is but, for me, it wasn't that bad. The truck has been garage kept for most of it's life before I got it so it has zero rust. Everything came apart fairly easily. I wouldn't hesitate to do it again. And I may have to. I'm still getting a grinding sound from the rear but, I can't tell if I just got a bad bearing or if the differential is making noise.


I am going to be taking on this same project myself this Sunday. I have the bearing, and the auto hobby shop I am visiting should have the rest, but do I need to replace the hub? Do you think the messed up bearing might have damaged it at all? I'm new to this so please help me out.

I don't think replacing the hub is necessary unless you find that it's damaged by a disintegrated bearing. I spoke with some others who work on their cars who agree. I also think that by the mere fact that they sell the bearing separately at the auto parts stores means that many people just change the bearing.


02 explorer torque specs for rear bearing replacement

Can someone tell me all the torque specs for replacing the rear wheel bearing on an 02 expolrer. Is there torque specs for the pinch bolt, lower bolt under the hub, upper ball joint, and what ever other pieces I need to take apart.


Can someone tell me all the torque specs for replacing the rear wheel bearing on an 02 expolrer. Is there torque specs for the pinch bolt, lower bolt under the hub, upper ball joint, and what ever other pieces I need to take apart.

I'm currently waiting on a shop to press out my hub & bearing. I remember for sure that my Haynes manual says 203 ft-lbs on the axle nut but I don't remember what the pinch bolts are, but Tyler92 is quoted on the first page of this thread as saying:

"Torque the pinch bolts to 66 Ft Lbs. The axle nut shows 203 Ft Lbs. I feel this is too much so I went with 175 Lbs and will check it periodically. My thought is that possibly the bearings wore out prematurely do an over tight axle nut. Your call on this."

Just reassembled the job today. So glad not to hear that annoying roaring sound from the back. Anyway, 66 ft-lb for both pinchbolts, 111 for the lower control arm, and 203 for the axle nut. All this info came from Haynes manual. I highly recommend to everyone to buy one.


Excuse my ignorance, but I'm gonna ask a dumb question here. What's a sticky? I take it's kind of like a "sticky note," a.k.a. post-it note?


Excuse my ignorance, but I'm gonna ask a dumb question here. What's a sticky? I take it's kind of like a "sticky note," a.k.a. post-it note?

no problem it is a "sticky note" It just moves the thread to the top of the forum to help other people find it.


Join the Elite Explorers for $20 each year.
Elite Explorer members see no advertisements, no banner ads, no double underlined links,.
Add an avatar, upload photo attachments, and more!
.


I
When my ’02 Explorer rear wheel bearings started grinding I knew this would be an expensive trip to the dealer so I decided to take the task on myself. I read many helpful posts here and last week I successfully replaced the passenger side bearing and coil spring.

Yesterday I took on the driver’s side and snapped a few pictures in hopes of helping others to avoid being ripped off at the dealer. If you have some mechanical background and some tools you can do it.The photos below are of the left rear of my ’02 explorer and your vehicle my differ if it’s from another year.

Some of the tools needed are:
Torque wrench
Metric sockets and wrenches
Hub puller (I borrowed one from Advance Auto for free)
Hammer
Small pry bar
Chisel
Spray all bolts and nuts and pins with PB Blaster at least one day prior to removing them. This will help loosen the rust.
To get started jack the vehicle up and USE JACK STANDS. Safety first.

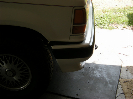
First thing I noticed is the broken coil spring. This was broken in two spots. The right side in three.There's a good chance yours are also broken.

editP1010639.jpg

Remove the two bolts holding the caliper using a 10mm socket. Pry the top out first with a screw driver or small pry bar. Don't pry on the pads and don't whack it with a hammer. Once removed tie it up to the coil spring or somewhere out of the way. Don't let it dangle by the hose. After removing the caliper pull off the rotor. If the rotor is stuck you may need to use a rubber or hard plastic hammer to pursued it. You can then pull out the emergency brake cable and end from the back plate. This will slide right out. If the E brake shoes are in good condition you can leave them on. I chose to remove mine from the backing plate to clean a little of the rust off.

P1010642-1.jpg

Next remove the axle nut. This nut is big and on very tight and requires a long handle 1/2 inch drive breaker bar to get it loose. Either put the emergency brake on or have someone press the brake to keep the axle from spinning while loosening. Almost every post tells you to use a 35 or 36mm socket. Who has one of those sitting around? I used a Craftsman 1 3/8 socket and it fit and worked perfectly. Once loose I used my 1/2 drive air gun to remove it. I also reused the same nut when reassembling. There was nothing wrong with it and I wasn't spending $15 to replace it.

P1010644.jpg

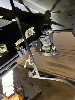
Now it's time to tackle the two pinch bolts that hold the upper control arm and the toe link to the knuckle. You will use an 18mm deep well socket to remove the nuts. As mine were rusted in pretty good, the way I got mine out was to insert a chisel into the slot shown to help spread apart the knuckle. Tap lightly and it should come right out. Don't hammer it too hard as you can damage the end of the bolt.

This photo was taken after the job was complete.
P1010659.jpg

This photo was taken after the job was complete.
P1010661.jpg


P1010641-1.jpg


P1010647.jpg

Now comes the hardest part of the job which is separating the upper control arm and toe link from the knuckle. These will be rusted in and require force to get them out. Using the same chisel I hammered it back in the slot as far as I could to try and spread the knuckle apart. The toe link should come out easier than the upper arm. Once you have the chisel inserted, carefully start tapping the arms to get them out. I was not successful on the passenger side getting the upper arm off and had to unbolt it from the frame of the vehicle and pull it and the knuckle out as one piece. Then I could get at it better and it popped right out. On the drivers side it came out but with much force. Warning! Stay away from the rubber boots with all pry bars, hammers, etc and do not use any heat. If you tear the boot then you have even bigger problems.

P1010652.jpg


P1010649.jpg

Now remove the bolt holding the lower control arm to the knuckle.

P1010662.jpg


P1010663.jpg

Now it's time to pull the knuckle. This is where the hub puller comes into play. Without one of these you will not be able to pull the knuckle off the axle spline. Note I have not touched the backing plate for the emergency brakes. Every post on this forum is telling you to either cut it in half or remove the three bolts that hold it on. There is absolutely no reason to do this. It can stay attached to the knuckle through the whole process.

P1010653.jpg


P1010654.jpg


Success!!!!

P1010655.jpg


P1010656.jpg

Time to install the new parts. I purchased these from AutoPartsDirectToYou.com. One of the forums on here stated the bearings were Timken which is of very good quality and the price was very good at $60 each. The bearings are not Timken and there are no markings on them at all so I'm sure they are a Chinese part. They do come with a lifetime warranty but who wants to do this job again soon. Not Me.

P1010657.jpg

I took the knuckle and new hub to NAPA to press out the old and press in the new. 1 hour and $30 later it was ready to go back together.
I didn't take pictures of the installation but here are a few tips.
Use some sandpaper or wire wheel to remove the rust from the pins on the toe link and upper control arm and used a generous amount of antisieze on them before inserting back into the knuckle. Clean the bolts and also use antisieze on them.
Install the axle nut first only snug and then reattach the toe link and upper control arm.
Torque the pinch bolts to 66 Ft Lbs. The axle nut shows 203 Ft Lbs. I feel this is too much so I went with 175 Lbs and will check it periodically. My thought is that possibly the bearings wore out prematurely do an over tight axle nut. Your call on this.
It will all go back together 100 times easier than it came apart. For the average occasional backyard mechanic, plan on at least a full 8 hour + time frame for doing this.
If you have any questions or comments please post them here and I'll try and answer them. Hope this helps and good luck.


Finished job. This picture also shows a new spring and strut installed which I did along with the bearing replacement.

P1010658.jpg


Maaaan this was very very helpful. I was stuck and bout to give up but somthin told me to look online and found this chat. U saved me $400. Thanks..... I'm still not done yet but atleast I have an idea of what I'm doing now. Ur a life saver.....


Back
Top