How To: Build a Center Console | Ford Explorer Forums - Serious Explorations

  • Register Today It's free!

How To: Build a Center Console

Scott B.

Explorer Addict
Joined
February 15, 1999
Messages
2,822
Reaction score
28
City, State
GA
Year, Model & Trim Level
'93 Ranger XLT
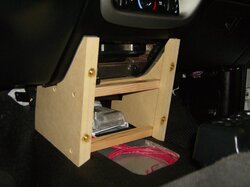
This project started by my need to mount a CB radio, several switches and a gauge somewhere in my truck, a 2006 Ranger FX4 Level II.

I have a K40 CB radio - a small radio with few controls and good signal processing. The speaker is mounted in the bottom of the chassis, so an external speaker is in order. (Actually, the external speakers sound much better than the built-in radio speakers anyway.)

I am adding lights, an air compressor, and ??? so I need to be able to control these devices. The Gen3 dash design does not have a place to add switches like the Gen2 dash.

Gauges - the instrument console only has 2 gauges - water temp and fuel. Everything else is idiot lights. Tranny temp and oil pressure will go on the A-pillar pod. I really want a voltmeter - but while I'm at it, I decided to add an engine oil temperature gauge. 4 gauges look better than 3.

First picture - before (looks like all the others!)
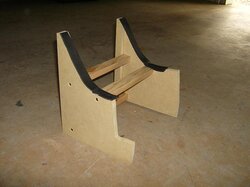
Second - console body
 

Attachments

  • Console 1.JPG
    Console 1.JPG
    55.7 KB · Views: 24,206
  • Console 2.JPG
    Console 2.JPG
    38.8 KB · Views: 11,647


Join the Elite Explorers for $20 each year.
Elite Explorer members see no advertisements, no banner ads, no double underlined links,.
Add an avatar, upload photo attachments, and more!
.


Given my space requirements and the dash layout, I decided to build a console. I removed the ashtray and passenger airbag switch to have room to place the CB radio. Of course, then I had to mount the airbag switch to the console front panel. More on that later...

I made cardboard templates for the side pieces, and cut them out of 1/2" MDF. On the first prototype, I cut some cross pieces from scrap wood to space the sides correctly, and hold them together while trying to figure out how to mount everything. Low and behold, the wood cross pieces turned out to be the way to do it! As an added bonus, I mounted the CB to one of the cross braces too. A way-cool accidental discovery!

As you can see in the pictures, the console is a free-standing unit, that fits up under the dash.

(The hole in the floor mat is from the original console. The silver box on the hump is the airbag deployment sensor. The red wires are part of a wiring harness I made which adds 6 additional circuits/switches.)
 

Attachments

  • Console 1.JPG
    Console 1.JPG
    45.2 KB · Views: 11,957
  • Console 2.JPG
    Console 2.JPG
    52.9 KB · Views: 13,966
  • Console 3.JPG
    Console 3.JPG
    36.8 KB · Views: 11,551


I covered the sides of the console body with vinyl leftover from a tonneau cover project. I used 3M spray glue as the adhesive, and it has held fine for the past 8 months.

In the front, you can see how I plan to mount the front panel. I epoxied in 4 brass threaded inserts. Since their threads are tapered, you can't screw them into MDF - it will split. I drilled holes slightly larger than the outside diameter of the threads, and used a two-part epoxy to hold them in place. The hardest part was making sure the inserts were exactly perpendicular to the face of the console body. If not, the screw heads on the panel would be crooked.

The long screws and aluminum plates are to mount the CB.

The metal "tabs" sticking up are "L" brackets. The line up with existing holes in the dash frame, so I am able to bolt the console to the dash. It is actually quite sturdy mounted this way.
 

Attachments

  • Console 3.JPG
    Console 3.JPG
    77.4 KB · Views: 11,485
  • Console 2.JPG
    Console 2.JPG
    53.5 KB · Views: 11,470
  • Console 1.JPG
    Console 1.JPG
    70.9 KB · Views: 11,493


Here, you can see the console in place.

The black square thing in the upper right is the airbag switch. The trailer light connector is part of the wiring harness I built for the gauges. The radio is mounted. The red coiled wires are switch feeds, and the black and red wires to the left are power feeds.
 

Attachments

  • Console 1.JPG
    Console 1.JPG
    68.2 KB · Views: 11,465
  • Console 2.JPG
    Console 2.JPG
    67.5 KB · Views: 11,672
  • Console 3.JPG
    Console 3.JPG
    67.2 KB · Views: 11,416


Now for the front panel...

The panel is built from 1/8" aluminum sheet. The top has a 90 degree bend (and them some, to fit tight to the dash) - the bottom matches the curve of the floor.

The layout consists of the 4 mounting holes, the airbag switch (with indicator light), 2 gauges, CB, and 7 switches. There is room next to the CB to add something later, if need be.

I sanded the panel, and filled the scratches with glazing compound. The end result was quite smooth.
 

Attachments

  • Panel - raw.JPG
    Panel - raw.JPG
    51.8 KB · Views: 11,328


Here are some views of the panel during layout. (This was before sanding - you can see my local fab shop did not bother to cut the aluminum from a new piece.)
 

Attachments

  • Console 4.JPG
    Console 4.JPG
    64.7 KB · Views: 11,315
  • Console 5.JPG
    Console 5.JPG
    61.6 KB · Views: 11,308
  • Console 6.JPG
    Console 6.JPG
    68.7 KB · Views: 11,303


Primed and painted with Rustoleum Satin Black. Autometer Sport Comp gauges installed with angled collars. (You can see the other half of the gauge wiring harness.) One switch and 6 plugs installed.
 

Attachments

  • Console 10.JPG
    Console 10.JPG
    58.6 KB · Views: 11,249
  • Console 11.JPG
    Console 11.JPG
    61.6 KB · Views: 11,262


The final result!

Yes, the gauges do not face me directly, but they are not that difficult to read.

I used stainless steel round head allen machine screws to attach the panel to the body. I thought about using chrome screws, but they would not match anything. The s/s is close to the aluminum trim ring color.
 

Attachments

  • Console 14.jpg
    Console 14.jpg
    61.3 KB · Views: 11,258
  • Console 13.jpg
    Console 13.jpg
    66.8 KB · Views: 11,255
  • Console 12.jpg
    Console 12.jpg
    45.8 KB · Views: 11,234


Here is a view of the other gauges in the A-pillar and the factory instrument cluster.

(You can see part of the console in the lower right corner.)
 

Attachments

  • A pillar.JPG
    A pillar.JPG
    78.4 KB · Views: 13,413


i like...you've given me some ideas for my ex now....thank you much!!!!!!!!


Indeed, I've been wondering how to make another center console for mine using my current console, but also molding it into the front dash... this helps me out a ton!

Looks good, any idea what you'll add with the switches?


looks great, nice clean look


....:shifty_ey ..I knew you were up to something, great job...:biggthump

...I noticed Nytroman's comment and I didn't have a problem viewing your pics with Firefox...I do see all red x's with Window's IE8 though...:dunno:


I use Firefox. Why in the world would you use IE8?


...I always use Firefox now except when I'm watching the girlies..:eek:..Ummm...Except when I'm checking out the problem for another member...yea, that's it..:D


Looks great man, you should put a switch in like every other hole, i have a switch panel i made with 8 holes for switches, somewhat like yours, but Idk what to use EIGHT for haha, so I just put a switch in every other one, it gave it a cool look too.


i love it! your idea's gave me a place to mount my switch (soon to be switches.)
thanks for posting the how to!

DSC_0192.jpg


Join the Elite Explorers for $20 each year.
Elite Explorer members see no advertisements, no banner ads, no double underlined links,.
Add an avatar, upload photo attachments, and more!
.


I'm liking the pics in this thread. Hopefully once I recover from my shoulder surgery (if I ever do), I'll be able to make a fiberglass center console to my specifications :p


Back
Top