also there is to different control arms the one thats stock and one that kind of looks like a clamp looking thing here is the site http://www.partstrain.com/store/?PN=5566&N=0&VN=4294967188+4294966864+4294966120+4294966602+4294966877&Nr=AND(universal:0)
-
Performance Upgrades - Maintenance - Modifications - Problem Solving - Off-Road - Street Trucks.
Covering the Explorer, ST, Sport, Lincoln Aviator, Sport Trac,
Mercury Mountaineer, Mazda Navajo, Ford Ranger, Mazda Pickups, and the Aerostar.
Featuring H.I. - Human Intelligence.
Register Today It's free!
- Forums
- Generation Specific Forums
- 1995 - 2001 Explorer Ranger Merc. 2nd Generation
- Stock 1995 - 2001 Explorers
You are using an out of date browser. It may not display this or other websites correctly.
You should upgrade or use an alternative browser.
You should upgrade or use an alternative browser.
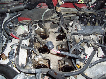
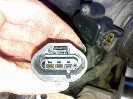
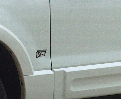
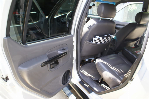
How To: Upper Control Arm / Ball Joint Replacement (Lots of Pictures)
- Thread starter MountaineerGreen
- Start date
-
- Tags
- ball joint
Elite Explorer members see no advertisements, no banner ads, no double underlined links,.
Add an avatar, upload photo attachments, and more!.
ndfangoirish
New Member
- Joined
- July 23, 2010
- Messages
- 2
- Reaction score
- 0
- City, State
- Evansville, IN
- Year, Model & Trim Level
- 1997 XLT
Replacing UBJ without replacing Control Arm
Is it possible to replace the Upper Ball Joint without replacing the entire control arm?
Is it possible to replace the Upper Ball Joint without replacing the entire control arm?
dstro
New Member
- Joined
- July 26, 2010
- Messages
- 7
- Reaction score
- 0
- City, State
- Seattle, WA
- Year, Model & Trim Level
- '99 Explorer XLT; V6 4.0L
Realize this post is a few years old.......
Went to replace UCA on '99 XLT, but couldn't get the Camber adjuster bolt completely out of its hole. It was blocked by the frame and other innerds....tried all sorts of manipulations.
I'm thinking of getting a replacement bolt and just cutting the old one out. If I do this, and then insert the new bolt from the opposite direction (so the nut is towards the wheel), would that impact anything too negatively? Thanks for the help.
- Joined
- February 2, 2006
- Messages
- 7,476
- Reaction score
- 53
- City, State
- North East Arkansas
- Year, Model & Trim Level
- 2012 F150 4x4
Its a common problem, it will/can come out, don't cut your bolt. It must be oriented like it is now otherwise the alignment tech can't access it.
xaviervp
Member
- Joined
- July 25, 2010
- Messages
- 11
- Reaction score
- 0
- City, State
- Miami FL
- Year, Model & Trim Level
- 2000 Explorer XLT
2000 Explorer XLT Front upper arms
Hi All
Could someone explain why when I search for RH upper control arms
with bushings and balljoint I get two styles that according to description
fit my 2000 explorer on the pasanger side.
I get one that is bolted on with two bolts and anotherone which looks
much like the one on the drivers side.
I know my Explorer has the one bolted on but what is the other one for?
do I need both?
Thanks
Xavier
my pos mounty
Explorer Addict
- Joined
- September 15, 2009
- Messages
- 1,809
- Reaction score
- 1
- City, State
- Land of Corruption
- Year, Model & Trim Level
- 06 F-350
No, you do not need both.
You have a choice because both will work...however, if you choose to go to the one-piece unit-and you currently have a two-piece unit, you will also need to install an "alignment kit". It is basically mounting bolts that have an eccentric on them to give the alignment shop the ability to align that side of the truck.
You have a choice because both will work...however, if you choose to go to the one-piece unit-and you currently have a two-piece unit, you will also need to install an "alignment kit". It is basically mounting bolts that have an eccentric on them to give the alignment shop the ability to align that side of the truck.
xaviervp
Member
- Joined
- July 25, 2010
- Messages
- 11
- Reaction score
- 0
- City, State
- Miami FL
- Year, Model & Trim Level
- 2000 Explorer XLT
Is there any advantage or disadvantage one over the other?
any particular brand better than others that I should look for?
I was looking at Mevotech and saw the same part numbers as Moog, are they the same company?
Also read something about Moog not fitting correctly? any experience with them.
guess ill go with one piece and ill buy an excentric kit for it.
Thanks
Xavier
JByl
New Member
- Joined
- August 16, 2010
- Messages
- 2
- Reaction score
- 0
- Year, Model & Trim Level
- 2002 Ranger XLT
upper ball joint replace
This is a great description to replace the complete uca, pics are great. But I need to replace just the ball joints, which are available for the coil spring suspension. Has anyone pressed the bj from the uca? and if so how? photos? This rig has no cam kits, it is still factory. If I replace the bj it should bring the alignment back into spec. I have already r&r lowers and nothing else is worn out. 2002 Ranger.
Jim
JByl
New Member
- Joined
- August 16, 2010
- Messages
- 2
- Reaction score
- 0
- Year, Model & Trim Level
- 2002 Ranger XLT
Upper ball joints 02 Ranger 2wd coil springs
Completed replacement of both upper ball joints in my 02 Ranger 2wd w/coils today. I started out thinking I was going to be able to press out the oil joint and press in the new without removing the uca. But it became obvious that the arm needed to be removed. Using a ball joint press borrowed from Auto Zone ($100 deposit), clamped arm into vise and very easily pressed old out and new one in, no problem. This truck came from the factory with the cam/caster adjustment blocks. So I didn't need to mark anything to put it back together where it was. It drives the same, but now I know the ball joints are good and can now be greased, unlike the factory sealed units.
Completed replacement of both upper ball joints in my 02 Ranger 2wd w/coils today. I started out thinking I was going to be able to press out the oil joint and press in the new without removing the uca. But it became obvious that the arm needed to be removed. Using a ball joint press borrowed from Auto Zone ($100 deposit), clamped arm into vise and very easily pressed old out and new one in, no problem. This truck came from the factory with the cam/caster adjustment blocks. So I didn't need to mark anything to put it back together where it was. It drives the same, but now I know the ball joints are good and can now be greased, unlike the factory sealed units.
jekaio
New Member
- Joined
- January 18, 2010
- Messages
- 3
- Reaction score
- 0
- City, State
- charleston
- Year, Model & Trim Level
- 2000
im having a massive problem trying to find an upper control arm with ball joint for the drivers side.
every website I look on, only lists a control arm for the passenger side and not drivers.
http://shop.advanceautoparts.com/we...onal_24013245-P_2070_R|GRP60005_1409378503___
point and case right there.
my main question though is that does the 90 degree angle part matter on what side it is installed on? Becuase oviously its going to be on the opposite side on the drivers/passengers if I use the same control arm for both sides.
thanks!
andrew
my pos mounty
Explorer Addict
- Joined
- September 15, 2009
- Messages
- 1,809
- Reaction score
- 1
- City, State
- Land of Corruption
- Year, Model & Trim Level
- 06 F-350
Perhaps if you listed the year of your ex, 4x4 or 2wd, 6 cylinder or 8... We could help you easier
EDIT: Also, in the search box on that website, enter "upper ball joint". You will see right (passenger side) and left (drivers side) listed.
Keep in mind that the passenger side is a two piece unit from the factory and it may have been changed to a one pice unit. If it has not, and you wish to go to a one piece unit, you will need to purchase an "alignment kit"
jekaio
New Member
- Joined
- January 18, 2010
- Messages
- 3
- Reaction score
- 0
- City, State
- charleston
- Year, Model & Trim Level
- 2000
sorry man.
2001 explorer XLS
4 litre V6
4 wheel drive
Ok, so if I go to the one piece design then im going to need an alignment kit, got that.
but for some reason, I CANNOT find a 2 piece control arm that is listed as the LEFT side. And now im just wondering if the right side 2 piece control arm will work on the left side.
my pos mounty
Explorer Addict
- Joined
- September 15, 2009
- Messages
- 1,809
- Reaction score
- 1
- City, State
- Land of Corruption
- Year, Model & Trim Level
- 06 F-350
sorry man.
2001 explorer XLS
4 litre V6
4 wheel drive
Ok, so if I go to the one piece design then im going to need an alignment kit, got that.
but for some reason, I CANNOT find a 2 piece control arm that is listed as the LEFT side. And now im just wondering if the right side 2 piece control arm will work on the left side.
Left side is always a one piece unit.
T
ThePhoenix
I suggest you call or goto the rockauto website., They can help you with all your options and prices
http://www.rockauto.com/
tell them that you are a member of this forum and get a discount
http://www.rockauto.com/
tell them that you are a member of this forum and get a discount
SailorKane
Member
- Joined
- December 28, 2009
- Messages
- 27
- Reaction score
- 0
- City, State
- Tampa, FL
- Year, Model & Trim Level
- Explorer '97 4x2
I got mine from rockauto: quality was good, shipping fast, prices good and they had both sides, including the alignment bolt kits.
SailorKane
Member
- Joined
- December 28, 2009
- Messages
- 27
- Reaction score
- 0
- City, State
- Tampa, FL
- Year, Model & Trim Level
- Explorer '97 4x2
I know this information on this thread is old, and has been used by many people for several years. However, I just did my upper and lower ball joints and found this information SO informative. Without these photos and information, I would not have tried the job. With it, a $1400 ball joint job became just $200 for parts and probably $50 for some tools, sockets, etc. Just fantastic. The left side took a day and a half. The right side took less than 3 hours. "Once you have done it, you know how to do it."
So I thank the alien gurus from the previous civilization (circa 2006) who published this fantastic information for us future archeologists to find. And strongly recommend to others that, if I can do it, anyone can.
Peace and fair winds. Mark.
So I thank the alien gurus from the previous civilization (circa 2006) who published this fantastic information for us future archeologists to find. And strongly recommend to others that, if I can do it, anyone can.
Peace and fair winds. Mark.
specauto
New Member
- Joined
- March 14, 2010
- Messages
- 2
- Reaction score
- 0
- City, State
- Stanley, NC
- Year, Model & Trim Level
- 1996 Explorer XLT V8 AWD
Put the Moog upper and lower in my '96 V8 AWD. Very pleased so far, can't believe that Ford had the joints SEALED with no grease fittings!!! No wonder they wore out. About 3/4 of the older Explorers that roll by me have the joints worn out, they squeak like a buggy. I look forward to these lasting a long time, With a new set of Goodyears, new hub bearings, new sway bar bushings and shocks, this thing drives like brand new. Plan to use the chassis in a couple years to put under my '48 F-1 truck, thats why I sprung for all the expensive stuff.......
budwich
Explorer Addict
- Joined
- May 4, 2005
- Messages
- 3,243
- Reaction score
- 8
- City, State
- Ottawa, Ont
- Year, Model & Trim Level
- 96 XL
Just finished the left side upper on my 96. I had done it when I first got the vehicle (5 years ago) using a wrecker part cause I was broke and figured the vehicle wasn't going to last too long anyways. That still might be true as rust is going at it from everywhere (dam salt). Anyways, it was certainly easier doing it the second time as I usually "antiseize" most bolts when I put things back together. Yes, the control arm bolts are tough to get out especially the closer to the driver. Release the bolt holding the one large hard "return vapor" line, "unclip" it from the frame holder, and lever it up a bit and the cam bolt can be turned and moved by things (after also undoing the grounding bolt that blocks its "escape"). From what I can figure, IF you scribe your cam bolts with marks even with the tops of the frame mounting brackets, on reassembly, you just put them back and align marks and you "appear" good to go... or at least you won't be any further off your alignment than you were originally assuming you haven't had a major "bang" on a suspension part. Further, it would appear that the factory cam bolts don't really allow much "changed" as they basically "lock" in about 3 or 4 positions which appear to only give you a "degree or two" of adjustment. Anyways, hopefully that's the last time I will doing them on this vehicle as it approaches its "life expectancy" both in mileage and overall age.
brookwood61
New Member
- Joined
- November 17, 2010
- Messages
- 2
- Reaction score
- 0
- City, State
- Columbus,Ohio
- Year, Model & Trim Level
- 98 4WD 4.0
HI-New here today. I have read this thread last week, and I am very grateful to all who posted. I did both lowers Saturday, and the right upper this afternoon. Only took about an hour. I'll tackle the left upper Friday, or Saturday, and hopefully it will not be too ungrateful. The lower were pretty easy.
I did notice today on the right side, TRW on the upper control arm. I only replaced to ball joint section, as everything else check out tight. But, like I said, TRW was cast on the section I did not replace. Did Ford use these originally, I have had this truck 7 years.
Thanks again for this thread!! It saved me some guess work, and knuckle skin, for sure.
Elite Explorer members see no advertisements, no banner ads, no double underlined links,.
Add an avatar, upload photo attachments, and more!.
brookwood61
New Member
- Joined
- November 17, 2010
- Messages
- 2
- Reaction score
- 0
- City, State
- Columbus,Ohio
- Year, Model & Trim Level
- 98 4WD 4.0
Well, I got it in, drivers side upper. Spent about 3 hours, and some knuckle skin. Those fuel lines are a pain, but it was all doable if you were careful.
I did remember reading that for the rear bolt to come out, the bushing has to be all the way toward engine. Same going in.
My fit was tight, a little too tight to fenangle the bushing back into the right place. So, I used the bolt backwards to line up the hushing with the slot. I took the bolt out, and installed it the right way, and had to use the cam to get the bushing correct. That was a pain, but it worked. The front bolt was pretty easy, once I removed the wire harness bracket. It just rotated as everyone said, and came right out, and went right in, after the bushing was lined up with the slot. I reversed it at first too, to get the bushing lined up.
Long winded, but thanks again for all the help!
Featured images


Featured images
Similar Threads
- Replies
- 0
- Views
- 3,088
- Replies
- 1
- Views
- 1,102
- Replies
- 12
- Views
- 2,950
- Replies
- 12
- Views
- 1,874
- Replies
- 2
- Views
- 3,193