JTX's Return! 1997 Mountaineer Build Thread SAS/4wd Conversion | Page 2 | Ford Explorer Forums - Serious Explorations

  • Register Today It's free!

JTX's Return! 1997 Mountaineer Build Thread SAS/4wd Conversion

I've been gone for several years after losing the transmission in my 94 Ford Explorer(almost 10 years ago!:eek:). Life has changed a lot since then, I got Married, had a Child, and am having another one any day. Some of my greatest memories growing up came from my 1994 Ford Explorer. Memories with my Father, Friends, and several life lessons through High School.

Once my Son Luke was born I realized I would love to carry on these same memories with him and my Dad. I originally planned on redoing my 1994 Ford Explorer, but after looking at it and realizing some of the hack jobs I did to it in High School I decided to start fresh.

My second vehicle was a 97 Mercury Mountaineer. I decided to use this vehicle for several reasons. I liked the V8 and figured the interior would be better for four wheeling with my family. After I had the Mountaineer it was passed on to my Sister and drove until 2010. After that it sat for about 2 years until I started this project. Here is a list of the problems it had when I started.

  • Blown Head Gasket
  • 200k Miles
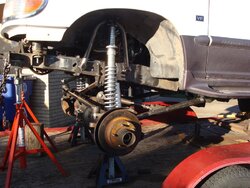
  • Front Suspension was Shot
  • Was no longer running

The first thing I did was pick up a new Motor and Transmission from the local U Pull. The engine and AWD transmission came from a 98 Explorer with 90k miles.

DSC_0267_zpsc1d23e9a.jpg

Taking the old Motor out. Son and Grandfather.

When I picked up the engine I also pulled a 4406 Transfer Case. The Mountaineer started as 2wd, so this will be a 4wd Conversion as well.

At this point the Mountaineer sat for about 6 months. Once I finally got the new Motor and Transmission in I decided to start the SAS. I probably should have got it running first but I needed a little motivation to get things rolling.

IMAG0507_zps4bc06e1c.jpg

Ford 9inch from 94 Explorer. 4.88 Gears and Full Spool.

IMAG0508_zpsebae6c3e.jpg


The SAS was done by Brian1 of the Forum. I wanted to make sure everything was done right this time around so I talked to Brian and we worked out a plan for the front end.

IMAG0570_zps19ed7bb4.jpg

IMAG0569_zpsc867df4d.jpg

Prepping the Frame

Once the Frame was prepped i was ready to take it to Brian.
10529702_10204229259555485_1455209045_n.jpg


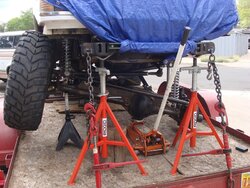
Brian needed to be able to move the Mountaineer around so we decided to leave it on the trailer during the swap.


Join the Elite Explorers for $20 each year.
Elite Explorer members see no advertisements, no banner ads, no double underlined links,.
Add an avatar, upload photo attachments, and more!
.


Looks great, really like the steering box mounts.


Join the Elite Explorers for $20 each year.
Elite Explorer members see no advertisements, no banner ads, no double underlined links,.
Add an avatar, upload photo attachments, and more!
.


Mounting Coilovers Pt 1

Now it was time to hang the coilovers on the Mounty. For this project Joey got some 2" x 14" FOA Coilovers. I had previously cut out the lower mounts and to get them to fit perfectly I had to trim a little to fit onto the axle tube and truss. I held it up in place, marked it with a sharpie then notched them to fit on the ironworker again.

I tack welded the lower coilover mounts to the axle and now I could start mocking up some shock hoops. The hoops are going to be made from 1.5" x .120" tube so I put a short stick through the engine compartment to get a look and figure out the angles and height it needed to be. You can also see the upper mounting tabs that I made. They fully capture the tube and can be welded all the way around the tube. I have seen coilover tabs that are only partially welded around the tube fail/crack/rip out so when I can, I like to use fully captured tabs.

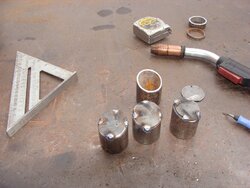
I started to make the bases of the coilover hoops. I used 1.75" tube cut straight on the frame end and then a slight angle on the outer end. I capped them off with some round drops off my plasma table. I welded them on and then sanded them smooth with a flap wheel.
 

Attachments

  • m_DSC09743.jpg
    m_DSC09743.jpg
    148.4 KB · Views: 311
  • m_DSC09746.jpg
    m_DSC09746.jpg
    114.4 KB · Views: 330
  • m_DSC09747.jpg
    m_DSC09747.jpg
    86 KB · Views: 328
  • m_DSC09750.jpg
    m_DSC09750.jpg
    66.7 KB · Views: 330
  • m_DSC09744.jpg
    m_DSC09744.jpg
    93.4 KB · Views: 315
  • m_DSC09749.jpg
    m_DSC09749.jpg
    92.7 KB · Views: 320


Mounting Coilovers Pt 2

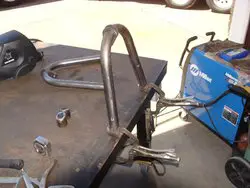
I entered the dimensions I had into the software Bend-Tech and then I was able to print out the bending directions that had the exact tube cut length and bend start right there on the sheet saving any guesswork and wasted tube. I bent the hoop and then notched it at a slight angle to lean it out from the frame some. At this point I clamped the frame plates to the frame and put the hoop on to check for fitment again.

Once everything looked good I tack welded the plates to the frame since they would be coming back off shortly. Soon I would be tacking the hoops to the plates.

From the picture with the hoop mocked up - those of you have done this before may notice how low the hoops sit which had me :scratch: at first. There are a few things that contribute to this. For a 14" coilover the FOAs compressed length is the shortest on the market. The coilovers are basically mounted right on top of the axle tube which helps cut down on height. Another reason is that Joey has a 2" body lift installed that really helps create more room. Lastly, keep in mind that when the axle goes to full stuff it really does stuff in there with not too much room between the frame and oil pan in areas since I built the suspension at full stuff which means that the Mounty is not built sky-high. There is roughly 6" between the top of the hoop and the master cylinder.

I took the hoops to my welding table and "threaded" the upper tabs on the hoop and then tack welded the bottom mounting tubes to the hoops.
 

Attachments

  • m_DSC09751.jpg
    m_DSC09751.jpg
    78.2 KB · Views: 306
  • m_DSC09757.jpg
    m_DSC09757.jpg
    107.6 KB · Views: 298
  • m_DSC09758.jpg
    m_DSC09758.jpg
    122.2 KB · Views: 299
  • m_DSC09759.jpg
    m_DSC09759.jpg
    83.5 KB · Views: 324
  • m_DSC09756.jpg
    m_DSC09756.jpg
    112.2 KB · Views: 311


I spy nice welder in back ground - I have the same and love it!


Mounting Coilovers Pt 3

I got everything tack welded in place and then double checked droop, ride height, articulation and full stuff for any clearance problems before fully welding them
 

Attachments

  • m_DSC09765.jpg
    m_DSC09765.jpg
    130.8 KB · Views: 298
  • m_DSC09764.jpg
    m_DSC09764.jpg
    105.3 KB · Views: 304
  • m_DSC09762.jpg
    m_DSC09762.jpg
    112.9 KB · Views: 333
  • m_DSC09761.jpg
    m_DSC09761.jpg
    131.2 KB · Views: 291
  • m_DSC09760.jpg
    m_DSC09760.jpg
    139.5 KB · Views: 300
  • m_DSC09766.jpg
    m_DSC09766.jpg
    94.6 KB · Views: 302


...Load this puppy up and get it out for the Truckhaven run in October..:biggthump


Mounting Coilovers Pt 4 & Frame Plates

With everything now tacked in place and checked for clearances I cut the tack welds and removed the plates from the frame. I bench welded the hoops to the plates, the upper mounting tabs as well as the final welds on the frame trackbar mount.

I also marked the plates with sharpie as to where it was covering holes in the frame. I drilled holes for the plug welds avoiding those areas. The rear plates got 4 plug welds and the front plates got about 5 or 6.

Once the welding was all done I repositioned the plates on the frame and burned them in. While the axle and steering box was still out I also welded the inside steering plate.
 

Attachments

  • m_DSC09779.jpg
    m_DSC09779.jpg
    98.6 KB · Views: 313
  • m_DSC09784.jpg
    m_DSC09784.jpg
    104.7 KB · Views: 353
  • m_DSC09783.jpg
    m_DSC09783.jpg
    96.7 KB · Views: 285
  • m_DSC09768.jpg
    m_DSC09768.jpg
    89.8 KB · Views: 298
  • m_DSC09777.jpg
    m_DSC09777.jpg
    101.6 KB · Views: 294
  • m_DSC09767.jpg
    m_DSC09767.jpg
    91.6 KB · Views: 288


Coilover Hoop Gussets

I cut out some gussets for the hoops that would tie them into the inside of the frame for extra strength. They are made from 1/8" plate and are dimpled to make them more rigid. The front of the driver side hoop gets the smaller gusset to clear the a/c compressor and lines on the engine.
 

Attachments

  • m_DSC_3850.jpg
    m_DSC_3850.jpg
    75.9 KB · Views: 289
  • m_DSC09796.jpg
    m_DSC09796.jpg
    99.9 KB · Views: 295


Finishing the Links

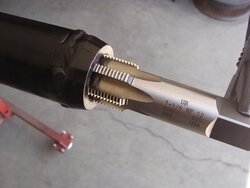
With the hoops and coilovers now mounted it was time to start welding everything. First up was the links. I plug welded the bungs and then welded around the outside of them. I only had to chase the threads in 2 of them, 1 being the big 1.25" as shown and the other being the 3/4"

On the upper links and track bar I machined wrench flats in the tube so the jam nuts could easily be tightened up without spinning the heim joints on both sides. The flats are for a 1.25" wrench and were machined to make the corners rounded and avoid sharp corners which would be stress risers.

Joey came over again and painted the links and steering while I was welding and finishing up the links.

On the bushing end of the lower link I wrapped the ends with a 1" x 1/8" strap for extra strength. The bushings had a grease zerk in them so I drilled a hole in the strap for a socket to access the zerk if it ever needed to be removed.
 

Attachments

  • m_DSC09787.jpg
    m_DSC09787.jpg
    167.9 KB · Views: 295
  • m_DSC09781.jpg
    m_DSC09781.jpg
    90.9 KB · Views: 300
  • m_DSC09782.jpg
    m_DSC09782.jpg
    48.2 KB · Views: 301
  • m_DSC09773.jpg
    m_DSC09773.jpg
    97.5 KB · Views: 284
  • m_DSC_3855.jpg
    m_DSC_3855.jpg
    82.7 KB · Views: 282


Finish Welding the Axle

I finished up the lower link mounts on the axle. The lower plate I hit with a small sledge to round it over the bottom of the axle tube since it extends forward of the lower axle centerline by about an inch. In the first picture you can see how close the inside link tab is to the diff casting. If I had not cut away part of the casting that tab would be on the cast part of the diff and not solid to the axle tube which results in a much better weld. I also welded everything that was only tacked to the axle. The axle got a coat of gloss black then it was ready to put under the Mounty for the last time.
 

Attachments

  • m_DSC09793.jpg
    m_DSC09793.jpg
    107.8 KB · Views: 304
  • m_DSC09795.jpg
    m_DSC09795.jpg
    87.9 KB · Views: 282
  • m_DSC_3835.jpg
    m_DSC_3835.jpg
    54.6 KB · Views: 285
  • m_DSC_3843.jpg
    m_DSC_3843.jpg
    70 KB · Views: 308
  • m_DSC_3839.jpg
    m_DSC_3839.jpg
    69.4 KB · Views: 290


Making Coilover Reservoir Tabs

I made a few tabs that would hold the coil over reservoirs in place. These would be welded to the top of the frame and the reservoir would be clamped to them with a hose clamp.

I first cut the pattern out of some 1/8" sheet and then bent the small tabs on my box and pan brake. After that I clamped a piece of 2" DOM scrap in a vice then rounded the rest of the tab over the tube with a hammer.
 

Attachments

  • m_DSC09809.jpg
    m_DSC09809.jpg
    114.2 KB · Views: 278
  • m_DSC09824.jpg
    m_DSC09824.jpg
    90.6 KB · Views: 285
  • m_DSC09815.jpg
    m_DSC09815.jpg
    109.3 KB · Views: 271
  • m_DSC09810.jpg
    m_DSC09810.jpg
    83.7 KB · Views: 303
  • m_DSC09802.jpg
    m_DSC09802.jpg
    83 KB · Views: 295


What's the name on the axle gusset?

And is anyone else thinking that there is a kit just waiting to happen here?

Are you referring to the little plate on the front of the axle truss? That's my limited edition unofficial logo :D.

I don't have any intentions of making a kit, just too many variables in a SAS. A few components of it though like the frame plates, maybe.

Looks like great work.

Thanks!
 

Attachments

  • m_DSC_3841.jpg
    m_DSC_3841.jpg
    72.5 KB · Views: 283


Stellar work Brian, I think you're outdoing yourself on this build:thumbsup:


Air Bumps / Bump Stops

From the very beginning the plan has been to use some F-O-A 2" x 4" "Air" bumps. The lower link tab on the axle was made with a flat top for a landing pad for the bumpstop to hit. I cut out the side and bottom bump can plates out of 1/8" and dimpled the plate on the underside. The cans were from FOA as well. I had to cover the giant hole on the underside of the frame with another plate wirh a smaller hole which still allows socket wrench access to 1 of the motor mount bolts.

The bumps were a tight fit with the coilover when the coilover goes into full droop so it took some time to get them in the right place. With 5.5"-6" up travel at ride height we may eventually short stroke the air bumps to around 3" so they don't hit too often but that decision will be made later after a few shakedown trips.
 

Attachments

  • m_DSC09818.jpg
    m_DSC09818.jpg
    92.2 KB · Views: 285
  • m_DSC09816.jpg
    m_DSC09816.jpg
    122 KB · Views: 286
  • m_DSC09822.jpg
    m_DSC09822.jpg
    128.5 KB · Views: 297
  • m_DSC09801.jpg
    m_DSC09801.jpg
    107.7 KB · Views: 290


Limit Strap Tabs

I got the coilovers back on it. They were set to 1" of preload on the springs using a custom wrench I cut out on my plasma table. I made some measurements and cut out 4 tabs for some 14" limit straps to be mounted, allowing for 1" of stretch. The lower tabs mount up the lower links a few inches and the top tabs were welded to the frame plates.
 

Attachments

  • m_DSC_3862.jpg
    m_DSC_3862.jpg
    96.1 KB · Views: 266
  • m_DSC_3860.jpg
    m_DSC_3860.jpg
    103.2 KB · Views: 272
  • m_DSC_3864.jpg
    m_DSC_3864.jpg
    93.7 KB · Views: 282


Join the Elite Explorers for $20 each year.
Elite Explorer members see no advertisements, no banner ads, no double underlined links,.
Add an avatar, upload photo attachments, and more!
.


Back
Top