My 93' Explorer Restoration Project | Page 8 | Ford Explorer Forums - Serious Explorations

  • Register Today It's free!

My 93' Explorer Restoration Project

Quite the contraptions you seem to come up with! :thumbsup: You're almost finished, good work!
As well, I can see a second gen disc brake conversion coming soon. :D
http://www.explorer4x4.com/discswap.html

as do i but since he is talking re gearing and more lift and bigger tires already, he might as well just get a whole axle from a newer explorer and regear it then just swap the axles out. Seems much easier?


Join the Elite Explorers for $20 each year.
Elite Explorer members see no advertisements, no banner ads, no double underlined links,.
Add an avatar, upload photo attachments, and more!
.


X2. I have to do an AAL too... foo...:D


Teaser pic, it is done! Just a few cosmetic things I need to take care of and I'll finish up the thread :D

Summer024.jpg


It looks SICK!!!! Captain America has definitely been working out! Thanks again for letting me borrow the manual and letting me see C.A.

Thanks for the nice comments man! It's always a pleasure to have you over! I think Captain America can finally roll with the Hulk now Lol!

get finished!

Here it goes:

I was battling the rust off of the lower shock mounts last time I posted. Rust, rust, rust...

DSCN3009.jpg


Queue the OCD...

DSCN3010.jpg


Honorable, although those tight spaces still had some rust. Naturally this got coated in Rust Restorer and undercoating, but no pics :(

Getting the upper piece through the bushing was a huge pain in the ass!

DSCN3013.jpg


Thankfully, Bryan a.k.a. adamsbro2 came over and gave me a hand with the second one. He showed me a simple little trick using a socket and C-clamp. Took a few seconds and worked beautifully! I tried a much more unconventional method that took lots of time and was painfully slow. Glad to have a buddy helping me out!

Next Bryan gave me brake bleeding 101. Not rocket science, but I still really appreciate having a helping hand teaching me the right way! After the brakes were squared away (so.. much.. brake.. fluid..) it was on to the alignment. I should have taken pictures, but alas, I did not. Bryan brought over some kick-ass alignment plates and got my tires pointing pretty freakin straight. Next was the highway text (Pass!) and then a few truck shots! First a thank you and tribute to the Hulk for coming over and helping me finally knock out the last bit of the lift!

DSCN3016.jpg


Again, I really appreciate the help Bryan!

DSCN3017.jpg


At this point I was super ecstatic about the Explorer! It drove like a Cadillac De Ville and handled great! After getting the alignment I found we weren't far off from being perfect, but the alignment shop did not address the camber :mad: They told me the expected B.S. of, "We'll have to schedule a diagnostic" and "We've never adjusted the camber on an axle like 'yours'." Even though they said they could. B#####d's. This was the Firestone in Sugar House aka South Salt Lake. They were really nice, toe in and toe out great! but there didn't seem to be hope of a camber fix through them. Tried the Firestone in Bountiful aka North of Salt Lake. Still no dice. The tech, "Didn't see a way to adjust the camber." Even after saying, "Yeah, we can camber align it!" Les Scwab seemed promising, but didn't end up going there. In the mean time I had been shopping for tires, got like 6 quotes, and kept staring at how the front end was lower than the rear. Probably a good inch difference. I called James Duff. Absolutely, positively, undoubtedly, now way they were going to sell me an additional spacer shim to go under the coil to level out the lift. They used the excuses of, we don't have any, we are not allowed to because it isn't a modification engineered into the kit, and because they exceed the stud height which makes it impossible to thread the coil nut. I'm calling B.S.! But you do what you got to do:

DSCN3019.jpg


I tried them on with welded triples, then loose 6's, and measured a lot! The gas tank really affects the lift when you measure out the front. I came to the conclusion of a 6 pack of welded washers for the driver side and a 4 pack of welded washers for the passenger side. Pancake flat and level!

DSCN3025.jpg


Welded by a pro (really! He welds the diffuser covers on cruise missile engines!) and came out great! After all this, I finally got a good guy to do an alignment (through Ray's Muffler in Bountiful)! I think leveling it out really helped cure the camber though. Got the tires in today! Hankook Mud Terrain!

*I would like to mention that I don't suggest you do anything I did. I am not responsible for any modifications you make and I did not do this thread as a guide, but as a documentary of my truck. I will not be held liable for anything you do because you saw me do it.*

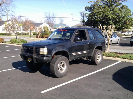
Sorry, seemed like a good idea, you never know... (besides, you guys know who this is directed at and what it means). And yes, PICTURES!!!

Summer024.jpg


DSCN3023.jpg


DSCN3020.jpg


DSCN3021.jpg


DSCN3024.jpg


FINALLY! It was a hell of a lot of fun putting this truck together and doing it in conjunction with the forum! Thanks for you guys that lended a helping hand and left great, positive comments! I really appreciate it! Thanks again Bryan for coming over with the Hulk and getting this guy back on the road! Next stop, MOAB!!!


James Duff Lift Review:

Great lift! The hiem joint radius arms are awesome! Full mobility, not to mention the adjustablility factor if a bracket gets mounted a millimeter farther backwards or forwards to keep the tires perfectly in line. Stressful drilling. Drilling a lot of holes, worst ones were the driver side shock mount holes. Fun, but stressful to me. Kind of a do it right the first time or your S.O.L.! Front wasn't level with the rear. The rear got a good 3 inches. The front had about 2 inches. If you want a level ride you will probably have to come up with something creative (shims, washers, spacers, etc..). Heavy duty, I'll probably tweak the frame before any of the brackets break. Instructions are a little vague. I think simply researching and understanding what you are actually doing to the vehicle is the best way to go into this lift as apposed to relying on the instructions. LOTS of EXTRA HARDWARE! Loved all the bolts it came with! Beam mount bracket on the passenger side of the vehicle (the one that holds the arm with the diff) was good, but super close fit on actually accepting the beam. Hammered the crap out of it getting it to align with the pivot hole.

I thought over all it was a great lift!!! Looks really cool! Handles well! Drives like a caddy! (I want to emphasize DRIVES LIKE A CADDY!) I would do it again, however, I would need a cooler full of beer to go along as well :D I love the results!


Great writeup man we are all super impressed with your abilities. Cant wait to get together for a 4wheel trip if i can get the hulk to stop eating wheel bearings lol stupid damn valucrap bearings!!!


Wow looks great! Awesome of Hulk to come over and help out...


Thanks for the comments guys! Hopefully I can get it all cleaned up today for a picture. Here are the rims from last night (I cleaned the back sides):

DSCN3030.jpg


Well, thanks to Adamsbro aka Bryan, the Explorer has been outfitted with Warn Hubs!! The wheel bearings and grease were also old and shot, so those were replaced as well. Thanks again Bryan for all the help, really appreciate it man!

DSCN3082.jpg


DSCN3080.jpg


DSCN3088.jpg


:D


Wow man , Great work on this , Looks Great ! .


Damn, that looks great... I am starting to do some of the same thing to mine, so thanks for the great pics. :)


Great looking rig! I purchased a 94 a few months ago and have been accumulating parts. Gonna order the duff kit in the next few days, what size tires did you end up with? I was looking at 265 75 16 on 16x8, but yours look effective for what I'm planning on doing.


Did any of you guys who installed the duff kit have an issue with the transmission crossmember being too wide to slide in between the radius arm brackets? mine seems to be 3/8 maybe a little more too wide.


Nope. I remember it being tight, damned tight, but it did fit just right with a bit of persuasion.


I got my crossmember in. Didn't make spacers, Loosened off the drivers side radius arm bracket, lined it up with the crossmember, lifted both together and used a ratchet strap on the front diff to get the holes to line up again. Stuck the bolts through, torqued everything down and it expanded back in.
It's impossible to do if you tighten the radius arm brackets down first as per the instructions


Join the Elite Explorers for $20 each year.
Elite Explorer members see no advertisements, no banner ads, no double underlined links,.
Add an avatar, upload photo attachments, and more!
.


It's been forever since I've gotten my thread up to date! Long story short - I blew a head gasket, got another car, fixed the head gasket, started working on the other car, got another car, started working on that one too! I'm finally finding myself with time to spend on my Explorer. It has been an awesome truck and I'm looking forward to resurrecting my thread (and all the friendships on here)!

Here is a picture from last fall :)

054_zpse2po0fmv.jpg


Back
Top