My Jurrasic Explorer build thread | Ford Explorer Forums - Serious Explorations

  • Register Today It's free!

My Jurrasic Explorer build thread

92exp4x4

Elite Explorer
Joined
February 5, 2003
Messages
1,792
Reaction score
407
City, State
Covington, Kentucky
Year, Model & Trim Level
92 XL 2-door and others
:JP:

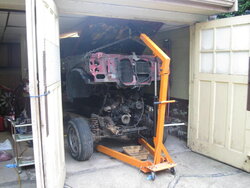
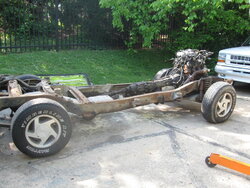
Well, I've been wanting to do this for a while, and finally got the chance to start this week. Last year I bought two explorers from a used car lot in Louisville, Ky. One is a 91 and the other is a 93. The 91 was rotted out so bad it was unsafe to drive and was trailered home and the other was cosmetically trashed by its previous owner and ran on 5 cylinders all the way back home (cracked head).

Between the two I have everything i need to build one good vehicle and have wanted to do this conversion ever since the movie came out. I was 11 and loved dinosaurs and explorers, still do I guess.

For those who want to follow along, this thread will be updated as I get the chance and as time and money allow. I am really going to push hard to get this thing done in time for my best friend's wedding in August of this year.

We'll see what happens I guess.

The red one is the 93 and the gold one is the 91. The 91 had the clear glass I needed, and correct running boards and a perfect interior. Only had about 90,000 miles.

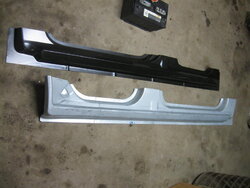
The 93 is solid except for the normal rust spots, nothing a little welding won't fix. Both are 4x4 and the red one will be converted to 2x4, like the movie cars. I will be scratch building the brush gaurd and roof extension. A friend is working with a contact to help me make the clear roof, hopefully he'll come through for me. That will probably be the last thing done. My goal is to finish everything but the roof for august.

Enjoy, I know I will... This is my first complete auto restoration.

5Ge5K75M23Ie3Jd3N5c8q1c3d5ecd91d71a96.jpg


5Nd5G25Mc3Kd3Gc3o2c8q7cba41cba98a12b2.jpg


Join the Elite Explorers for $20 each year.
Elite Explorer members see no advertisements, no banner ads, no double underlined links,.
Add an avatar, upload photo attachments, and more!
.


Part 1 Dissassembly

I was suprised to learn that sometime in this truck's life, it was wrecked down the passenger side.

Both doors had evidence of repair and they put a new quarter panel on that side. It was a genuine Ford part which leads me to believe it was a dealer fix and happened sometime early in this trucks life.

Who ever did the work, they did an exceptional job. I never noticed anything at all until I pulled the interior panels. I'm kind of detail oriented; as you may notice in the future of this project.

I'll shut up and show some pics.
 

Attachments

  • Picture 012.jpg
    Picture 012.jpg
    78.9 KB · Views: 1,400
  • Picture 014.jpg
    Picture 014.jpg
    52.5 KB · Views: 1,383
  • Picture 015.jpg
    Picture 015.jpg
    71.2 KB · Views: 1,397
  • Picture 017.jpg
    Picture 017.jpg
    96.1 KB · Views: 1,463


Some more disassembly:

Got her down to a shell, gonna order some panels now. Needs both front fenders, stone deflector, both rocker panels and some misc body parts-headlights, weatherstrip and such.

Found out too, someone must have hit a deer. The bumper is not orginal to this truck and it also has a different grill. That explains the damaged stone deflector. I pulled the headlights and grill off only to find damaged mounting brackets and stuff. Nothing major but, this Explorer has had a rough life.

The last pic is how she sits tonight. I'll probably pull the dash and front doors next. Having them off will allow better access to remove the bad rockers. The previous owner even broke the dash board and i'm going to use to one from the 91.

I don't understand how people can destroy stuff so completely, but strong work for not being half a$$ed!
 

Attachments

  • Picture 1017.jpg
    Picture 1017.jpg
    61.3 KB · Views: 1,391
  • Picture 020.jpg
    Picture 020.jpg
    90.9 KB · Views: 1,374
  • Picture 1023.jpg
    Picture 1023.jpg
    103.8 KB · Views: 1,383
  • Picture 1026.jpg
    Picture 1026.jpg
    83.6 KB · Views: 1,411


Facebook-Like-Button.jpg


Awesome project! Will definitely follow the progress.


Good luck on the project:thumbsup::JP:


Well, got a little bit done this weekend. I had good weather to swap utility bodies on my superduty, so that took up my saturday. But today i removed the doors and the dash. The body is almost ready to pull from the frame.

Some time this week i'll get some wood and build some heavy duty saw horses to mount the body to while its off its chassis. I want to be able to clean and prep to underside, plus it will be easier to repair the rust.

The chassis is going to get cleaned, prepped, and painted as well. New brake lines and the conversion to 2wd will be easier this way too.

Got my rocker panels today as well. Rockauto sent me the wrong left side so I got to call them in the morning. Still waiting on the other stuff.


I talked to Rockauto today. Apparently Sherman has changed the design of thier rocker stampings. I'm not sure which is the old style, but I'm after the one that includes the dogleg and rocker as one piece. I got one of each and am tying to sort it out with them.

One of my fenders got destroyed too, even before it left the supplier. So we'll see what happens with that i guess.

Some pics of the panels and thier differences, and the truck as it sits tonight.
 

Attachments

  • Picture 0131.jpg
    Picture 0131.jpg
    53.1 KB · Views: 1,327
  • Picture 0141.jpg
    Picture 0141.jpg
    47.4 KB · Views: 1,411
  • Picture 0151.jpg
    Picture 0151.jpg
    71.3 KB · Views: 1,336


A little more disassembly...

Had a busy weekend and couldn't do much until today. I took a vacation day for other reasons and got a little more done on this project. I'm stuck with the rocker panels. I had to order the dogleg to complete the driver's side. They told me the silver, one piece panel is no longer available. I got a refund for my fender and ordered a new one from Rockauto. Any one who wants to do a project like this, be sure to order CAPA certified body parts. Its amazing how close these parts are to the OE stuff.

For those of you who have never seen an Explorer without its chassis, this one is for you. I wish I had room for a lift. This would have been about an hours work otherwise.

Shown is one of the great repairs that have been done recently (before me), and the reason for a persistent 'check engine' light.

Next step will be loading the chassis on the trailer and heading to the shop for a good cleaning.

Enjoy.
 

Attachments

  • Picture 2014.jpg
    Picture 2014.jpg
    68.5 KB · Views: 1,274
  • Picture 2017.jpg
    Picture 2017.jpg
    84.1 KB · Views: 1,287
  • Picture 2018.jpg
    Picture 2018.jpg
    91.6 KB · Views: 1,296
  • Picture 2020.jpg
    Picture 2020.jpg
    103.9 KB · Views: 1,277
  • Picture 2022.jpg
    Picture 2022.jpg
    90.9 KB · Views: 1,295


Awesome pics man, keep up the good work.

I've never seen the body off before. If you've got a few more pics of the chassis I'd love to see them, just out of curiousness.


Sure thing, I just got back from my employer's shop. I cleaned the whole thing top to bottom and nearly inside to out. We have a wash bay with soap and hot water. It makes it so nice to work on stuff when its clean, plus the paint will stick better!

I'll post more pics when I get them. Didn't have any time to take any and I forgot my camera when I left.:(


I got the chassis unloaded today and took some pics. I finally got to talk to the painter today too. He is a friend of my neighbor and does really good work. He said he would not have any trouble doing the paint work. Most shops were willing until I told them about the fade, then they wanted nothing to do with it. The only shop that would consider it quoted $10,000!!:eek:

Here are some chassis pics, all squeaky clean. Some rust here or there.
 

Attachments

  • Picture 3014.jpg
    Picture 3014.jpg
    87.2 KB · Views: 1,239
  • Picture 3012.jpg
    Picture 3012.jpg
    109.3 KB · Views: 1,229
  • Picture 3015.jpg
    Picture 3015.jpg
    87.7 KB · Views: 1,215


Well I didn't get to do much this weekend, I spent most of it in the hospital. Not for me but for a very good friend of mine and his family.

If anyone out there has a motorcycle, please wear a helmet. My friend would still be alive had he been wearing his. I know there are lots of opinions on seat belts and helmets, but for the majority of accidents these safety items do their job, nearly perfect, every time they are needed.

My friend left this world doing something he loved, surrounded by those who loved him. I don't think he felt a lot of pain for very long, but the 28 hours we waited for him to pass, was excruciating. Especially for the first few hours while there was hope for his recovery. The bleeding in and on his brain was more than expected at first and he quickly slipped into a coma, became unresponsive and finally passed Sunday afternoon.

You will be missed Bill, by everyone who knew you. Rest in peace my friend, and save a cold one for me.:salute:


A little more dis-assembly:

Almost got-er stripped. This thing has brand new rotors. That's great because i think my Limited has a cracked passenger side rotor. Aren't interchangeble parts sweet?

Next will be a little grinding and some paint as soon as I get it ordered, hopefully tonight.

Here are some pics:
 

Attachments

  • Picture 4088.jpg
    Picture 4088.jpg
    83.2 KB · Views: 1,169
  • Picture 4089.jpg
    Picture 4089.jpg
    98.8 KB · Views: 1,190


Pretty much got it stripped to the bare essentials.

Can't go anywhere but forward now. I installed the new shackle bushings in the frame yesterday. I just have to remove the front TTB mounts and start grinding rust. I can't wait to see some paint on this thing.

I'm gonna put an order in for new body mounts and jounce stops. I was hoping to save the mounts, but they are in pretty bad shape.

Next will be cleaning up the garage and getting the rear axle squared away. A good cleaning, paint, all new seals, brakes, brake lines and oil is planned for it. I thinking of using stainless lines. Has anyone out there dealt with stainless? I know its much harder to work with. I may have to get special flaring tools and stuff but I don't know for sure.

Some pics:
 

Attachments

  • Picture 5083.jpg
    Picture 5083.jpg
    102.1 KB · Views: 1,136
  • Picture 5084.jpg
    Picture 5084.jpg
    94 KB · Views: 1,146


Hey man, Great work so far! Cant wait to see how this thing turns out!


Thanks for the compliment. I can't wait to see it done myself.

Well, its been a while since I have been able to work on this. As of now, I will not be getting this done for my buddy's wedding. I lost a bunch of time the last few weeks, due to multiple things but that's the way it goes I guess.

Got the prep and painting done on the frame and rear axle. Next will be finishing the springs and front suspension. Then I can start on the engine and trans and put a rolling chassis together. Hopefully the next two weeks will be more productive than the last, although the tractor showing season is about to get into full swing!

I think I'm going to order the body mounts next week. LMC has a pretty complete listing for the parts I need. I will probably order all the exhaust parts and misc bushings, brake lines, trans kit and parts to convert the trans to 2WD at the same time. Hopefully by the start of July, I should be posting body work pics. I guess we'll see what happens.

Some progress.

Picture 082.jpg


Picture 083.jpg


Picture 086.jpg


Looks great! You are doing some good work.
:thumbsup:


Join the Elite Explorers for $20 each year.
Elite Explorer members see no advertisements, no banner ads, no double underlined links,.
Add an avatar, upload photo attachments, and more!
.


Thanks fellas, I have not done a whole lot here lately. Its been raining so much and we have been really busy at work. I'm hoping I'll get some time here soon to work on it.


Back
Top