crazyflights
Explorer Addict
- Joined
- August 31, 2008
- Messages
- 2,477
- Reaction score
- 21
- City, State
- St. Joseph, MO
- Year, Model & Trim Level
- 97 1 ton Jeep
So, I had searched alot about this and I have found several threads, but not the photos I wanted and for my application. So here is my Dana 60 install.
My Jeep is 97 Wrangler ***But I have had several RBVs and think this would be very very simialar on another RBV****
-I'm building a custom 3 link front
-I have a 14 bolt in rear from Chassis cab so my width is 63-64? inches
-I'm narrowing my front to be 65inches -stock is 69.25 inches, I have read that less than 65inch makes it very difficult to fit and I would agree, the balistic mounts go all the way out next to the knuckles for it to all fit.
-My 60 is from a Single wheel 86 F350, I bought entire truck for axle and scrapped-parted the rest.
-I'm only stretching the front just a little 1-3inchs, so i can use my stock steering box
Parts for 3 link
Artec Pass side frame rail 3 link Mount
Artec lower control arm frame Mounts
Artec Axle mount for upper link on passenger side
Fabbing mount for track bar on axle and frame
Ballistic Fab Lower Coil Mount plates with Lower control arm mount and shock mount built into 1, like $60 bucks.
I'm currently using my 4in lift coils that came on Jeep. Rough Country brand
DOM Links 2in 1/4 wall
1.25 Heims and inserts from Ruff Stuff
7/8 Heims track bar
GM 1 TRE for steering
Now for pics:
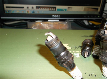
Front axle- remove passenger side hub, spindle,axle shaft

Supported and counted clicks on jackstands incase of movement, supported pinion with another jackstand and took some calculations.

Just getting ready

I took some measurements, I know that the Inner C were the weld on the axle tube connects it, needs moved in 4.25 inchs, but this is not your cut off line. Remember the Inner C slides over some of the tube. I made the measurements.

Picture showing the axle tube in the Inner C:

I used my angle grinder with 6in cut off wheel, make sure to use gloves and eye protection.")

More pics next post
My Jeep is 97 Wrangler ***But I have had several RBVs and think this would be very very simialar on another RBV****
-I'm building a custom 3 link front
-I have a 14 bolt in rear from Chassis cab so my width is 63-64? inches
-I'm narrowing my front to be 65inches -stock is 69.25 inches, I have read that less than 65inch makes it very difficult to fit and I would agree, the balistic mounts go all the way out next to the knuckles for it to all fit.
-My 60 is from a Single wheel 86 F350, I bought entire truck for axle and scrapped-parted the rest.
-I'm only stretching the front just a little 1-3inchs, so i can use my stock steering box
Parts for 3 link
Artec Pass side frame rail 3 link Mount
Artec lower control arm frame Mounts
Artec Axle mount for upper link on passenger side
Fabbing mount for track bar on axle and frame
Ballistic Fab Lower Coil Mount plates with Lower control arm mount and shock mount built into 1, like $60 bucks.
I'm currently using my 4in lift coils that came on Jeep. Rough Country brand
DOM Links 2in 1/4 wall
1.25 Heims and inserts from Ruff Stuff
7/8 Heims track bar
GM 1 TRE for steering
Now for pics:
Front axle- remove passenger side hub, spindle,axle shaft
Supported and counted clicks on jackstands incase of movement, supported pinion with another jackstand and took some calculations.
Just getting ready
I took some measurements, I know that the Inner C were the weld on the axle tube connects it, needs moved in 4.25 inchs, but this is not your cut off line. Remember the Inner C slides over some of the tube. I made the measurements.
Picture showing the axle tube in the Inner C:
I used my angle grinder with 6in cut off wheel, make sure to use gloves and eye protection.
More pics next post