New guy old builder album | Page 7 | Ford Explorer Forums - Serious Explorations

  • Register Today It's free!

New guy old builder album

Build plan

Got a few things working right now:

1. Passenger side door cap...completed

2. Step plates for the door caps and the tailgate....completed

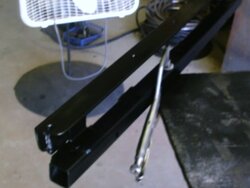
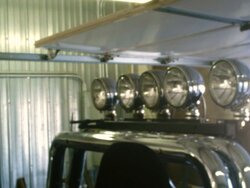
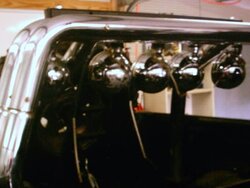
3 Hinge assembly for the folding light bar.....completed

4. Windshield cowl plate

5. 2" receiver hitch for front and rear

6. Front end frame brace

7. Front tow hooks

8. 8.8 build

9 Dana 35 build

10. Front shock hoops & radius arms

11. Spring mounts

12. 64" Chevy springs with shackle flip

13. Traction control arms

14. Drive shafts

15. Rear shock cage

16. Tube doors....completed

17. Raydot mirrors....completed

etc. etc. sounds like a lot don't it? Good news is I have a decent drive train under it, even though the suspension is not even close I can still wheel it and if I plan around building my spare Dana 35 and 8.8 in the shop this winter I still can play on those nice days, even short snow blasts (kinda like a sleigh ride) If I plan right I should be able to build the shock cage and most of the other mods without being wheel less for more than a couple of days at a time, no problem this winter...just need to get everything under a roof before it gets bad weather wise. I've got plenty of space just need to keep cracking.


Join the Elite Explorers for $20 each year.
Elite Explorer members see no advertisements, no banner ads, no double underlined links,.
Add an avatar, upload photo attachments, and more!
.


GOD!

I love reading this thread!


keep up the good work!

Hey thanks, Can't tell 'ya how much I appreciate the feedback...I wish I had joined the forum two years ago when I first started reading Fortune 410 and rookieshooters threads, I did it for the entertainment but it also let me know that their were others who had cool projects and great ideas that they were gracious enough to share with others...made me feel guilty that I wasn't posting some of my misadventures. Keep wheelin' & building...and stay tuned for the further misadventures of the "old builder" (or BS'er) whatever rocks your boat make sure you got the plug in her! :salute:


Well...

Deep subject that you pull water from...oh well. Interesting day that included a lot of customer work of the not profitable or interesting type, but good for public relations. Finally got to work a little on my stuff. Finished the scuff plates/ door sill/ door cap, not sure what to call it. Used pop rivits to attach.

Rookieshooter has a neat little tool that he hooked up to his winch hmmm, got me thinking. My DD has receiver hitches on front and rear, that I use for all kinds of tool attachments that I have made one of the ones I find myself using frequently is a rack that I plug in front and rear to haul 22' long steel and since I have a roof rack that I don't trust to carry much of anything I don't want to fall off on the road, I can at least use it as tie downs and if the long limber pieces of metal flex the factory roof rack protects the top from dents. Sometimes I just mount the one shown on the rear to haul metal walk gates (I also bend ornamental steel) rather than hook up a trailer....just lash it on. I also have attachments that I can bolt on to support odd sizes or irregular shapes.
I never even thought about using these tools with a winch, but I bet one could easily build an adapter that would accept both winch and tool into the appropriate existing receiver hitch.
 

Attachments

  • IMAG0011.JPG
    IMAG0011.JPG
    59.4 KB · Views: 271
  • IMAG0013.JPG
    IMAG0013.JPG
    57.1 KB · Views: 273
  • IMAG0012.JPG
    IMAG0012.JPG
    77.3 KB · Views: 270
  • IMAG0005.JPG
    IMAG0005.JPG
    94.4 KB · Views: 265


Daily driver

Didn't take the time to plug a rack into the front receiver but I doubt anyone will have a problem seeing the utility that such a setup serves. The tools might be as large and robust as is required the small carrier shown on the rear of my B2 is duplicated without the gate carrier on the bottom and allows long loads to be safely carried...the 1 1/4" tube that was used for the frame has carried as many as 20, 22 foot long pieces of 14 gauge steel 1&1/2" tube...want to carry more just build using heavier material and appropriate gusseting. Imagination is key to building something that you can use. Simple or elaborate, up to the individual, safety, utility, functionality and servicability ...some of the things i'm interested in when designing tools.

Brush guard is welded to a half inch thick 3"x5" angle iron bolted to each frame with grade 8 -5/8"inch bolts, the plate is used as an attaching support for not only the guard but also towing hooks and the receiver. The plate also substantially strengthens and stiffens the frame.
 

Attachments

  • IMAG0003.JPG
    IMAG0003.JPG
    50.3 KB · Views: 272
  • IMAG0001.JPG
    IMAG0001.JPG
    55.4 KB · Views: 265


Obras

Rookieshooters hunting trip, reminded me of why I have kept & built offroad vehicles for many years...the joy of being outdoors, going when I wish and where I want...no road no problem (yeah I like to build, especially vehicles) but just go.

Hunting & fishing etc. have been a source of much enjoyment for not only myself but friends and family as well. I don't do much of either any more as I have concentrated more on watching and studying wild creatures in order to better understand them which helps me to capture their spirit in drawings and paintings, another of my pastimes. I know this is a truck forum but forgive me for posting a couple of my works....I don't paint what I haven't studied in the wild and these two paintings are of two of my favorite New World cats, the Ocelot and the Jaguar both of which I observed on multiple occassions while working in South and central America.


Shop time

I guess I'll stumble over to the shop and see what I can mess up on over there...can't be any worse than I'm doing on the keyboard this morning.


Light bar

Took the Light bar off in order to convert it to a fold down bar utilizing three 3inch weld on hinges & a 36" long 2" angle iron with 5 - 9/16" holes to mount the 5 KC Hilites on...the hinges will be welded to the 2"x2" tube after the 5 existing light tabs are cut off. When the lights are lowered I will gain 5 inches of head space going into my garage, which will be necessary after the upcoming suspension changes.

When lowered the lights will shine directly to the rear providing the potential of a 1,000,000 candle power work light.

The photo shows the 3" diameter down brace for the double bars...need to increase the distance between the lights to clear the fold down.

The tabs on the original bar will all be cut off & 3 hinges welded to that bar.
 

Attachments

  • IMAG0011.JPG
    IMAG0011.JPG
    67.8 KB · Views: 271
  • IMAG0009.JPG
    IMAG0009.JPG
    58.6 KB · Views: 278
  • IMAG0002.JPG
    IMAG0002.JPG
    64.8 KB · Views: 275


Fold down light bar

Hinges were not in stock locally so went ahead and drilled the angle iron for the light mounts and cut off the old tabs....dummied up an old hinge and scrap 2 inch angle iron to make sure my mental image was correct in fact. Glad I did as it gave me a way to see a couple of things that I would need to do regarding pinning the light in a verticle position when lowered (kinda need the lights to shine straight back and not canted up as they will do because of the weight of the lights & for securing in the driving light, up, position.

Shows the angle iron light support
IMAG0014.JPG


Hinge down light directed straight back
IMAG0005.JPG


Really a simple solution & eliminates the need to add extra work lights to the rear of the truck...which unless caged in steel will quickly be broken, usually by me. lol


Nice work, great paintings too!


Like the way your mounting those lights. This will be interesting when done.


Metal work is complete on the light bar, waiting for paint to dry...probably mount it latter this afternoon. Took a few shots while I was working:

Painted photo position lights would be in the down or work light position

The second photo shows the bar in the running light position, bolted firm

The bracket tabs come to bear on the light bar angle iron when in the down position (pointing towards the trucks rear) & prevent the bar from swiveling the lights past horizontal.

Final shot bar is positioned between the up and down positions

The square tube will be bolted to the roll bar and the 5 KC Hilites will be mounted to the angle iron.

The holes closest to the hinge (both in the square tube and the angle iron) are located on both ens of the assembly and are for the 2 bolts which will secure the light bar in the running position.

Most of this will be readily apparent when I post the whole light assembly photos.
 

Attachments

  • fold back position.JPG
    fold back position.JPG
    69.7 KB · Views: 267
  • bottom detai running position.JPG
    bottom detai running position.JPG
    63.7 KB · Views: 263
  • painted fold down.JPG
    painted fold down.JPG
    59.5 KB · Views: 273
  • stop detail.JPG
    stop detail.JPG
    57.2 KB · Views: 264


Fold down light bar/work light

Mounted lights to check fit and everything clears still have to paint and wire up. I will use the two out side lamps for work lights, as I have switches and relays to run a combination of either or both pairs or a single (middle of the 5) so I'll hook up outsides as a pair, insides as a pair and center as a single. Three switches total, fused and on relays.
 

Attachments

  • IMAG0001.JPG
    IMAG0001.JPG
    79.1 KB · Views: 257
  • IMAG0002.JPG
    IMAG0002.JPG
    64.3 KB · Views: 252
  • IMAG0003.JPG
    IMAG0003.JPG
    74.5 KB · Views: 260
  • IMAG0004.JPG
    IMAG0004.JPG
    84.9 KB · Views: 254


Light bar continued

Think photos are self explanatory, lotta light for front or rear. lol
 

Attachments

  • IMAG0007.JPG
    IMAG0007.JPG
    70 KB · Views: 257
  • IMAG0006.JPG
    IMAG0006.JPG
    84 KB · Views: 270
  • IMAG0005.JPG
    IMAG0005.JPG
    80 KB · Views: 268
  • IMAG0008.JPG
    IMAG0008.JPG
    63.6 KB · Views: 263


This is the most awsome light bar I've ever seen including the way you wired it up.


lights & mods

Rookieshooter is always an encouagement.

Light bar, roll bars, tire carrier & both seats will have to come out yet another time during fabrication of frame support crossmembers for chassis strength and a solid platform on which to mount roll bars and the shock cage.

A large section of the rear floor pan will also feel the heat of plama, as I clear the way for my rear suspension workover. I am trying to occupy my time with making the small changes that I have been putting off, like the light bar and door capping (which I will get back to shortly) & other odds and ends. Weather here is quite nice, still bone dry, but I want to keep the Broncobra in running condition until Winter so I can have a little driving fun, yet make some progress on her build.

Light bar would have been so quick and simple to construct except for the rear extending support legs of the roll bars. They are 3" in diameter and in the way of the big KC's necessitating a wider spacing between the outside lights than those in the interior. Not only that but they also interfere with the angle iron light support bar when the lights are folded to the down and shining back position, making the lights shine up into air traffic space. lol

As you may have noticed a quarter moon shape cut into the angle iron allows them to fold all the way down, but this cut substantially weakens the very bar that is the sole support of the KC's and would certainly fail in even moderate offroad environs. I will add a third hinge in the center which will substantially strengthen the bar & also add small gussets to reinforce. That's why my crappy photos show areas that aren't painted. Just a test fit. I really don't mind the extra fuss with the lights etc. as problems create opportunities to make a vehicle special and even when no one else knows what we go through in getting our poor little projects completed...we do.


as problems create opportunities to make a vehicle special

And with this quote, you just succinctly summed up over half a Century of Hot Rodding. No matter if it's Frenching the headlights on a 5 Window coup or setting the Nitrogen charge in his coilover.

Somewhere someplace some guy right now is asking himself...What if?
Now that's unless your worried what the RBV community says, then you might as well set on the porch.


Wildlife art

Nice work, great paintings too!

Thanks for your comments, I enjoy getting out in the middle of nowhere and watching the wildlife & latter trying to capture their essence on canvas, but getting out there in a built 4x4 now that's living large!


Somewhere someplace some guy right now is asking himself...What if?
QUOTE]

darn right he is, and a lot of the time that guy is me!!!

light bar is pretty dang cool man, nothing like running down some sandy roads or river beds with more light than the middle of the day but with the cool night air whippin through your hair. thats livin as well buddy


Join the Elite Explorers for $20 each year.
Elite Explorer members see no advertisements, no banner ads, no double underlined links,.
Add an avatar, upload photo attachments, and more!
.


Overhead door

Just had to see the difference in clearence on my overhead shop doors. The photos don't really reflect the one inch I had to spare with the KC's up, but they do show the big difference when the lights are lowered. Pretty happy with the mod. Also painted the polished aluminum door cap plate.

Also welded a center hinge on the bar for extra support & attached two bolts to support the lights wile in the upright position. The light bar will also be used for attaching the Bikini Top.
 

Attachments

  • IMAG0003.JPG
    IMAG0003.JPG
    80.2 KB · Views: 234
  • IMAG0004.JPG
    IMAG0004.JPG
    80 KB · Views: 246
  • IMAG0006.JPG
    IMAG0006.JPG
    86.4 KB · Views: 245


Back
Top