How to: - 1994 Head gasket replacement / engine pull | Page 7 | Ford Explorer Forums - Serious Explorations

  • Register Today It's free!

How to: 1994 Head gasket replacement / engine pull

Prefix for threads which are instructional.
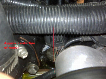
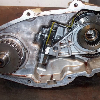
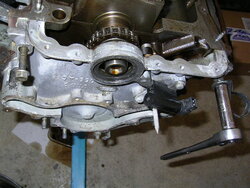
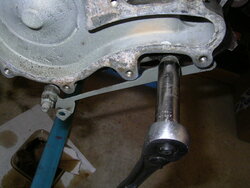
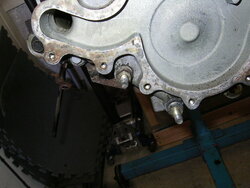
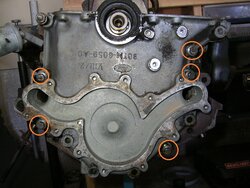
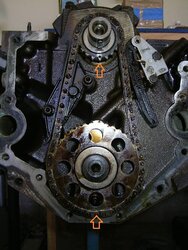
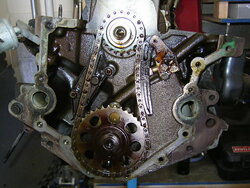
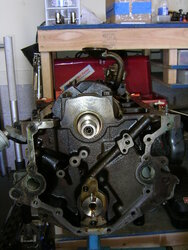
Timing cover removal. Note that my engine is still upside down...

1. Quite a few different types of fasteners so pay attention to what you remove and where it came from.

2. Top left and right (normally bottom right and left) have 13mm heads. One is just a standard bolt with an odd head that looks like it was meant to be a stud. The other is a stud and has a nut on it holding the bracket for one of the heater hoses.

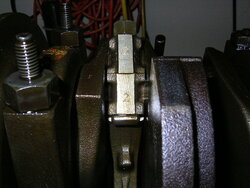
3. This bracket thing is soft metal so loosen each nut just a little at first. In my case, one side the nut came off and the other side the whole stud came out, so it wanted to twist the bracket.

4. More studs for a 13mm deep socket.

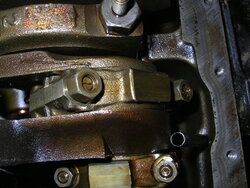
5. I'm removing the crank position sensor. 10mm socket on the two bolts.

6. These short bolts are all identical length. 10mm socket.

7. Cover comes off without much fight.
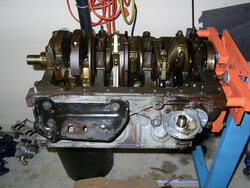
 

Attachments

  • PICT0011.JPG
    PICT0011.JPG
    129 KB · Views: 204
  • PICT0012.JPG
    PICT0012.JPG
    112.1 KB · Views: 220
  • PICT0013.JPG
    PICT0013.JPG
    114 KB · Views: 218
  • PICT0014.JPG
    PICT0014.JPG
    111.1 KB · Views: 205
  • PICT0015.JPG
    PICT0015.JPG
    110 KB · Views: 210
  • PICT0016.JPG
    PICT0016.JPG
    140.1 KB · Views: 229
  • PICT0017.JPG
    PICT0017.JPG
    118.1 KB · Views: 222


Join the Elite Explorers for $20 each year.
Elite Explorer members see no advertisements, no banner ads, no double underlined links,.
Add an avatar, upload photo attachments, and more!
.


1. View of timing chain components. We have chain, cam and crank sprockets, chain guide, and chain tensioner.

2. New tensioner comes with the little U-shaped clip you see, which holds it in its retracted position. I added the zip tie as a failsafe.

3-4. Stock tensioner can simply be pushed back into its retracted position. You can use the u-shaped clip to hold it retracted. Be aware that oil will squirt out.

5. Alignment marks are on both sprockets. Note again that my motor is upside down. This is how they should be positioned.
 

Attachments

  • PICT0023.JPG
    PICT0023.JPG
    156 KB · Views: 216
  • PICT0024.JPG
    PICT0024.JPG
    111.3 KB · Views: 222
  • PICT0020.JPG
    PICT0020.JPG
    103.7 KB · Views: 208
  • PICT0019.JPG
    PICT0019.JPG
    105.6 KB · Views: 218
  • PICT0018.JPG
    PICT0018.JPG
    88.4 KB · Views: 208


Tensioner comes off with two bolts. 10mm socket.

Comparison of old and new tensioners. Note what 197k miles of wear looks like on the tensioner guide... not bad.

Replacement is a Cloyes set. To be honest, I am thinking about putting the stock tensioner back in. It has a longer guide and seems better made.

The new Cloyes tensioner does have a ratchet mechanism, whereas the stock Ford piece is just spring and oil tension.

What do you think? Keep the factory tensioner?
 

Attachments

  • PICT0025.JPG
    PICT0025.JPG
    115.9 KB · Views: 222
  • PICT0026.JPG
    PICT0026.JPG
    109.7 KB · Views: 215
  • PICT0027.JPG
    PICT0027.JPG
    109.5 KB · Views: 214
  • PICT0028.JPG
    PICT0028.JPG
    105.2 KB · Views: 219


1. T-30 torx removes the two bolts holding the chain guide. It can't come out though until the chain comes off.

2-3. This woodruff key needs to come out to allow the crank sprocket to get by. Hopefully yours comes out easily. Mine was in there tight. The trick is to get it out without damaging the crank sealing surface behind it. Have patience and work it out.

4. Remove the bolt holding the cam sprocket. T-55 torx. I don't recommend an impact wrench. Instead I used a 3/8 extension through a hole in the sprocket to hold it from turning, while loosening the bolt with a large ratchet. Leverage helps.

5. All bolts removed.

6. Grab the whole assembly and slide it off. Keep it together. Chain guide comes out too.
 

Attachments

  • PICT0031.JPG
    PICT0031.JPG
    102.2 KB · Views: 213
  • PICT0030.JPG
    PICT0030.JPG
    88.6 KB · Views: 213
  • PICT0029.JPG
    PICT0029.JPG
    90.7 KB · Views: 212
  • PICT0032.JPG
    PICT0032.JPG
    120 KB · Views: 211
  • PICT0033.JPG
    PICT0033.JPG
    87.4 KB · Views: 222
  • PICT0034.JPG
    PICT0034.JPG
    116.6 KB · Views: 218


The new Cloyes tensioner does have a ratchet mechanism, whereas the stock Ford piece is just spring and oil tension.

What do you think? Keep the factory tensioner?

In this thread, member 2000StreetRod states that the ratchet style is better and why. I think I'll go ahead with the new ratchet style tensioner unless anyone has any opinions. The shorter guide may not be an issue.


Getting ready to take the pistons out.

1. First, have to use a ridge reamer to remove the ridge at the top of the cylinder. This is mostly carbon. This allows you to remove the pistons more easily, and is essential to avoid damaging the new rings.
You can rent the tool from an auto parts store. Try to get one that's in good shape and not been all beat up.
I followed this video - https://www.youtube.com/watch?v=79i-_-u3HzA
Follow the manufacturer's instructions for the tool. I had a hard time at first because of a worn out tool and I was resting it on the piston (don't do that).

2-3. Remove oil pump. First while it's bolted down, use a Torx T30 to loosen the bolts holding the pickup. I'm not removing it yet, but I will be later to clean it out. It's tougher to remove these when the pump isn't bolted down, so I'm loosening them now.
Use a T40 to remove the two bolts holding the oil pump down. You'll need a good quality bit. Mine wasn't and it twisted, but held together. Warranty!
Lift the pump off. There was no gasket beneath it on mine.

4-5. Grasp the oil pump drive shaft and pull it out. I marked with a paint pen which side goes to the pump, just in case it matters. Morana Racing sells an upgraded ARP version of this, but mine is in fine shape.
 

Attachments

  • PICT0006.JPG
    PICT0006.JPG
    87 KB · Views: 203
  • PICT0005.JPG
    PICT0005.JPG
    107.8 KB · Views: 201
  • PICT0004.JPG
    PICT0004.JPG
    110.3 KB · Views: 218
  • PICT0003.JPG
    PICT0003.JPG
    100 KB · Views: 198
  • PICT0002.JPG
    PICT0002.JPG
    83.2 KB · Views: 202


Piston removal.

1. We now have easy access to all the connecting rod end caps. You can rotate the crank by hand (grab the weights, watch your fingers!) to raise each rod to where it's straight (bottom of piston's stroke).

2. Ford did us a solid and numbered all the connecting rods and their end caps. Remember that caps need to stay with their rods for re-assembly and they can't be flipped around. You'll notice this one is numbered 2, and it's numbered only on one side. All of the numbers are on the same side of the engine. Additionally, all the pistons have an arrow on them pointing toward the front of the engine. It's completely idiot-proof as long as you follow the numbers and arrows.

3. Use a 13mm socket and loosen the nuts on each rod. Once the nuts are off, grasp the end cap and you should be able to wiggle it up and off without much effort.

4. End caps 1 through 6. These will have a bearing shell in each that you can easily pull out with your fingers.
Once the cap is off of a connecting rod, push the rod down away from the crank. Put your hand under the piston because you don't want it to fall on the floor. It should not take much effort to push each piston out, so just use your fingers. Try not to let the rod bolts or the rods bang into the cylinder wall or the crank. They can touch, but don't let them hit hard.

5. All pistons are out. Inspect them for any damage and check that rods are not bent. Check the bearings for any signs of unusual damage or wear. Reading the bearings can tell you if the engine has oil starvation or contamination, a warped crank, wear from lugging (manual trans), and so on.
 

Attachments

  • PICT0007.JPG
    PICT0007.JPG
    108.9 KB · Views: 201
  • PICT0008.JPG
    PICT0008.JPG
    110.5 KB · Views: 197
  • PICT0009.JPG
    PICT0009.JPG
    84.9 KB · Views: 230
  • PICT0010.JPG
    PICT0010.JPG
    107.3 KB · Views: 201
  • PICT0011.JPG
    PICT0011.JPG
    97.2 KB · Views: 205


Id suggest swapping out the oil pump for a mellimgs m328 high volume pump..helps the valve train stay oiled..i personally think its worth it and its not one of those things that can be swapped without pulling motor..

You going to hone the walls at all??if reusing stock pistons, make sure the ring grooves are super super cleaned.

Your replacing you crank with one thats been turned or you having yours turned?? Rock auto sells one thats turned and comes with bearings. .ive used them for last couple motors ive built,what i have in both my big hp motors..dont just swap bearings on the stock crank..

Fyi good trick is to take and put little stubs of vacuum hose over the threads on the pistons rods so they dont scratch the cylinder walls when pulling out or putting them in

I considered the higher volume pump, might still change my mind, but think I'll stick with stock. From what I can tell my valvetrain is in great shape. Haven't fully inspected it yet but my pushrods look awesome. I know these motors have a reputation but it seems like I got lucky. Have to check price on the Melling though.

Honing is happening next. :) I've got to inspect the pistons and I'm hoping they're in good shape to re-use. Plan is to remove the rings, dip the pistons in Chem-Dip to loosen up the carbon, then brush off any remaining gunk with a plastic bristled brush. Maybe a light attack with a brass bristled brush if there's problem spots.

I've got to check the crank once I get it out. Plan to have it checked by a shop before proceeding.

That vacuum hose trick is a good one. I'll have to do that during re-assembly.


The m328 aint cheap,stock is good if you maintain your motor and use good oil.just the HV definitely helps get extra oil up there..

Ive found it cheaper to just order the crank from rock auto..no mattter what your machine shop is going to have to turn it .010 if not more..just no way would you not turn the crank and put it back in with just new stock bearings. .i know my guy charges i "think" $250 to turn it and think rock auto comes out to around $150 including bearings

I soak the pistons in cleaner and then hit the ring grooves with a plastic brush wheel, in the dremel.

$250? Dang! There's only one decent engine builder I know of around here, but their hours are the same as my work hours so I'd have to take a day off just to see them (and they're like 40 mins away). Awaiting a response from them on prices.

On RockAuto I see a Crankshaft Supply 25053 for $154 and an Engineteck 162300 for $167.79. Either of those good brands? They appear to have different "neck keyway" sizes, 3/8" long vs 5/8" long.

RA's prices on pistons aren't great compared to Summit. A full set of Speed Pro H570P pistons will run me $129 from Summit, or I could get the WH570P for $23 each which seems to have an anti-scuff coating on the side.

A couple of my pistons seemed to have mild scuffing on one side. I'll have to take a closer look in a bit and post a picture. Unsure if they need replacement.


I put in the M328. I'd disassembled my OE and it looked fine, but you can't tell how the spring is. Seeing as how the engine has to come out to replace it, wasn't worth reusing it.


$250? Dang! There's only one decent engine builder I know of around here, but their hours are the same as my work hours so I'd have to take a day off just to see them (and they're like 40 mins away). Awaiting a response from them on prices.

On RockAuto I see a Crankshaft Supply 25053 for $154 and an Engineteck 162300 for $167.79. Either of those good brands? They appear to have different "neck keyway" sizes, 3/8" long vs 5/8" long.

RA's prices on pistons aren't great compared to Summit. A full set of Speed Pro H570P pistons will run me $129 from Summit, or I could get the WH570P for $23 each which seems to have an anti-scuff coating on the side.

A couple of my pistons seemed to have mild scuffing on one side. I'll have to take a closer look in a bit and post a picture. Unsure if they need replacement.

The longer key is for 97+..its a new design and uses a different lower timing gear..if you look at the lower timing gear it has a SMALL tab on it that locks it to the crank..the new design the balancer key goes through the lower timing gear,the timing gear is notched for it.this is much better.ive had the older style break before..

As far as pistons i ran the speed pros,i havent used the WH570p..ive reused pistons before a couple times with no issues, just not in any of my motors..also wont reuse them in any 10:1 build or boost/NOS build..bare minimum the speed-pros,they are about 15% stronger than stock


One of my pistons has a cracked second ring land. Weird.
Ordered a set of the Speed Pro WH570P pistons.
Ordered a Melling M328.
Ordered 12x Melling MR-927 rocker arms.

After some thought, decided I'm not going to go into detail on further engine machine work/etc. This isn't a performance build, I'm not rich, and everyone has different opinions on what constitutes a job done "right". I'd love to build it like a high dollar race motor but I'm limited on time/funds and also there are very few decent shops around here. I'm having a hard enough time finding tools. I've achieved the original point of the thread, which is showing how I removed the heads and the engine from the vehicle. With that said, I do greatly appreciate all the advice I've received thus far!


One of my pistons has a cracked second ring land. Weird.
Ordered a set of the Speed Pro WH570P pistons.
Ordered a Melling M328.
Ordered 12x Melling MR-927 rocker arms.

Is there a advance auto near you?? If so go online and order the rockers arms from them..use coupon code TRT30...much cheaper.

Also i dont believe the WH are coated..now i think about it i think the h570p was an old part number..i called them before about it


What other machining work was you planing? ?i thought you was doing a bare basic rebuild? ? All the advice ive given is bare bone basic,besides the oil pump and all work can be done in your garage. .no machine shop required


Is there a advance auto near you?? If so go online and order the rockers arms from them..use coupon code TRT30...much cheaper.

Also i dont believe the WH are coated..now i think about it i think the h570p was an old part number..i called them before about it

The rockers were $7 each on Amazon. We used to have an Advance Auto nearby but they closed down.

Every stock photo of the WH570P that I can find shows them with the coating on the side. Hoping I paid the extra couple bucks for something.


What other machining work was you planing? ?i thought you was doing a bare basic rebuild? ? All the advice ive given is bare bone basic,besides the oil pump and all work can be done in your garage. .no machine shop required

I'm waiting to see what the shop nearest me charges. If I had the money or the price was right, I'd love to have the block and heads hot tanked and magnafluxed, new cam bearings installed, port work, new freeze plugs, so on and so on...

All your advice has been great! I was just thinking though, that it's only a matter of time before someone chimes in with "you shouldn't half-a$$ the job, you should have had the block photon blasted and stress relieved and heads de-ionized, plus blessed by a priest, how dare you misinform people on a how-to forum". :D

I see nothing wrong with doing a bare basic rebuild at all,hell ive done many..the OHV is a great motor and pretty cheap to rebuild and get tons of life back outa it


Join the Elite Explorers for $20 each year.
Elite Explorer members see no advertisements, no banner ads, no double underlined links,.
Add an avatar, upload photo attachments, and more!
.


The rockers were $7 each on Amazon. We used to have an Advance Auto nearby but they closed down.

Every stock photo of the WH570P that I can find shows them with the coating on the side. Hoping I paid the extra couple bucks for something.

Wait what.. $7 that cant be right..you using R1092 as the part number??

Advance has been cheapest place around at about $8 and free shipping.they typically are like $15-20 per rocker

Ill look into the piston. .swear i remember something about that..be nice to have coating if thats the case


Back
Top