fast_dave
Explorer Addict
- Joined
- June 6, 2005
- Messages
- 1,369
- Reaction score
- 775
- City, State
- East Bay - Nor Cal / PRK
- Year, Model & Trim Level
- '98 Spt 4.0 OHV 5 spd 4x4
This 4.0 OHV repair guide will cover how to replace the (3) O-Rings that seal the Oil Filter Adapter (mount) to the engine block.
At approximately 180,000 miles, my Ex's 4.0 began weeping oil from the Oil Filter Adapter. This first showed up as a thin stream of oil, leading to the bottom of the oil filter. As my Ex approached 200,000 miles, it only got worse, to the point where the top area of the adapter became coated in a mixture of oil & road dust, and oil dripped on the garage floor.
I researched the problem, and found that although it was written about, no one had made a picture heavy guide that could help out someone who had worked with wrenches, but was afraid to step up to the plate without some pics.
The following repair is about a 5 on a scale of 1-10; with 1 being the easiest and 10 being the hardest. The part you need to pay the most attention to is proper (safe) preparation of lifting all four corners of your Explorer HIGH in the air so you have room to work and drop the exhaust system "Y" pipe. The second part that is kind of tricky is the actual removing and re-installing of the exhaust system "Y" pipe - it's bulky. The rest of the repair is basically "plug and play".
NOTE: The reason why you have to remove the Exhaust System "Y" Pipe is due to clearance - or lack thereof. The bolt that fastens the Oil Filter Adapter to the engine block cannot be completely unscrewed from the engine without hitting the Passenger Side Exhaust Pipe that connects directly to the exhaust manifold - see Picture 5 below and you'll see what I mean.
OK - With that said, before lifting your Ex in the air, and supporting the front and rear with jack stands, loosen the lug nuts on the Driver & Passenger Side Wheels. The front wheels will be removed when your Ex in in the air, so as to easily access to the engine compartment.
The 1st picture shows the view of the engine compartment from the passenger side wheel well. Some years ago I removed the rubber flaps that cover the upper front suspension, that's why you have a clear view of the engine block. The top of the (2) 13mm Bolts that hold connect the exhaust manifold to the "y" pipe were sprayed down with PB Blaster the night before the repair. Do this on BOTH sides of the engine! NOTE: check out all of the motor oil/dirt collected on top of and around the oil filter adapter!

The next picture shows the O2 Sensor green/white connector that needs to be unplugged.
NOTE: Un-plug the O2 sensor connector on the Drivers side as well.
Move the O2 sensor wiring out of the way, so they don't get tangled up when you remove the "Y" pipe.

I made a little cheat sheet guide for re-installation of the exhaust bolts.

Leave the OIL FILTER on so you don't get oil dripping all over you - I'll let you know when to take it off!
OK - use a 13MM socket, and remove the (2) exhaust bolts from both sides of the engine.


The night before your repair, REALLY SOAK the (3) Nuts on the 1st Catalytic Converter with PB Blaster (Note the emphasis on "really"). Lots of heat in that area so the nuts are on there pretty good ;-)
Remove all (3) nuts with a 13MM ratcheting wrench OR deep well socket.

Now's the time to remove the Oil Filter!
Take an adult beverage break and let the oil drip into your drip pan - the more that goes in the pan is the less that drips down your arm!
When the oil stops dripping down make sure to move your drip pan out of the immediate area.
You DO NOT want the "Y" Pipe falling down and hitting a pan full of used motor oil...

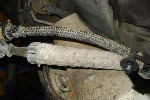
It's now time to remove the "Y" pipe assembly.
This is accomplished with a combination of graceful moves; pulling down and pushing forward.
No need to fight it with brute force - removal is better accomplished with small well-thought moves and finesse.

OK - here's the deal on how the fun begins ;-)
When my engine was assembled in Cologne, Germany; they chose to really lay on the grey engine paint both ON and AROUND the Oil Filter Adapter bolt.
During 20 years of operation, that engine paint has really baked solid and hard...
When you look at the picture below, note how you can see cracked paint INSIDE of the 10MM Hex Key Bolt.
Yes - they painted the inside of the bolt where the hex key socket goes...

This step is accomplished via the Passenger Side Wheel Well.
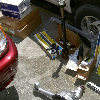
Tools Used:
1/2" Breaker Bar with a Cheater Pipe connected to a 3/8" step-down adapter socket, connected to (2) 1 foot long 3/8" Extensions connected to a 10MM Hex Key Socket.
To get the 10MM Hex Key Socket SECURELY inside the Oil Filter Adapter Bolt, I had to tap it in with a 4lb sledge hammer.
I probably could have used a smaller hammer - but I like the effect it has in the photo below ;-)
The reason I tapped in the hex key socket is because I wanted to ensure that I did not strip the inside surface that the hex key came in contact with.
When I hooked everything up to the Oil Filter Adapter bolt, I I literally had to go lefty loosey / counterclockwise 22 degrees off of perfectly horizontal before I heard a "bang" - and the paint surrounding the Oil Filter Adapter Bolt finally broke, allowing the bolt to loosened.
My heart skipped a beat when I heard that "bang" - this was the scariest part of the repair - as I didn't know if the bolt broke free OR if I snapped the bolt the block (it's hollow to allow oil to pass through it) ;-)

At approximately 180,000 miles, my Ex's 4.0 began weeping oil from the Oil Filter Adapter. This first showed up as a thin stream of oil, leading to the bottom of the oil filter. As my Ex approached 200,000 miles, it only got worse, to the point where the top area of the adapter became coated in a mixture of oil & road dust, and oil dripped on the garage floor.
I researched the problem, and found that although it was written about, no one had made a picture heavy guide that could help out someone who had worked with wrenches, but was afraid to step up to the plate without some pics.
The following repair is about a 5 on a scale of 1-10; with 1 being the easiest and 10 being the hardest. The part you need to pay the most attention to is proper (safe) preparation of lifting all four corners of your Explorer HIGH in the air so you have room to work and drop the exhaust system "Y" pipe. The second part that is kind of tricky is the actual removing and re-installing of the exhaust system "Y" pipe - it's bulky. The rest of the repair is basically "plug and play".
NOTE: The reason why you have to remove the Exhaust System "Y" Pipe is due to clearance - or lack thereof. The bolt that fastens the Oil Filter Adapter to the engine block cannot be completely unscrewed from the engine without hitting the Passenger Side Exhaust Pipe that connects directly to the exhaust manifold - see Picture 5 below and you'll see what I mean.
OK - With that said, before lifting your Ex in the air, and supporting the front and rear with jack stands, loosen the lug nuts on the Driver & Passenger Side Wheels. The front wheels will be removed when your Ex in in the air, so as to easily access to the engine compartment.
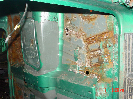
The 1st picture shows the view of the engine compartment from the passenger side wheel well. Some years ago I removed the rubber flaps that cover the upper front suspension, that's why you have a clear view of the engine block. The top of the (2) 13mm Bolts that hold connect the exhaust manifold to the "y" pipe were sprayed down with PB Blaster the night before the repair. Do this on BOTH sides of the engine! NOTE: check out all of the motor oil/dirt collected on top of and around the oil filter adapter!
The next picture shows the O2 Sensor green/white connector that needs to be unplugged.
NOTE: Un-plug the O2 sensor connector on the Drivers side as well.
Move the O2 sensor wiring out of the way, so they don't get tangled up when you remove the "Y" pipe.
I made a little cheat sheet guide for re-installation of the exhaust bolts.
Leave the OIL FILTER on so you don't get oil dripping all over you - I'll let you know when to take it off!
OK - use a 13MM socket, and remove the (2) exhaust bolts from both sides of the engine.
The night before your repair, REALLY SOAK the (3) Nuts on the 1st Catalytic Converter with PB Blaster (Note the emphasis on "really"). Lots of heat in that area so the nuts are on there pretty good ;-)
Remove all (3) nuts with a 13MM ratcheting wrench OR deep well socket.
Now's the time to remove the Oil Filter!
Take an adult beverage break and let the oil drip into your drip pan - the more that goes in the pan is the less that drips down your arm!
When the oil stops dripping down make sure to move your drip pan out of the immediate area.
You DO NOT want the "Y" Pipe falling down and hitting a pan full of used motor oil...
It's now time to remove the "Y" pipe assembly.
This is accomplished with a combination of graceful moves; pulling down and pushing forward.
No need to fight it with brute force - removal is better accomplished with small well-thought moves and finesse.
OK - here's the deal on how the fun begins ;-)
When my engine was assembled in Cologne, Germany; they chose to really lay on the grey engine paint both ON and AROUND the Oil Filter Adapter bolt.
During 20 years of operation, that engine paint has really baked solid and hard...
When you look at the picture below, note how you can see cracked paint INSIDE of the 10MM Hex Key Bolt.
Yes - they painted the inside of the bolt where the hex key socket goes...
This step is accomplished via the Passenger Side Wheel Well.
Tools Used:
1/2" Breaker Bar with a Cheater Pipe connected to a 3/8" step-down adapter socket, connected to (2) 1 foot long 3/8" Extensions connected to a 10MM Hex Key Socket.
To get the 10MM Hex Key Socket SECURELY inside the Oil Filter Adapter Bolt, I had to tap it in with a 4lb sledge hammer.
I probably could have used a smaller hammer - but I like the effect it has in the photo below ;-)
The reason I tapped in the hex key socket is because I wanted to ensure that I did not strip the inside surface that the hex key came in contact with.
When I hooked everything up to the Oil Filter Adapter bolt, I I literally had to go lefty loosey / counterclockwise 22 degrees off of perfectly horizontal before I heard a "bang" - and the paint surrounding the Oil Filter Adapter Bolt finally broke, allowing the bolt to loosened.
My heart skipped a beat when I heard that "bang" - this was the scariest part of the repair - as I didn't know if the bolt broke free OR if I snapped the bolt the block (it's hollow to allow oil to pass through it) ;-)
")