RockRangerII the build up. | Page 24 | Ford Explorer Forums - Serious Explorations

  • Register Today It's free!

RockRangerII the build up.

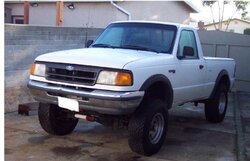
After loosing my last ranger a bit over a year ago I finally got onther one to replace it. The truck I am starting with is a 1993 ranger 4X4 xl standard cab short bed. It is pretty much a bare bones truck. No AC no cruise and a manualt t case. It also has a 4.0 and a 5 speed with 3.73 and an open rear diff. When I purchased the truck it came with a 2.5" rancho lift 31" bfg AT tires on aluminum rims.

I have had the truck around 3 months now and have put about 3000 miles on it sofar. Over that time I have noticed a few things about it. When they installed the lift instead of installing longer brake lines they installed limit straps that limit down travel to about 1" from ride height and also removed the sway bar. They also didnt lift the rear at all and it has a serous case of butt dragging.
 

Attachments

  • ranger.jpg
    ranger.jpg
    39.5 KB · Views: 3,909


Join the Elite Explorers for $20 each year.
Elite Explorer members see no advertisements, no banner ads, no double underlined links,.
Add an avatar, upload photo attachments, and more!
.


Look how pretty the hood is on that other Ranger. :p Is that my duct tape??!


You should cut some 4"x4" plates to use as washer in the inside of the box where it gets bolted. I imagine it being in the bed day in and day out will weaken the strength of the plastic fairly quickly. You think?


Join the Elite Explorers for $20 each year.
Elite Explorer members see no advertisements, no banner ads, no double underlined links,.
Add an avatar, upload photo attachments, and more!
.


That box is the same box I use in the zuk. It's been a good, water tight box, at a great price.


full foot notch said:
im guessing the two bolts on each side of the frame ,and then the two bolt in the center of that rearmost crossmember

Image793.jpg


am i correct? thats from the explorer manual i have

Sorry I didnt see your post till now. That hander deal is differnt then the ranger setup is like. To do the BII tank like I did to get it tucked up high would require that tire carrier to be removed. Not sure if it is bolted in or riveted in on the explorers.

I took a few pictures of how mine is mounted and hopefully this will help give you an idea of what I did.

The first one shows the rear. I welded a piece of angle iron to the back of the skid plate then bolted it to teh fram rails. The red circles shows the bolts holding it to the frame. The blue bolts are holding the straps that hold the tank to the skid plate.

The second one shows the front of the skid plate. The blue line is on a piece of angle iron that goes across the frame rails. I welded tabs to the ends then bolted it to the frame on each side. The red line is a piece of angle iron welded to teh skid plate that then gets bolted to the angle iron bolted to teh frame rail.

The third pic shows where I had to cut out a good chunk of teh cross member to get the tank up higher. Not sure what might be in teh way on a BII.

I hope this helps explain it better.
 

Attachments

  • gas 16.jpg
    gas 16.jpg
    19.1 KB · Views: 621
  • gas 17.jpg
    gas 17.jpg
    39.8 KB · Views: 613
  • gas 18.jpg
    gas 18.jpg
    29.7 KB · Views: 634


I have four 1/2" grade eight bolts holding it down right now. When I get a chance I might run a pice of steal across the front and rear to each bolt to hold it down. The box was only like $18 so Im not to worried about it. Hopefully it will last a few trips till I can tube the bed out.

And yes section that is still your duck tape. One of these days I will oder a new tail light to replace that one.


Geeze Matt the truck is looking great IMO, talk about a quick and capable build.
Seems you learned what you wanted the right away with old Ranger, do's and don'ts...

I have been thinking of buying another BII with a really straight body ($400) and taking it down to the frame, box it, solid axle, chop top and go from there....with 270K miles the frame and body are the only things that really need attention now and with my rust it may be the best option. But then there is the senitmental value of the OEM stuff....

Ranger looks great! How can you get that paint back to white?
On the boat it took vinegar and water.....


It is getting there. Not as fast as I would like though. Hopefully I can get some more time here soon to work on it. Work has been keeping me busy so the truck time has been negated.

As far as the paint Im not sure what I am going to do. I figure it will only last a few more wheeling seasons anyway so I dont want to spend a bunch on a paint job. However I did just go out and try some vinegar and water on the hood to see what would happen. I know I couldnt make it look worse so I gave it a shot. All that was in the house was 5% wite vinegar 95% distilled water. Maybe a more potent mixture would help then a bit of sanding and give it a shot of primer? Ive never paid much attention to paint stuff so Im not sure if I am missing a crusial step or not. I am pretty sure if I leave any rust spots and don't sand them out they will come back right?
 

Attachments

  • paint-vinigar.jpg
    paint-vinigar.jpg
    33 KB · Views: 602


Worked on the truck today some. My goal was to get the gas filler neck figured out so I could get gas in the thing. I remembered a few years back that trckmagic from this site had used a jeep TJ support to hold his filler. So I gave the local jeep dealer a call to see if they had the "plastic housing that bolted to the body to hold the gas filler neck and hose" The guy knew what I was talking about and for less then $20 I was out the door with a piece to hold my gas filler neck.

To make it fit I had to cut about a 5.5" diamiter hole in the bed to recess it into the the side. What a PIA with a 4.5" grinder but I was finally able to get the hole in there and make it fit. I went to Home depot and picked up some #10 and #8 self tapping screws to make it go on. I had to extend the outer hose about 2" to make it reach. Luckly I had an old filler neck end to cut up to get a piece to splice it together. Few more hoseclamps and off to the gas station to see if would accept gas.

It took gas fine. Only down side is that it ios iffy to just lock the handle and let it run. I held in and had no problems. So no washing the windows while it is pumping gas.

This is pretty much how it going to have to go to moab. My brother I think blew a head gasket in his ranger so my ranger is back to daily driver status for him till he (I :rolleyes: ) gets his fixed.

Anyway on to the pics and yes I still need to go buy a tail light :D
 

Attachments

  • tj filler1.jpg
    tj filler1.jpg
    18.2 KB · Views: 588
  • tj filler2.jpg
    tj filler2.jpg
    20.6 KB · Views: 1,194
  • tj filler3.jpg
    tj filler3.jpg
    31.2 KB · Views: 565
  • tj filler4.jpg
    tj filler4.jpg
    34 KB · Views: 582


That turned out pretty cool there Matt :cool: I was thinking, could you have used the old filler door assembly deal? If I remember right it's just a few spot welds and it's out. Just thinkin' out loud :rolleyes:


The old filler hole is going to be where my on board air hookup will come out at :D I dint look at taking it off and trying to move it. I thought about trying to build my own thing but when I called jeep and it was less teh $20 for the part it wasnt worth trying to fab something. If I did it over again the hole needs to be moved about a 1/2" towards the front of the truck. Turned out fine for now though.


Matt, I like how you're working out all the bugs for me! :p ;) Looks good!


Matt your setup is still using the two hose filler?? I mean with the smaller hose inside the outer? Curious how you use a coupler (2" extension) with this setup?


Yes I am still using the 2 hose system. I pulled the outer hose off and then extended it two inches. I had earlier cut about 4" off the inner hose and just left it as is. It is a real PIA to get that inner hose back inside the outer hose. The coupler is basically a 2" outer diamiter tube with a pice of hose on each end. The inner hose is still longer then the outer hose. I wish I could have taken pics but I didnt have access to a camera while I was working on it yesterday till the end of the day when I had it all back together. I hope that makes sence to you.


Matt you got a part # there? I have been thinking about the getting rid of my gas door for awhile. ;) Looks Good ;)


0 52127675-AC HOUSING F 14008001

Thats what it says on the recipt. The counter guy made it sound like it was a pretty common part to have to replace on TJs. Something about them cracking around the base or something. He asked me where mine was cracked. When I said it is going on a ranger he gave me a bit of a confused look.


oh god, i shudder at the pics of that fuel part, that was part of the reason that my thumbnail got mangled like it did a fewmonths ago, it stilllllll growing back

hey, just a a question that popped into my mind, pretty much right angle bracket steel is what holds/supports the front and rear of that tank and just placed onto the frame and that rear spare tire area was just a great spot to put it?, just an odd thought that popped into my mind, today, on easter sunday, im gonna go work on the beast, now thats dedication to a truck


Join the Elite Explorers for $20 each year.
Elite Explorer members see no advertisements, no banner ads, no double underlined links,.
Add an avatar, upload photo attachments, and more!
.


She pulls parts in the junkyard for you too? Nice! ;)

Don't let her get away buddy....You know what to do :thumbsup:


Back
Top