Scott B's 93 Ranger XLT V8 | Page 16 | Ford Explorer Forums - Serious Explorations

  • Register Today It's free!

Scott B's 93 Ranger XLT V8

Man, your truck is going to be awesome! A new lease on life, can't wait to see it! How did you make out with your other truck? is all back to normal now? I was thinking about that mishap the other day..... what a scare! Well I went to the dark side, I went and got a gently used and clean dark green 2007 J*** L******, with only 60,000 on the clock. New tires, Hankooks of course, roof bars for the kayak, ordered a set of skids and front recovery hooks, GPS, then it will be ready for some mild wheeling. Since the Ranger has a tad over 70,000 on the clock I want to save it for long range expeditions and the J*** will be the new DD. J*** is not too bad a word is it? It's a cool little truck all said...... :D stay safe, Michael

Other truck is back to normal - still need to wax it.

You can daily drive your J*** - it will make you appreciate your Ranger that much more!


Join the Elite Explorers for $20 each year.
Elite Explorer members see no advertisements, no banner ads, no double underlined links,.
Add an avatar, upload photo attachments, and more!
.


My J**P

Yeah....... your right, my truck is the ONLY expedition truck, but the J*** is still fun! Michael


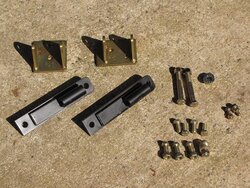
Here is a picture of the L & L engine mounts (that I waited 3 months for!)

I just painted the adapter, so I will get a picture of that this weekend.

As for the progress, the adapter fits fine, holding the engine where I want it. The headers clear the mount, though not by as much as I would like. :( The problem is the steering - tube 7 intersects the steering shaft.

This weekend, I will see how to get some clearance between the steering shaft and header tube. I will need to cut a new shaft (from the leftover material) moving the slip joint toward the steering column end. Also, I will check to see if there is any "adjustment" in the steering column. Lastly, I will dimple the header tube.
 

Attachments

  • Engine Mounts.JPG
    Engine Mounts.JPG
    151.7 KB · Views: 771


Engine Mount Installed, Left Side

Here you can see the L&L engine mount and the adapter block I made.

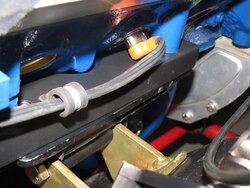
I added the Adel clamp to hold the engine block heater power wire away from the header tubes. I need to put the transmission kickdown cable in this clamp also.
 

Attachments

  • Adapter1.JPG
    Adapter1.JPG
    109.8 KB · Views: 787
  • Adapter2.JPG
    Adapter2.JPG
    71.6 KB · Views: 793
  • Adapter3.JPG
    Adapter3.JPG
    61.6 KB · Views: 804
  • Adapter4.JPG
    Adapter4.JPG
    73 KB · Views: 779


Transmission Shift Cable Bracket

I made a new bracket to hold the trans shift cable. The first one I made did not have the angle in it, and I didn't like the angle between the cable and shift pawl.

This one is also made of thinner steel, so I welded a re-enforcing plate along the top, to prevent flex.
 

Attachments

  • ShiftCableBracket2.JPG
    ShiftCableBracket2.JPG
    59.1 KB · Views: 757
  • ShiftCableBracket1.JPG
    ShiftCableBracket1.JPG
    94.1 KB · Views: 777


I was able to get some adjustment out of the steering column. As can be seen in the photos, the steering clears the headers!

Since they are practically touching, I am going to dimple the header to add clearance.

I am also going the change the boot on the steering shaft. Instead of the accordion style one from Flaming River (don't need it since the shaft does not move in and out under normal operation) I am going to use a piece of clear vinyl tubing. All I need is a dust seal, so this should work fine. (Until the head melts it, of course...)
 

Attachments

  • Inter1.JPG
    Inter1.JPG
    104.3 KB · Views: 771
  • Inter2.JPG
    Inter2.JPG
    92.4 KB · Views: 775


That's one hell of a build you have there. I just got done reading all the pages


Thanks.

Hope to get the V8 conversion in the very near future!


I've been contemplating doing the v8 conversion on my 93 ex ltd and was going to use the aod trans and mustang v8


I've been contemplating doing the v8 conversion on my 93 ex ltd and was going to use the aod trans and mustang v8

It is a much easier job to keep the wiring '93 vintage.


In the process of making the adapter for the right side engine mount, I decided to lower the right side of the engine slightly. As it was, the right side was slightly higher than the left side. By lowering the right side, I made some more room between the left side header and steering shaft and I added some clearance between the underside of the body and the right side header.

However, in so doing, I had to make more room in the A/C box to clear the valve cover.

Since there was really no way to get to the box with the engine in place, I decided to remove part of the box and work on it outside the truck. It turns out that removing the box was not that difficult. A couple of screws were tricky to get to, and I had to wiggle and squeeze it past the engine - but it came out!

Building a new recess plate was much easier on the bench. Also, I was able to through-bolt the plate to the box - much stronger/more secure than rivets.

The pictures show the front and back sides, with the new plate installed, before and after insulation.
 

Attachments

  • After2.JPG
    After2.JPG
    88.1 KB · Views: 738
  • After1.JPG
    After1.JPG
    90 KB · Views: 735
  • Before2.JPG
    Before2.JPG
    89.2 KB · Views: 706
  • Before1.JPG
    Before1.JPG
    88.8 KB · Views: 731


Here is the A/C box re-installed in the truck.

I removed the valve cover to get some more clearance.

I had to take another picture of the rocker arms - I really hate to cover them with a valve cover!
 

Attachments

  • Installed1.JPG
    Installed1.JPG
    88.3 KB · Views: 724
  • Installed2.JPG
    Installed2.JPG
    97.5 KB · Views: 696


That looks very clean. Hopefully it will pay off with cold air.

Sure - once I figure out where/how to mount the condenser...


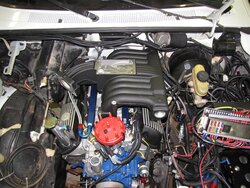
I started wiring the engine today.

I am holding off putting on the upper intake until after the headers are installed.
 

Attachments

  • Wiring2.JPG
    Wiring2.JPG
    111 KB · Views: 706
  • Wiring1.JPG
    Wiring1.JPG
    114.3 KB · Views: 702


It's been a busy couple of weeks. Busy at work, computer problems at home (not fully resolved yet :() and working on the truck.

Headers

I put a dent in the one tube on the driver's side that was interfering with the steering shaft. Now there is plenty of room for the steering, and the dent is so small that it won't affect performance any.

The passenger side header interfered with the firewall (right below the fuel pump shutoff), so we had to modify the firewall.

As you can see in the picture, a plasma cutter was used to cut a hole. Then a patch panel was fabricated and welded in. Once that was compete, I seam sealed the opening, primed it, and covered the patch with paint inside the cab and undercoating outside the cab.
 

Attachments

  • Firewall.JPG
    Firewall.JPG
    80.6 KB · Views: 676


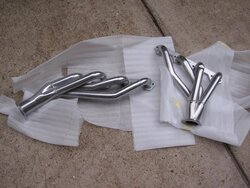
I sent the headers off to be ceramic coated. (Found a good shop right here in town - not that expensive, either!)

I like the thermal properties offered by the ceramic coating - it is tight in the engine compartment, so anything to reduce heat buildup is a good thing.
 

Attachments

  • CeramicHeaders.JPG
    CeramicHeaders.JPG
    75.3 KB · Views: 652


Once the headers came back, I was able to install the driver's side header with no problem! (Finally!)

The passenger side header presented 2 problems. I had to redo the transmission cooling lines, as the hard line contacted the header collector right as it came out of the transmission. These were replace with steel braided line all the way to the cooler(s). Second, I decided to re-route the battery cable. As it was, the cable came across the upper rear of the engine, and turned down just behind the head. This header stays close to the block - I thought the wire was too close. So, I routed the wire over the header to the frame, then loop back under the header to the starter. Now, the passenger side header is installed!


While waiting on the headers, I decided to test-fit the upper intake and spacer. I haven't fit these since I installed the new motor mounts.

Oh goody, another problem to solve!

It seems the throttle body cable attaching flange (no idea what this piece is called) and the upper tube of the evaporator want to occupy the same space. :mad:

I pulled the evaporator out again, and dropped it off to have a tube with a bend welded in in place of the straight tube.

The good news out of this is having the evaporator out left a lot of room to re-route the battery cable and install the header bolts.

Here is a preview picture.
 

Attachments

  • Preview.JPG
    Preview.JPG
    118.5 KB · Views: 657


Join the Elite Explorers for $20 each year.
Elite Explorer members see no advertisements, no banner ads, no double underlined links,.
Add an avatar, upload photo attachments, and more!
.


Today's project is replacing the body mounts.

After a lot of trial an error (and cutting) I was able to remove the driver's side body mounts. When installing the new ones, I realized I didn't have all of the correct parts. :( I have the wrong upper retainer for the center mounts.

Tomorrow, I will have to see about getting the correct ones.

So, for now, the truck sits with new bushing on one side. (Yes, there is a lean...)
 

Attachments

  • Body Mounts.JPG
    Body Mounts.JPG
    101.7 KB · Views: 659


Back
Top