thanks for the photos
This post has saved me a lot of trouble.
Thanks to those that posted before me. (Except for Mr.Parts train)
I thought I'd add some photos to hopefully help others.
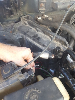
This is the tube in question.
2 Bolts go through the EGR.
There's also a nut that holds on the dipstick tube.
Remove this nut, then bend the tube's mount up and then take out the stud. (Colored for emphasis)
Then it will be free. (I moved the A/C lines first, since they were in my way)
Sorry I don't have a good photo of these bolts.
Here's the hole that the stud comes out of by the dipstick.
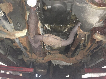
Here's a photo of the tube to show how it's shaped.
The nuts are welded on the onto the tube. At least they're supposed to be.
One of mine broke loose...
so I got to practice with my new welder.
It's ugly, but it held.
The Felpro gasket set I got came with an o-ring for this tube.
The tube just pulled out of the plenum without much trouble.
You could use some WD-40 if it's stuck.
Maybe I could have taken the plenum off without removing the tube from the EGR.
Anybody had success doing it that way?
Good luck
this thread rocks thanks for helping me with my next step..... EGR replace
In my 99' explorer, I have a P1309, P0174 and P0171, which first code means I have a misfire,,,, the plugs had 125K on them so that's the thing I changed as matter of fact,,,,,,,
I used the “TOAD” PC Software on my OBD and put up the live graph for short term fuel trim bank 1 and short term fuel trim bank 2 and long term trim for both banks as well.....
this is cool
I saw that the fuel trim for both banks was up and down near 25% to 40% (40% is maximum trim) this is the computer attempting to regulate/correct the fuel air ratio based on engine parameters throttle position, fuel type, altitude etc. also means it’s not specific to one bank or one O2 sensor,,,,,,,,
So AH HA moment high fuel trim means lean that’s why I’m getting the P0171 and P0174,,,, the P1309 means misfire, and is setting because the computer is trimming all over the place to correct the lean condition and prevent misfires but cannot be more specific as to why.......
what overall issue can affect all cylinders? MAF, IAC, ...... easier yet let’s see if there is a "Vacuum Leak",,, so I started spraying starter fluid at idle on the usual suspect rubber hoses under the hood,,,,, came around to drivers side one squirt and it started to behave badly..... bingo, hit under the EGR Valve and the Live fuel trim graphs start heading toward zero.... got it under the EGR valve near the diaphragm holes and it stalls....... start it back up and reduced the amount of spray and I can hold the graph near zero and make it stall at any time by full blast spray....
I am heading to the parts store or rockauto to get a new EGR and looking forward to having a beautifully running drivetrain,,,,,
lower ball joints and its finished for another 50k....