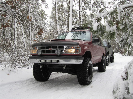
What did YOU do to your Explorer today? | Page 6 | Ford Explorer Forums - Serious Explorations

  • Register Today It's free!

What did YOU do to your Explorer today?

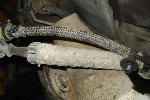
Finally got that ICM from the salvage yard in. FR-425 was right. It does have more kick to it! Thanks to him for the idea. Haven't had it on the highway to see if it quited the ping yet. Also cleaned the intake up a bit (as much as I could without removing it). Might need new IAC.

It'll probably still ping a bit between 2700 and 3000 but not the hammer monkey it was.


Join the Elite Explorers for $20 each year.
Elite Explorer members see no advertisements, no banner ads, no double underlined links,.
Add an avatar, upload photo attachments, and more!
.


Noticed a small puddle forming underneath while it was idling. It was clearly not condensation from the a/c. Crawled underneath to discover that my water pump had finally given up the ghost. Made a quick run to the parts house and grabbed another, but weather kept me from swapping it out today. It'll have to wait. Hopefully she'll keep cool throughout the week and I can do it next weekend... If not, I'll have to muster what little strength I've got left at then end of my work day and get it done.


Some fresh Oil for my Adrenalin! :exporange
photo%205_zpsv30mdmff.jpg


I bought two used tires, patched one rotated them, had them installed on my teardrop wheels.

Need to fix the drivers window motor and track.

To do list:
passenger fender replacement
newer tupperware
modify the front center caps to clear the manual hubs.


Water pump didn't make it. The leak from the weep hole was so bad, I barely made it home without overheating. Pretty smooth job though. It gave me a chance to insect everything while I was in there. Everything looks to be in tip top shape. The belt looks to be fairly new, not a single crack on the fan, clutch seems to still be nice and tight, no cracks in the radiator. All in all, I don't think it could have gone better.


Was having a mis-fire at highway speeds and hard accelerations for the last couple months.. It struggled and shacked at 55 could feel a lack of power trying to go 60. So I did another spark plug change and new wires again. I just did this a couple months ago I did NKG copper plugs and Denso wires. This time I went with NKG Iridium plugs and Moroso Mag-Tune wires. The old plugs looked good coming out nice golden brown. But what I found was my gap somehow got wider on some. Last time I also installed a Davis Unified Ignition coil it called for a .065 gap but somehow some measured at .075. My #4 plug was wet smelled of gas. The Denso wires I never liked could never get the plug to the coil to stay clipped down. The Moroso wires only used a single style clip to the coil and seems to be a better design. Also I gaped the Iridiums at .055 even though the coil recommends .065 gap well not recommend but says you can go up to .065. I think the bigger gap plus the #4 plug was causing my mis-fire. So now it doesn't mis-fire or feel like its struggling to go 60+ mph anymore
 

Attachments

  • DSCN3448.jpg
    DSCN3448.jpg
    97.6 KB · Views: 333


Washed both cars - finally! FYI, when recently replacing the belt tensioner pulley (just the pulley, not the entire tensioner) I found the tensioner bolt almost 'finger loose'. Something to add to my 'check it' list whenever I remove the air duct.


Gave the $800 beast a bath and a butt lift.
Before
DSC00583(1).jpg

DSC00585.jpg

After
DSC00588.jpg

DSC00595.jpg

Next up: Rusted out rocker panels.


Replaced the broken inside door handle on the driver's side. Used push-on 'nuts' on the plastic pins since I didn't have an easy way to heat seal them. Managed to break the plastic frame inside the armrest, but fortunately I had a spare. (Bought left and right front door interiors for $10 from a 'parting-out' seller some months ago.)


what I did to the explorer today

I installed a 3" body lift kit. I was pretty much a straight forward process. I just removed body mount bolts, jacked each side up and put in 3" body mounts. Had to add steering adapter and trim the bottom fan shroud alitte, then done.


Replaced my fourth DPFE sensor in 2 months, this one from Autozone is made by AIRTEX / WELLS Duralast Part # SU243 and I hope it lasts a while. I also replaced the EGR valve so I hope I don't see the Check Engine light for a long time.


It was time to do some more work on the X. Had gathered some parts I planned to put on this summer. Picked up 3-core radiator end of last summer. New Bosch water pump new red silicone heater hoses new thermostat. Been gathering this stuff since last year. Been procrastinating this summer decided today was the day to do it all.

I first did a complete flush of the cooling system. Put some Prestone flush fluid in yesterday drove around with it. This morning took the thermostat out put it all back together put another bottle of radiator flush in ran the engine for 15min then drain it out. Unhooked the upper and lower hose ran water continuous through the engine till it the water ran clear. When taking off the water neck I notice I had a stripped thread on one of the bolts. Must of done that before long ago cause I had lots of silicone between the flange it when I took it apart.
Lucky I had an extra lower intake manifold from when I swapped a 95 engine years ago from that motor. So I needed to take that out not planned but no problem got to do it. So now I needed new valve cover gaskets. So after changing that I took out the old water pump. Nothing wrong with it just felt it was time I like being preventative why wait for it to go out and over heat. Oh also had gotten a new belt tensioner pulley my old one was squealing and making grinding noises.

Now onto to the new radiator. The fit seem a bit tight I will note I had to cut off a portion off the lower radiator pipe to clear the steering pump. I manage to get it to line up and bolted down.
Got everything done in 6 hours had to make 2 trips to Autozone but she all back together she should run a little cooler now.


Next weekend my rear drums brakes. I have a leaky cylinder on the driver side. Those drums hadn't been off in years!!!! I made a custom pulley to pull the drums off. I got the idea from a guy on you tube. Its basically a 8" 3-jaw puller but had to extend the brackets to make it a 11" puller to fit wide enough around the drum. With an Impact gun it should pull off easy. I ordered some new drums so should be here this week.
 

Attachments

  • DSCN3585.jpg
    DSCN3585.jpg
    81.4 KB · Views: 245
  • DSCN3584.jpg
    DSCN3584.jpg
    65.2 KB · Views: 272
  • DSCN3587.jpg
    DSCN3587.jpg
    73.2 KB · Views: 233
  • DSCN3588.jpg
    DSCN3588.jpg
    72.7 KB · Views: 251


Didnt do it but i bought it

I found a warehouse in dearborn mi who bought all 1st gen explorer sheet metal dies. I picked up a set of rockers made with the same die that made mine 24 years ago


Found and purchased a new wheel for the spare that actually fits over the front hubs (a previous owner lacked this foresight). New wheel matches the other 4 (very happy with that bonus). Did an oil change, and tomorrow, drain and fill the transmission and get that spare tire mounted on the new wheel!


Scored a Curtis class III hitch in new condition with hardware for $40 and it was only a mile from my house!


Painted my engine cover last night. Since I went with red radiator hoses thought it look good if I painted my cover to match.

DSCN3595.jpg


Looks good indeed. Where'd you get the hoses? Am I remembering right that they're silicone?

Also, is that a water vapor injector on the right? The jar.


Join the Elite Explorers for $20 each year.
Elite Explorer members see no advertisements, no banner ads, no double underlined links,.
Add an avatar, upload photo attachments, and more!
.


The hoses come as a pair upper/lower sold on ebay. My upper hose I had a hard time getting it over the water neck. I think on my set one end that fits the neck side should of had an expanded end but it was cut off I think. Cause the other side that fits to the radiator was expanded and fit on easy. The lower hose fit easy on both ends.

No the Mason jar is my homemade PCV oil catch. It started out smaller but I made it bigger so I could fill the jar with absorbent material and extend the inlet tube down into it.


Back
Top