Aussie Locker for DANA 35 | Ford Explorer Forums - Serious Explorations

  • Register Today It's free!

Aussie Locker for DANA 35

zhanx

Explorer Addict
Joined
April 6, 2004
Messages
1,453
Reaction score
4
City, State
Up state NY
Year, Model & Trim Level
2000 xls
Ok i got one on the way. Should be here in time for install this weekend. Which means it will go in on Sat. I will be documenting to whole Install from start to finish. With a little write up on Sunday on how it preforms on the road and of course offroad. Mr. Cole agreed to sell it too me with the understand it may or may not work. So the long awaited Aussie locker may finally be here.

AND NO THIS IS NOT A PLUG.. I just know people have been waiting like I have (i started buggin way back in june about it)


Join the Elite Explorers for $20 each year.
Elite Explorer members see no advertisements, no banner ads, no double underlined links,.
Add an avatar, upload photo attachments, and more!
.


Cool let us know.. You would be the second person testing it other than a certain moderator with a 2nd generation Explorer.


then i guess we see who gets in first *hint* *hint*should of have it done so i did have to bregg to for one*hint* *hint*


hopefully all goes well. I expect it too.


aussie!

please let us know as soon as its in, i want one for thanksgiving weekend, did they get it int he test truck this past weekend like they had said they would? I think we should get a discount for bein guinee pigs


I too have been admited to the aussie club. :thumbsup: Bill has me fitting an aussie for the 1991-1994 model 35's.


Cool so that should take care of everyone. and make everyone happy with thier locker choices.


zhanx said:
Cool so that should take care of everyone. and make everyone happy with thier locker choices.

Have you received yours yet?

did they tell you what the aussie model number is? The XD13527 is what they sent me for the 1991-1994 models. The dana 35 is one of the more difficult diffys to modifiy, because of the so many different variations of the thing. I am going to have to grind out my carrier so the Aussie can fit, and probably more then just 'imperfections,' atleast 1/16th of an inch as to come out. You might have to do the same...


Creager said:
Have you received yours yet?

did they tell you what the aussie model number is? The XD13527 is what they sent me for the 1991-1994 models. The dana 35 is one of the more difficult diffys to modifiy, because of the so many different variations of the thing. I am going to have to grind out my carrier so the Aussie can fit, and probably more then just 'imperfections,' atleast 1/16th of an inch as to come out. You might have to do the same...


umm they told my the model number but umm i forgot.. It was mailed out today. 1/16th of an inch where? in the window(s) or the whole interior of the carrier. Wont know if i'll have any problems with it till i get it.


zhanx said:
umm they told my the model number but umm i forgot.. It was mailed out today. 1/16th of an inch where? in the window(s) or the whole interior of the carrier. Wont know if i'll have any problems with it till i get it.

…The interior of the carrier. Its probably Just the little nicks and flashings that get in the way.

Yours is going to be completely different. The only alikeness between my Dana 35 and yours... is the name.


Creager said:
…The interior of the carrier. Its probably Just the little nicks and flashings that get in the way.

Yours is going to be completely different. The only alikeness between my Dana 35 and yours... is the name.

true that.. btw Mr. Cole emailed me, he sent the locker out. shipped it via overnight mail to me. So this is diffinetly going in on Saturday.. anyone in the fort Bragg area want to come over and lend a hand? anyways.. need to pick new spindle nuts and some more grease and i am ready.. and of course now i have to do the brown wire mod.


zhanx said:
true that.. btw Mr. Cole emailed me, he sent the locker out. shipped it via overnight mail to me. So this is diffinetly going in on Saturday.. anyone in the fort Bragg area want to come over and lend a hand? anyways.. need to pick new spindle nuts and some more grease and i am ready.. and of course now i have to do the brown wire mod.

Cole is a great guy, hes there every step of the way. Aussie in general is a very dedicated company. I feel honored to be doing this for them.

im in charlotte if you wanna come by haha. I'm working on the Aussie myself.

I love how they finished the metal on these things... i know that has nothing to do with how it functions, but the meterial or the finishing is a really cool color of grey haha... [/donebeingADD]


95exploderboy said:
or swap to the manual shift BW 1354, is one of the best mods my ex has

that will be done, but right not no time to find one. no money for one.. tis christmas and i should've have waited on the locker but heck you only live once. good thing i dont have kids.


ok the locker is here. going to start the install after lunch.


ok after grinding a little on the window only it fits.. only one problem.. cant find my feeler gauges so i am off to the store.. after i get back i'll post some pics.


Install pics

ok a couple of fast pics. then back to the install after dinner.. all that is left is reassembly of the diff and stuffing it back in.
 

Attachments

  • IMG_0355_800x600.jpg
    IMG_0355_800x600.jpg
    102.9 KB · Views: 2,459
  • IMG_0353_640x480.jpg
    IMG_0353_640x480.jpg
    74 KB · Views: 2,452
  • IMG_0358_640x480.jpg
    IMG_0358_640x480.jpg
    74.3 KB · Views: 2,409


ok taking a break (one of many) ok other than the fact i forgot the top rear driverside bolt for the diff and had to tear down again to put it in. everthing is all good. i passed the tire rotation test. just fine. need to grab some fluid aussie cause for 85-140 and i have is 80-90. some by myself install time 5 hours. should be done in ten more just need to tighten spindle nuts and lug nuts and double check everything.


ok this is my first how to guide. Hopefully you all like it.

Tools you will need :

Drip pan / Drain pan
Metric/Standard Socket Set
at least 2 3" extensions, a 6" would be a plus
Torque Wrench
Feeler Gauges (the thing one with numbers not a round one)
Breaker Bar
Paint Marker
Dremel or die grinder with abrasive stone (or method of your choice)
Cardboard box
Haynes Manual (great for the torque specs)
Jack Stands
Wheel chaulks
Creeper
Torque's Bit Sockets

Ok the first thing i did was clean the area I was working in. Saves time later and makes things easier, after you dont want dirt in this project. if your like me and have aftermarket rims its easy to remove the spindle nuts. Break'um loose and the lug nuts. Jack up the truck in the front (dont forget to chaulk your rear wheels for safety);
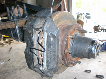
Remove the tires, spindle nut, brake caliper, rotor and disconnect the upper ball joint.

attachment.php

attachment.php


This will allow you to pull the passenger side cv joint with no problem. For the drivers side make sure its out of the spindle and loosened from your housing (you'll pull it when you drop the diff).

Next Disconnect the front driveshaft. Remove the 3 bolts that hold the diff up and set it on the ground (it helps to have a freind at that point). Drain what fliud you can out the passenger side helps later so you don't make a mess.

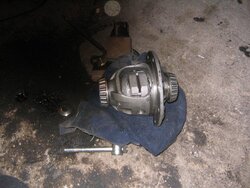
Ok Time for the Fun stuff. Open the Diff and remove the carrier. This were the cardboard comes in make spots and label EVERYTHING. you will need to put everything back in the same way it came out or you will have issues.

According the the Aussie locker direction if you have a thin ring gear you can leave the ring on. I dont i have thick ring 4.56's so off it came. I used a rubber mallet and whack it in circles around the gear till it came off. clean and set it aside.

Now you have a carrier with gears..How do you get them out? i used a 5.5? allen key with a ball in to drive it out from the side with the bolt heads for the ring gear was worked fine no damge to the roller pin. Next tap out the cross shaft. Pull out the spider gears. See this flat washer? keep it you''l need it for the locker and put it back on the same side (at least i did).

attachment.php


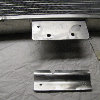
Ok now you should have an empty carrier with bearings on either end. ..clean it good reall good. i used eletronics part cleaning spray.. Cleans it up nice and drys fast. Now for the test fit. If yours looks like this then the dremel with comes in to play to help make room.
attachment.php


dremeled out :

attachment.php


After cleaning and double checking assembly per directions. They came with the locker for a reason. For me assblemy went smooth and everything was in the middle grounds.

attachment.php


ok now that you've assblemed the locker and everything is good to go reassemble you diff. Dont fill it yet seal it and torque everything to specs(why waste the fluid if it dont pass).. You still need to tire spin test it. Reverse the process and put everthing back together. Dont forget the diff bolt on the drivers side in the front i did and had to tear it down and do it over.

for the spin test you should turn the key on engauge 4-hi and pull it in drive NOTICE I DIDN'T SAY START IT. Follow the destructions and If you pass your all good fill it. and road test her.

I'll follow up tommorrow with a raod test and trip to uwharrie


Join the Elite Explorers for $20 each year.
Elite Explorer members see no advertisements, no banner ads, no double underlined links,.
Add an avatar, upload photo attachments, and more!
.


Just some notes and comments from Mr. Cole

We have found a couple of instances where the spin test at the end was very difficult because of tight tolerances and no lubricant. You did not have this problem, but I was just curious about what appeard to be the lack of grease on the parts
<- used very very light grease cause i hate working will dirty hands.

It appeared that you did not have to grind much away from the carrier to get the part in. That we find differs with each installation and casting.
<- appearances that way. but i removed about 1/16th to an 1/8th maybe a litttle more from each side. Basicly removed the area on the window down to the case.

Anyway, I am very pleased with the .156 as mid-range always works best. Be sure your spacer to cross shaft is in the same mid-point area and you should have a very smooth operating locker. I expected you to have some tolerance issues in getting the cam gears in. Our product is larger than the competition so we often have to grind a little carrier away to get a fit.
<- see you should use the feeler gauge and make sure your stuff fits right :eek:

Ok its 7 am gonna find a way to fill the diff without freezing the butt off and do a road test.


Back
Top