My 97 SOHC 5 speed swapped sport street/drag build | Page 8 | Ford Explorer Forums - Serious Explorations

  • Register Today It's free!

My 97 SOHC 5 speed swapped sport street/drag build

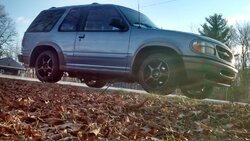
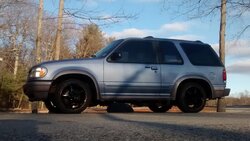
I picked up a rust free 2wd 97 big flare sport with the SOHC 4.0l about a month ago now. This thing is SPOTLESS!!! I bought it for Penny's with a bad transmission in it and the plan to turn it into a 12 second turbo'd street/drag truck.
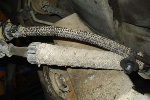
As of last week I finished swapping in a 5 speed manual transmission I built for it with the lower gear ratio out of the 4 cyl ranger. 3.73 posi rear end, I put on a custom bent Magnaflow stainless exhaust, lowered it 3" and put a set of 18x10 Ford Racing "Cobra" wheels on it.
The difference in power and acceration is incredible with the 5 speed compared to the 5r55e. I'm not entirely happy with the M5ODR1 though and will be swapping it out for a Tremec before I turbo it. I'm also swapping back to taller gears in the transmission since this thing has no issues launching in second gear with excessive tire spin as it sits now.
 

Attachments

  • IMG_20141219_144913455_HDR.jpg
    IMG_20141219_144913455_HDR.jpg
    68.3 KB · Views: 1,205
  • IMG_20141219_144755857.jpg
    IMG_20141219_144755857.jpg
    55.4 KB · Views: 2,992


Join the Elite Explorers for $20 each year.
Elite Explorer members see no advertisements, no banner ads, no double underlined links,.
Add an avatar, upload photo attachments, and more!
.


That was my thought on unplugging the vacuum line but I had 2 old time hot rodders arguing the point with me so I gave it a try. I didn't notice any changes either way good or bad. If I can manage to thread a bolt with a spring attached to the end in place of the vacuum line I should be able to increase the line pressure by turning the screw in like you would on your regulator. I haven't had a chance to cut open any of my spares yet though so I'm not sure if it's possible yet.


Join the Elite Explorers for $20 each year.
Elite Explorer members see no advertisements, no banner ads, no double underlined links,.
Add an avatar, upload photo attachments, and more!
.


Junkyard shopping spree!

I cut my vacation a little short today so I could get home and to a junkyard on my day off. I scored a set of 27lb injectors at a buddies garage out of a 2001 Saab 9-3 turbo (technically 2 sets). Those should be plenty for me until it goes turbo and for the $50 donation to him I'm OK with that expense for peace of mind.

20150803_202051.jpg


I also grabbed a 70mm TB at a local junk yard off a 5.4l F150 for $50. It looks close enough that it should work with a little throttle cable modification. Junk SOHC TB on left, F150 TB flipped upside down on right. I'm not sure how you guys are running a 75mm TB with your stock intake since any larger than 65mm you need to port out the manifold and any larger than 70mm and you get into the sealing o ring. Until I upgrade to an aluminum intake manifold this will work fine. Now time to hustle and get everything in the truck this weekend because it goes on the dyno for tuning next Monday.

I got a new dual electric fan set up while I was at the saab shop also. $40 and it has a usable shroud for my set up.
20150803_202134.jpg


20150803_202229.jpg


20150803_202103.jpg


20150803_202307.jpg


I've been busy!

My daughter has been on a week and a half long vacation so I took advantage and got some serious progress made on the explorer.

Here's the cleaned and epoxied 70mm F150 throttle body. I used a product called "Marine Tex" to fill the vent on the backside of the TB. The stuff is great, it's something we use often at the marina and is hard enough to drill and tap once cured.
20150806_220439.jpg


Here's my port matched intake after I opened it up a bit compared to an OEM manifold
20150806_210010.jpg


I had a mystery coolant leak I've been trying to track down for about a month now and finally had time to tear down the engine and find the issue. Ended up being a seeping water pump and a split thermostat housing. I tore it down completely and cleaned up the rust stains to make sure there were no other issues
20150805_191517.jpg


I took advantage of having things apart to shed some un needed weight. AC and all lines/condenser is gone, cruise control and all brackets are gone, battery relocated to the rear..... here it is all back together after the new cooling system parts, 27lb injectors installed, 70mm F150 TB and new electric fan set up.
20150807_230228.jpg


Here's the new belt routing minus the AC compressor. Managed to find one first shot off the shelf.
20150807_230431.jpg
 

Attachments

  • 20150807_230340.jpg
    20150807_230340.jpg
    51.7 KB · Views: 318


Wait there's more!

I apologize for the sideways pics. They are all straight on my phone and not sure how to flip them back.

So I may have lost a bit more weight in other area's of the truck as well. There's the new NHRA approved battery box mounted and the emergency Hella battery shut off switch mounted in one of the plate light sockets.
20150807_225749.jpg


20150807_230027.jpg


20150807_230041.jpg


20150807_230102.jpg


The switch fit perfectly and I didn't even have to drill a hole. Here it is in the on position
20150807_230118.jpg


Here it is off with the key removed.
20150807_230132.jpg


Over all I dropped about 500 lbs off the truck this week and freed up a couple HP with pulling the AC. I'll have some actual dyno numbers for you Monday night


My buddies V8 sport

My buddy came by with his V8 swapped sport to get some help on a couple things and show off his new/used wheels.
20150807_192230.jpg


20150807_192148.jpg


They are staggered 17x10 front and 17x12 rears with a 315/35r17 rear tire. I love the lip on them!
20150807_192255.jpg


He ended up leaving with my TFS stage 2 cam, crane beehive springs, ARP bolts, stainless reinforced head gaskets and a few other performance parts I bought for mine. So stay tuned because he'll be running that one at the track as soon as I help him build the engine. He has nitrous also....lots of nitrous!


Warm air intake

When the vehicle is sitting still the engine bay temperature rapidly increases to 150 deg F. If you put a shield around the filter to isolate it from the engine compartment so it pulls air thru the opening behind the headlight the IAT will be much closer to ambient air temperature increasing power off the line.


Intake temp stays right at ambient temp unless it's sitting in traffic. I've been monitoring that close because that was my concern. With a cardboard test shield in place the intake air temp was actually higher. I have no inner fenders so it's able to pull fresh clean air from there.


The headlight is also being pulled at the track to get more cold air into it. Once I pull the light the shield set up would probably help but for now it's making it like an oven. I was also testing things on a near 100° day so 90% of the heat was probably transferring from the hood


Explorers

Looks like you got a lot of work done!
Turned out nice looking under the hood and in the back.
There is a lower aluminum thermostat housing for sale here on the forum that is a great replacement for the plastic one that breaks all the time. I have one on my supercharged explorer and will never go back to the plastic.

How does the battery box mount to the floor?

If you have access to a computer with windows you can download the pictures, turn them in windows photo viewer, delete them from the post and then upload the new turned ones(under edit post).

Can you get a photo of your buddy's truck/rims from the back with a little bit of side showing? I would like to see how far the wheels come out in relationship to the flares, and how far they go in towards the leaf springs.


I added two 1 3/4 in. dia. ports to the stock air filter enclosure base.
View attachment 85401
They pull air from the front.
View attachment 85399
Then I modified the enclosure top to fit my intake tube.
View attachment 85402
View attachment 85400

I'll never knock you for going above and beyond while salvaging OEM parts where able! That is a pretty nice set up I'm just going for clean and simple with mine. The intake set up is being completely redesigned over winter with my other upgrades so I'm trying to keep things as simple and cost effective as possible for now. I just want to get the 1/4 mile time slip to get my name on that NA list with a junkyard engine before taking it to the Power adder list.


Looks like you got a lot of work done!
Turned out nice looking under the hood and in the back.
There is a lower aluminum thermostat housing for sale here on the forum that is a great replacement for the plastic one that breaks all the time. I have one on my supercharged explorer and will never go back to the plastic.

How does the battery box mount to the floor?

If you have access to a computer with windows you can download the pictures, turn them in windows photo viewer, delete them from the post and then upload the new turned ones(under edit post).

Can you get a photo of your buddy's truck/rims from the back with a little bit of side showing? I would like to see how far the wheels come out in relationship to the flares, and how far they go in towards the leaf springs.

I'll definitely upgrade to the aluminum housing next time I'm in need. Do you have a part # on that piece?

I'll try and get some better pics of the battery box mount today once I finish installing everything and running wires

I've still got a lot more to clean up in the engine bay. Over the winter I want to separate my harness and remove all the now obsolete wiring and re route things as hidden as possible. The coolant overflow bottle and washer tank are the next to come out in favor of a small aluminum bottle I can tuck in somewhere out of the way then I'll be removing the ABS pump, computer and all wiring and lines. We're making equal room on both sides of the engine for the upgrades ;) it should look very symmetrical when it's done.

As for the sideways pics... lol, I've been here till midnight or later everyday this week working on the truck then back here to punch in first thing in the morning. I haven't even seen my computer this week nevermind have a chance to upload and edit pics. Haha, cell is the best I can do until Tuesday

This is the best I can get right this second. These are pics he sent me a couple days ago. They sit in a good ways but have clearance on the leafs and they sit out about where mine do (minus my flares) he did use a 1/4" spacer behind them also.
IMG9501731.jpg


IMG9501721.jpg


IMG9501741.jpg


Thanks 4pointslow. The upper may work for me also depending on what I can come up with for an aluminum intake manifold. I want to get rid of the plastic before I put boost to it and delete the IMRC plate and all vacuum lines that aren't a necessity. As of right now it's looking like it may be getting a smaller pair of turbo's at lower boost instead of a larger set up. It should spool quicker and be easier on parts and wallet this way


Two turbo's

Thanks 4pointslow. The upper may work for me also depending on what I can come up with for an aluminum intake manifold. I want to get rid of the plastic before I put boost to it and delete the IMRC plate and all vacuum lines that aren't a necessity. As of right now it's looking like it may be getting a smaller pair of turbo's at lower boost instead of a larger set up. It should spool quicker and be easier on parts and wallet this way

Having two small ones would be desirable. Like you mentioned they will spool up faster, and with two they will still be able to carry the volume of air needed for each bank.

Something interesting I came across, thought you might like it.
One guy put these on a mustang 3.7 V6 = 400HP 450 TQ.
http://aerocharger.com/

His thread
http://www.mustangevolution.com/forum/f356/t361208/


I took it for a short test drive earlier, about a 3 mile loop, just to see how it ran with the new injectors and 70mm throttle body. The stumble seems to be gone so I was most likely maxing out my 24lb injectors. There is definitely a noticable power difference now. I can Roll into the throttle at 30 mph now and it easily breaks the tires free and the wheel hop gets bad. Tomorrow I'm going to install the walbro fuel pump (even though that doesn't seem to be the issue now)

I was able to make one hard pull on my test drive and data logged it. My MAF numbers jumped to 990 on that one test run so the new MAF was needed also but I need to wait until I get it to the tuner and recalibrate it before I can swap it on. I tried, it won't take any throttle as it sits with the 90mm so I'll have to swap it once it's on the dyno.


Dyno numbers are in!

Worked my ass off on the truck this week and it all paid off today. 91° air temp with 25% humidity. 220 hp and 256 tq! Dead on my guestimate. Couldn't be happier right now. The tuner said he was impressed with the homework I did and specific parts I chose to use.

I was maxing my injector flow and he said based on the data log I was pushing farther than the MAF could account for so the 90mm LMAF was needed. Runs awesome now!

Now it's time to get it to the track and take that #1 All motor spot ;-)

20150810_160351.jpg


20150810_163557.jpg


20150810_172811.jpg


20150810_172912.jpg


Dyno sheet

Dyno sheet from the final pull

20150810_185003.jpg


Surprising results!

Congratulations on your excellent (and surprising to me) results for an engine that I think still has stock internals. My engine with stock internals and 6 psi max boost is only 7 rwhp greater than yours. I noticed the pulls were on a Dynojet as were mine. Looks like an AFR of about 12.5:1 from 3,000 to 6,000 rpm. Outstanding! Did your tuner change the ignition timing from stock before the 218 rwhp pull?


Join the Elite Explorers for $20 each year.
Elite Explorer members see no advertisements, no banner ads, no double underlined links,.
Add an avatar, upload photo attachments, and more!
.


No he left it at 20° for the first pull, went to 27° on the second pull, which it did not like. Then stepped it back to 25° on the third pull. The last pull he decided to try taking one more degree out and see how it reacted. So now I know between 20-24° of timing is where the engine wants to be so I can play with it a little in those parameters at the track now. It's still got a few more ponies left in it from the dyno. Once the Temps drop down I'll pick up a few more horse and he also told me to try fattening up the fuel for the track.

I'll be over 230 whp once I'm done my next round of upgrades and changes and yes its still 100% stock internals and heads. Next up is some head work and an aluminum intake manifold but that will probably be winter work. I'm happy with it for now


Back
Top