Completed Project - My 98 super charged EX | Page 36 | Ford Explorer Forums - Serious Explorations

  • Register Today It's free!

Completed Project My 98 super charged EX

Use this prefix for completed projects that are not "How to" articles or threads asking for help.
1998 Explorer 4.0 SOHC
Bought it with a melted alternator/wiring harness from a junkyard for $1,000
Fixed it, drove it for two weeks, then I boosted it.
Started with an M90 supercharger kit from www.Bansheesuperchargerkit.com
Upgraded to an M112 Lightning supercharger that was a prototype kit.
Next was the M122 off a 2012 GT500
I have reached 20 lbs of boost (with ARP head studs) and a 12.83 in a quarter mile.

Pictures
1. How it looked when I brought it home.
2.The M90 supercharger installed
3.The GT500 supercharger installed
4.How it looks now
5.Wheelie
green ex.jpg
DSC02710.JPG
5.JPG
Lowered Rear.jpg
Exploder wheelie.jpg


Join the Elite Explorers for $20 each year.
Elite Explorer members see no advertisements, no banner ads, no double underlined links,.
Add an avatar, upload photo attachments, and more!
.


How is the exhaust at highway cruising speeds? Any droan?


Join the Elite Explorers for $20 each year.
Elite Explorer members see no advertisements, no banner ads, no double underlined links,.
Add an avatar, upload photo attachments, and more!
.


Highway

It used to drone at cruise with the old muffler, now it doesn't anymore.
It does get loud when you are doing more than just lightly accelerating.
The loud point is around 2200 rpms now where it used to be 3,000.
My cruising speed is around 3,000 so it is actually quieter at cruise with just enough pedal to keep it going or accelerate slightly.

Personally I would not recommend these mufflers for a daily driver, on Summits website it says something like this.
" If you really want to hear your exhaust system inside as well as outside of your vehicle, then these Super 44 Flowmaster mufflers are for you."

I can drive it in a way to make it quiet which is kind of fun, but if you have to accelerate in traffic you are going to make noise.

I may try a few different mufflers in the distant future to see how sound, backpressure and 1/4 mile times are affected.


New Dyno Sheet

Working doubles, but did get time to run my truck.
Here is the new dyno sheet and the bottom one is a comparison between the last dyno sheet and this new one.
Keep in mind the last dyno sheet was when I did not have water methanol injection or the exhaust.
 

Attachments

  • Dyno 7-1-2015.jpg
    Dyno 7-1-2015.jpg
    55.7 KB · Views: 299
  • Dyno comparison 7-1-2015.jpg
    Dyno comparison 7-1-2015.jpg
    61.6 KB · Views: 302


Thats awesome


Nice increase in torque under the curve. You are still making very good power at the end of the pull (6200 rpm?). I would be looking at increasing my shift rpm if HP doesn't fall off much faster beyond 6200 rpm. Assuming the internals will take higher RPM limits. I didn't really expect that out of such mild cams and stock heads.


nternals

Stock internals probably wont hold up. I cant believe they lasted this long.

I may try spraying the W/M sooner or closer to 3,000 rpm and increase the timing there, that would bring the torque up higher from 3,000 to 4,000 and get me better 60 ft times if nothing breaks.


Yes, it looks great.

Try to keep it reasonable at the shift points, avoiding excess shock there(higher power at the shift). The trans is still the weakest link.


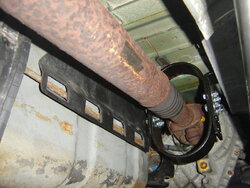
Driveshaft Loop on a second gen Explorer

I obtained a universal driveshaft loop from Summit Racing. It was not an easy install. Had to remove the fuel tank on the drivers side and had to drill some rivets out on the passenger side to remove a heat shield.

I used a hood prop to hold the bolts in place while I started the nuts from the top. After reinstalling the fuel tank I was very pleased with the clearance between the bolt heads and the fuel tank.
 

Attachments

  • 3 over tank.jpg
    3 over tank.jpg
    44.8 KB · Views: 242
  • 2 bolt holder.jpg
    2 bolt holder.jpg
    67.3 KB · Views: 237
  • 1 Loop.jpg
    1 Loop.jpg
    69.1 KB · Views: 234


Driveshaft loop

The passenger side went a little easier, after removing a heat shield.
I could install the bolts from the top since there is no fuel tank on that side to worry about. The bolt holes ended up right behind the front seats under the carpet. Plenty of clearance when finished.
 

Attachments

  • 7 done.jpg
    7 done.jpg
    74.5 KB · Views: 279
  • 4 PS bolts.jpg
    4 PS bolts.jpg
    69.5 KB · Views: 259
  • 5 PS bolts bottom.jpg
    5 PS bolts bottom.jpg
    44.7 KB · Views: 250
  • 6 clearance.jpg
    6 clearance.jpg
    72.1 KB · Views: 231


Very nice


nice. im going to have to figure out a way to do this still. there isnt much room there using a 4406 however :(


I guess your pretty much to the point where its a huge safety factor to do that.
Extremely nice install.
As always, you do amazing work.


Lowered front end

I lowered the front end last night about 1.5 inches. The front always seemed higher than the back to me, except when I had 1 1/2 turns of preload on the traction bars.
It still looks to high, I want to lower it more and eventually lower the rear a little too. I am concerned about blocks and the way I launch the truck at the track, I don't know if they are safe.

I cut the bump stops with a sawzall in a vice and reinstalled them. They have a metal backing that protrudes down one side or I may have cut it more.
After backing the torsion bar adjustment bolt out about 6 turns the suspension was 1.5 inches lower. The camber moved about a quarter of a degree. It had been at 0 and went to -.25
EDIT: after driving it the drop turned out to be 2 inches and camber is sitting at almost -1.25(time for camber bolts)

All you lowered Explorer guys, how far out do you have the adjustment screw and is there anything else that can get the truck lower? I thought I saw something about flipped torsion keys but thought that was for raising the trucks.
Also, besides removing the bump stops is there any other way to have thinner ones? Maybe off another year or model vehicle?
 

Attachments

  • DSC03079.jpg
    DSC03079.jpg
    55.3 KB · Views: 210
  • DSC03081.jpg
    DSC03081.jpg
    48.3 KB · Views: 211


For the front you need camber kits, basically a $30 kit of oblong special washers to provide more camber adjustment. Without them they really cannot get a decent alignment given any real height change.

The back can't go down much or the body hits the bump stops a whole lot. Explorer Express made the best bump stops, but everything they had was super high. Buying the whole kit for about $700 ten years ago was the best deal for the money. Those rear blocks EE made were 1.375", and very well shaped(not just square cut chunks like all other blocks). But those are very high too to buy separately.

BTW, I suggest measuring your height at the front based on the suspension, and not the body. The suspension works differently at differing LCA angles, so if your LCA mounting bolts are not at the same height, then the vehicle doesn't act quite symmetric, left turns may be different than rights etc. I set my front heights by measuring from the ground to the lower mounting bolts, the big ones near the end of the torsion bars.

I think I got my Mountaineer in the 8.5" range, while my Explorer is much higher, maybe 10" or more. The alignment shop could do as much with my Explorer, one spindle is not made as well(as if it was bent and the camber was affected). So I let them raise it enough to get a good alignment on it, and that was with the camber washers. I figured I'd later on replace the one spindle and try to bring it down a little more.

Those are 01+ 4WD spindles I bought for the bigger rotors, these came from a 2003 Sport Trac. Any 01+ Sport or Sport Trac will get you the 1" bigger rotor, using your old caliper/pads/hoses. It has to be a matching 2WD or 4WD spindle though.


Lower

I do have spindles from a newer explorer allowing me to use the 12 inch rotors also.
I will be getting the camber kits, after road testing it the camber showed to be almost -1.25.
The drop turned out to be about 2 inches on both sides after driving it. It is so more forgiving in the front when going over bumps too.


dont go any lower. its too stressful on the axles.....but im sure you knew this already


Before and After

Pics
 

Attachments

  • DSC03089.jpg
    DSC03089.jpg
    81.8 KB · Views: 214
  • DSC00380.jpg
    DSC00380.jpg
    89.1 KB · Views: 201


That's about right, that looks good. I played with mine just before doing an alignment, and then new tires. So I had it at about three heights for testing before I settled on where I'm at. It looked cool being even lower, but I also compromised because of the supposed issues with CV axles.

I have never had a CV issue with it for about 100k miles now. I changed one axle before the drop, and the other from a torn boot about two years later. That's all normal street use for me.

This is an old picture, with 17" Cobra wheels and 29" tires.
 

Attachments

  • 98MntnCobrawheels01.jpg
    98MntnCobrawheels01.jpg
    74.3 KB · Views: 188


Mountaineer

That is a good looking truck!
How much would you say you dropped it?
I can still go another inch down I think, that would put me at 3 inches lower. I want to lower the rear about 2 inches but would still like to have the front slightly lower than the back.

I wont mess with it until I get the camber bolts that I ordered this morning. I want to see how much adjustment they give. If they are maxed out to get the camber in spec, going down further may make it so it can not be put into spec and I can't have that.

I also ordered two upper control arms since the BJ boots are ripped on both. Already did the lowers when I put the spindles on a while back. Besides the passenger side is one piece and should weigh less. Maybe not that significant but might offset the weight of the water methanol pump. lol.
Parts should be here by Friday.


Join the Elite Explorers for $20 each year.
Elite Explorer members see no advertisements, no banner ads, no double underlined links,.
Add an avatar, upload photo attachments, and more!
.


I'm not sure what the change I made was, I relied on the end point which was slightly tweaked on the alignment machine. When I rebuilt the suspension much later, I took an 80lbs bag of cement and placed it in the driver's seat for the alignment. I was hoping to not be doing suspension work to it for a long time, so for that rare case I brought the added weight to help. I asked them to readjust the front torsion keys to be level at the LCA front bolts.

I can measure them again, I have 29" 18's on it now. Your truck has 30" tires, so the LCA bolts would be 1/2" higher for yours, given the same adjustment.

There are 2" rear blocks, I've forgotten what the best brands were now. You will need longer U-bolts for the blocks. Find the thread here about stronger rear shock mounts/plates one of our members makes and sells. He linked me to a site that sells nice and strong bolts and the nuts.


Back
Top