How To: Replace a defective sliding door latch. | Page 3 | Ford Explorer Forums - Serious Explorations

  • Register Today It's free!

How To: Replace a defective sliding door latch.

I'm tempted to send you my latch and let you fix it, lol. I am not that mechanicly inclined.


Join the Elite Explorers for $20 each year.
Elite Explorer members see no advertisements, no banner ads, no double underlined links,.
Add an avatar, upload photo attachments, and more!
.


I used a piece of stainless steel and a Ford screw.


So far the latch modification hasn't given any trouble until this morning. I was surprised that the spring managed to pop out even though the bracket is holding it in place. I removed the bracket, popped the spring back into place, reinstalled the bracket, and didn't have any other issues. Did anybody else ever experience this after modifying the latch?


I think that I figured out why the spring managed to pop out yesterday. I removed the latch today, and noticed that there are wide gaps where the spring could work its way out even though the metal bracket should hold it in place. I removed the bracket, wrapped electrical tape around the latch under the bracket, then reinstalled the bracket.


I have a very important update. The tape around the corners of the latch isn't a good idea as an extra precaution since it will eventually become loose, and the spring will work its way out. The correct way to install the bracket is to have the spring connect directly into the hole on the bottom of the bracket. This will hold the spring in place. The original idea was to have the bracket prevent the spring from popping out of position. This is good for a while until the spring becomes stretched out of shape. Here is a photo that I took with my cell phone (the photo isn't so clear):
The_spring_has_to_go_into_the_hole_in_the_bracket_.jpg

I'm going to edit the post on the previous page with the original door latch modification to update the repair procedure.


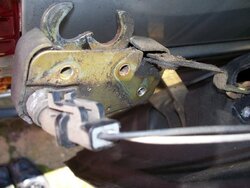
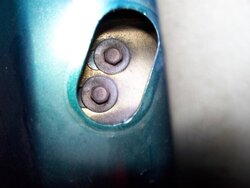
Here's another update. After the spring got too stretched out of shape, the 3/4" bracket didn't do its job like it did 2 years ago. I had to remove the 3/4" bracket, then use a 1" bracket, and make a new hole slightly above the old hole. It's possible to start with a 1" bracket instead of a 3/4" bracket, but the extra tight spring tension will make it hard to close the door the first few times. It should work fine after this break in period.

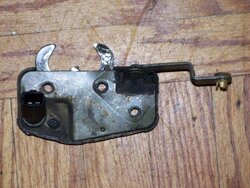
Here's another thing which I came across. The 1989 van uses the same sliding door latch which the rear hatch uses on a lot of models (it has a small switch). The switch on the hatch version of this latch controls the automatic operation of the dome light. The sliding door has a pin switch on the body for the dome light so I assume that the latch switch might be used to indicate which door is open on the digital dashboard display.
 

Attachments

  • Latch with the plug..jpg
    Latch with the plug..jpg
    58.9 KB · Views: 259
  • Latch without the plug..jpg
    Latch without the plug..jpg
    94 KB · Views: 231


The sliding door has a sliding center support with two adjusting bolts. The panel has to be removed to get to these bolts. They are covered by a rubber plug on the right hand side of the door.
 

Attachments

  • The bolts are hidden behind the right hand plug..jpg
    The bolts are hidden behind the right hand plug..jpg
    48.4 KB · Views: 249
  • Two center adjusting bolts in the sliding door..jpg
    Two center adjusting bolts in the sliding door..jpg
    40 KB · Views: 249


The sliding door has a pin switch on the body for the dome light so I assume that the latch switch might be used to indicate which door is open on the digital dashboard display.
Your assumption is correct.
I must have damaged my pin switch during my latch repair; as such I had to disconnect it as it would trigger a 'door ajar' warning + dome light.


The door ajar wiring on my 1995 van with an analog cluster has two contacts on the sliding door which meet the two contacts on the body. The other set of contacts is for the power lock in the sliding door. Sometimes the internal connection on the door ajar contacts fails or the metal contacts compress or wear out. The dome light is controlled by the pin switch on the body.


NICE Link! Thanks,Brookyn! don-ohio :)^)


There is a serious design flaw on the end of the sliding door track. The wide track gets reduced to a narrow tab under an area with the most amount of stress. This tab is located in the corner of the track where the track turns into the van. This part is responsible for keeping the door locked in place when it's fully closed, and for guiding the door out of the body when it slides onto the rear panel of the van. When you open the sliding door, you have to give it a hard pull which puts a lot of stress on this tab until it eventually cracks off of the track.

The solution to this issue (instead of replacing the entire track which is a discontinued part) is to add a thick gauge metal bracket to the track when this tab cracks off. The bracket was a little wide, so I had to grind the sides, bend the bracket to a 45 degree angle, and drill a hole for a 1/4" carriage bolt. To simplify the installation, a blow torch was used to solder the head of the carriage bolt to the bracket. A washer, nut, and cap nut were used to lock it into place.

Broken tab from a sliding door track..JPG


Front view of the repair bracket..JPG


Rear view of the repair bracket..JPG


Back
Top