vervepipes
Well-Known Member
- Joined
- January 26, 2005
- Messages
- 420
- Reaction score
- 0
- City, State
- Cold Lake, Alberta, Canada
- Year, Model & Trim Level
- '98 XLT
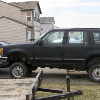
Well it was time to change my anti-sway bar links so I brought a camera. This is what I found one day after hearing loud clunks every time I hit uneven ground:

As much as I dont like NAPA, I'm a sucker and keep going back to them. The job would have neen made easier if the bolts were 1 or 2 MM longer to help the nuts grab the thread. The kit comes with both sides (indevidually packaged per side) loosely in a bag, but here is what the stackup should look like:

If your old link is broken, removal could be as simple as pulling down (or up) on the remaining bit, or else some release-all and a 15MM socket for the bottom and 16MM socket for the top will do the job. When I removed the non broken one, the nut was on the bottom and the bolt was passed down from the top, so because of clearance issues I lifted the truck a bit from the front crossmember to be able to pull the bolt out.
*note: I realize that safety wise I did the job wrong, I installed it from the bottom up. The reason for this is in the case of a nut letting go, the bolt will not simply drop out and disconnect the anti sway bar, so I may end up re-installing them later in the propor fashion, but you can still use the pics as reference, just start from the top instead of bottom.
start the stackup with a washer and bushing (they bushing "cups into the washer and the smallest part of the bushing should fit into the holes on the arm and bar, so it's hard to get it wrong)and pass it through the first hole

Then continue with a bushing and washer

This is where you would add the copper coloured tube spacer. The next half is identical to the first portion. To be able to get the nut started, you then have to drop the truck back down and tighten away. I dont know about a torque because you dont want to wreck the bushings, so I just put it tight with about 3-4 threads showing. The new bolt and nut were 11/16
Hope this helps anybody who wants to do this.
As much as I dont like NAPA, I'm a sucker and keep going back to them. The job would have neen made easier if the bolts were 1 or 2 MM longer to help the nuts grab the thread. The kit comes with both sides (indevidually packaged per side) loosely in a bag, but here is what the stackup should look like:
If your old link is broken, removal could be as simple as pulling down (or up) on the remaining bit, or else some release-all and a 15MM socket for the bottom and 16MM socket for the top will do the job. When I removed the non broken one, the nut was on the bottom and the bolt was passed down from the top, so because of clearance issues I lifted the truck a bit from the front crossmember to be able to pull the bolt out.
*note: I realize that safety wise I did the job wrong, I installed it from the bottom up. The reason for this is in the case of a nut letting go, the bolt will not simply drop out and disconnect the anti sway bar, so I may end up re-installing them later in the propor fashion, but you can still use the pics as reference, just start from the top instead of bottom.
start the stackup with a washer and bushing (they bushing "cups into the washer and the smallest part of the bushing should fit into the holes on the arm and bar, so it's hard to get it wrong)and pass it through the first hole
Then continue with a bushing and washer
This is where you would add the copper coloured tube spacer. The next half is identical to the first portion. To be able to get the nut started, you then have to drop the truck back down and tighten away. I dont know about a torque because you dont want to wreck the bushings, so I just put it tight with about 3-4 threads showing. The new bolt and nut were 11/16
Hope this helps anybody who wants to do this.