Cruise control steering wheel switch replacement | Ford Explorer Forums - Serious Explorations

  • Register Today It's free!

Cruise control steering wheel switch replacement

aldive

Elite In Memoriam
Joined
January 17, 2001
Messages
24,667
Reaction score
28
Year, Model & Trim Level
1999 XLT
The cruise control switches on the steering wheel of my ’99 finally bit the dust http://www.explorerforum.com/forums/showthread.php?t=221762&highlight=cruise+control . The switches still function but the light output at night is very annoying. In view of the fact that I use cruise control daily/nightly, a new switch assembly was required.

I ordered the new switch assembly from Torrie at Fast Parts Network ( http://www.fastpartsnetwork.com ). The part, SW-5928 F87Z9C888BB, cost $60.87 to my door.

Caution: extreme care as well as safety glasses should always be used when handling a live air bag.

The first step in the replacement was to disconnect the negative battery cable and wait about 15 minutes. This was followed by the removal of the two steering wheel cover plugs ( one on each side ) by prying loose with a pocket knife. After that, I removed the two driver side air bag module retaining bolts ( 8 mm ) with a ¼” air ratchet.

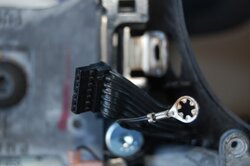
Subsequently I removed the air bag module by gently lifting the module and disconnecting the electrical connector then pulling the module free. The module was then cautiously set aside while replacing the switches.

The cruise control switches are held in place with 2 screws ( on each switch ). These were removed and the flat wire cable was unplugged from each switch. There was no need to replace the wiring harness since the switches still function and it was in pristine condition.

Assembly was simply the reversal of the disassembly.

The cruise control switch replacement took only 30 minutes ( including the 15 minute wait on the battery ) working at a relaxed pace.

A short road test confirmed a successful installation. Further a test at night established the lights function.
 

Attachments

  • 1.jpg
    1.jpg
    43 KB · Views: 45,303
  • 2.jpg
    2.jpg
    49 KB · Views: 45,200
  • 5.jpg
    5.jpg
    41.4 KB · Views: 45,134
  • 6.jpg
    6.jpg
    35.1 KB · Views: 45,127


Join the Elite Explorers for $20 each year.
Elite Explorer members see no advertisements, no banner ads, no double underlined links,.
Add an avatar, upload photo attachments, and more!
.


.
 

Attachments

  • 3.jpg
    3.jpg
    50.5 KB · Views: 58,001
  • 4.jpg
    4.jpg
    26.9 KB · Views: 45,203


I can't get the switches off the new wiring harnesses for same part number SW5928, any suggestions or directions for placing the switches and wiring harnesses even though my old ones are still good.


could I just remove the covers AND the backing plate?

i dont use the controls and think it might be better looking with it off...


Wiring Harness

Okay, that was our problem -- the original instructions did not say to take the switches off the wiring harness. And my DH -- with fairly large hands -- had problems with it. I futzed and futzed, and finally got it. Here's the basic deal:

Pinch the ends of the plug on the wiring harness together. Don't have to pinch hard. Keep wiggling the plug around while pulling apart. It took about a minute of wiggling and pulling, but it finally came apart. Takes steady traction, not a sharp pull. Using pliers did not work at all -- thumb and index finger worked well.

Good luck!


More info on doing this

Let me start by saying that (1) this really should take you only 30 minutes; (2) to make clear, you do NOT have to take the steering wheel off unless you need to replace the wiring harness as well as the switches; and (3) if you haven't done this type of thing before, read on to learn how NOT to turn a 30 minute project into a 12 hour one. The good news is that we made every mistake we could, and we still got it all back together and working . . . it just took a while.

First, the new switches come with the wiring harness attached. You have to take them off so that you can do the easy replace. I strongly suggest doing this before you start working on removing the ones in the car -- it's much easier to see what you are doing and then you know what you're trying to do with the ones that you can't see as well.

Note that it's pretty easy to screw up a connector in pulling it out of the switch. As one of the other posters noted, they seem impossible to get apart and my husband was convinced that we'd gotten a new design of the part that would not come apart. You need to work slowly and carefully, giving a steady pull and not a jerk. We found that my smaller hands were better suited to this than my husband's -- I've also done more mucking around with computer connections than my husband and am more familiar with this type of a connector. It took about a minute per connector to get apart, just slowly working it loose.

Second, it's very easy to reconnect the wires upside down. They snap right in, just like it's put together correctly. This is a MAJOR flaw in the design of the part. The plastic ridges on the connector go up (that is, towards the driver) and the single wire that goes to the horn goes towards the top of the steering wheel. This is true on both the left and right switches.

If you get a connector upside down, the exact symptoms will vary depending on which connector is wrong. Your first clue may be the horn honking constantly when you reconnect the battery (MNGohper said this was particularly startling in a closed garage!). For us, the green "Speed Cont" light on the dash began flashing when we turned the car on, and the "OFF" button on the switch honked the horn. Needless to say, the cruise control does not work.

Third, this is one of the projects where a digital camera can come in very handy. I HIGHLY recommend that you take digital photos at every step of this repair. Every time you're about to pull a connector off or take a screw out, take a photo first. You may not need them all, but we would have killed for a few good photos -- the photos above from aldive were all we had and while really helpful, we needed a few more.

Fourth, if you're like us and screw up a connector on the wiring harness and then end up having to take the wheel off to run the new one, be sure to take photos of how the cables are run around the wheel. And note that when you put it all back together, you have to make sure that no cables are pinched.

You'll also have to remove the right horn sensor within the wheel as the wire runs between it and the wheel itself. It's pretty self-evident. Not realizing that we only needed one off, we took both off and then wondered if there was a difference between the left and right. Not that we could tell, and this was not the cause of our problems.

If you have to take the wheel off, note that the wheel puller for the Explorer is not the standard one. We borrowed a wheel puller from AutoZone (what an awesome service -- $20 deposit refunded when you bring it back) and had to jerry-rig it to work on this wheel (if forced to do it this way -- all other stores in a small town closed for the weekend -- you can do it with a couple of big wing nuts to serve as claws to go under the "pull" areas of the wheel).

Finally, if you're like my husband and want to test the installation before putting the air bag back in place, you can. It should work perfectly without the air bag module (you'll see a yellow air bag icon on the dash, though). When we had the connector wrong, we wondered if our problems were because of the air bag not being in place. That was not the problem.

Don't let this info scare you off doing the project. It would have been a quick and easy job if we'd paid attention to these things in the first place. If you routinely do a lot of work on your car's electrical system, you may not need this info, but it's the first time we've tried something like this. We needed more detailed instructions! Many thanks to those who helped us figure out what our problem was -- that's why I'm posting here, to pay the help forward.


My left side switches dont light up, they did before I replaced them. Anyone know which one of those black wires is for the left side to light up? Been beating myself up about it. ROFL


Left switch doesn't light up

Don't know which wire it is, but from our experiences in replacing our switches, the first thing I'd try is to disconnect and re-connect the wiring harness, being sure to push the plastic parts together really hard. It's easy to get those connectors just slightly off from one another!

Good luck -- maybe someone else here will have a better idea.


OK, I have been pulling and pulling and pulling on the wiring harness plugs, but cannot get them apart from the cruise control switch. What I have is cruise control switch part # SW-5928, bought brand new from Amazon.

The first thing I noticed when I received this switch is that the plugs are loose and can wiggle back and forth. However, they will not unplug. When I am pulling on the plug, and working it side to side, I don't notice any progress being made. The plug is still the same distance inside of the switch.

Enclosed is a picture of me unsuccessfully trying to remove the plug. Am I doing it correctly?


cruise_002.jpg


Looks like you're doing the right thing -- pulling on the plastic fitting, not the wires themselves (if you pull on the wires, they'll pull out and you'll have to replace the whole wiring harness). Just keep pulling -- steady pull, not a jerk. It literally took over 60 seconds (which seems like forever), and right until the end, didn't seem to be coming apart. Finally it came. I broke a couple of fingernails doing it. Same hassle for all of them, unfortunately.

Keep wiggling!! Good luck!!

P.S. I had better luck than my husband -- smaller hands. If there is someone around with smaller hands, maybe ask them to try??


Ygofast, thanks for the suggestions, but I had to take a different route. I let my wife have a try. She is Thai, but those small Asian hands still couldn't pry the plug loose. I than gave it to my son. He figured out that there is a 'lip' on the plug as well as a 'lip' on the switch at the lower part where they connect (see photos). Using a butter knife, he pried them apart. When I got to the old switches on the steering
wheel I had to use a screwdriver. I wedged it between the switch and plug and applied pressure.
By far the hardest part of this whole repair job was getting the plug and switch apart.
I also heeded your warnings and made sure the plugs were aligned correctly before snapping them in place.

Since Ford sells the switches and wiring harness attached, and makes it so difficult to come apart, I think that they want people to pull the wheel and replace the harness. I agree with everyone else that its a much easier job replacing just the switches.

The switch and plug look chewed up in the photos but remember these are pretty good close ups. They still connected OK after the prying.

Thanks for the help.
plug_004.jpg

switch_004.jpg


AHA!! Thanks for the additional info and photos -- I'm sure they'll help others trying to get these &*#(& things apart.


Just wanted to add my thanks to all the folks who've posted up on this problem.

I ordered my replacement switches from Amazon and they came in on Friday. It honestly only took me about 10-15 minutes to swap out the switches. Thanks to everyone for the thorough descriptions and pictures. Aside from waiting after the battery was disconnected, the part that took the longest was removing the plugs on the steering wheel so I didn't mess them up. After I got the airbag removed, it just took a little prying with a flat screwdriver to disconnect the harness from the original switches. The new switches went on without a hitch, and my steering wheel looks great again. I'm looking forward to the next time I drive at night so I can do so without the broken switch shining in my face.


Cruise control switch tip

I joined this forum after getting really great info about replacing my broken (snapped at the screw holes) cruise control switch. Everyone seemed to be having trouble getting the wiring out of the switch. Try this: use a flat metal gap gauge, about .018 in thickness. Push it in on the side where the catch on the wiring harness is and gently pull the wiring out. Popped out like I had a tool specifically made for just that. Sorry I can't supply any pictures (need to go to a forum for fixing cameras). Again, thanks for all the good info on doing DYI repairs. Has saved me close to $300.00 already in just two repairs. The other one was replacing the main bulbs in the insturment cluster.


Great forum. I had to replace my totally worn out cruise control switches on the steering wheel. Easy to do except getting those dang connectors off. TimAhlgrim's hint of using the feeler gauge saved the day. i had to use a .012 gauge to get down in the slot since it's the side that is covered up with a notch. but it worked. Thanks to all.....

Bob


Damn You're Brave!

Greetings! I just went out to look at how to replace these things and once I saw the airbag assembly needed to come out I was thinking to myself, 'Oh Hell No'! But now that I've read your article I'm a tad more confident to do it. Thankxs for the procedure and pictures to do it!
regards,
Will


Anyone changed them on an '03? Which part number does it use? The only ones I can find online that specifically say 2003 have a really clunky square design to the switches.


Remove horn cover, 2 screws that hold the switch, and then the connector.

I have a 2000 Ford Ranger and I'm trying to *NOT* have to remove the air-bag and steer wheel... just to replace the cruise-control ON/OFF switch.

Sound like the 'connector' is VERY hard to get off.... but I willing to try.

WITHOUT removing the air-bag and steering wheel...

How do the 2 screws come off... that holds the ON/OFF switch in place?

How does the horn cover come off?


Join the Elite Explorers for $20 each year.
Elite Explorer members see no advertisements, no banner ads, no double underlined links,.
Add an avatar, upload photo attachments, and more!
.


The "horn cover" is the airbag. It has to come off.

The steering wheel does not have to come off.


Back
Top