Ronin8002
Explorer Addict
- Joined
- March 23, 2003
- Messages
- 4,416
- Reaction score
- 15
- City, State
- Virginia
- Year, Model & Trim Level
- 2008 XLT Ironman
Just wanted to post up pics and a quick rundown of a basic limiting strap install for the 3rd Gens. I think the install might vary a bit depending on what size spacers you're running and what type of upper control arms you have, but in general, I think this will work for most setups I've seen around here.
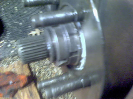
I'm running a pretty mild spacer lift, only 1.25" front and 1" rear, but in the front the uniball cup of my BTF upper control arms still hits the springs at full droop:

So I bought a set of 12" limit straps with mounting brackets from Ruffstuffspecialties.com. Here's what a strap looks like with all the hardware. The length measurement is from mounting hole to mounting hole:

Next, I used a wire wheel to clean all the paint off the points where I planned to weld the brackets. I also disconnected the upper control arm, removed the strut, and removed the swaybar end link to get the room I needed:

Next I welded one of the brackets to the lower control arm:

I spray painted it after it cooled down.
Then I hooked up one end of the limit strap to the lower control arm and reinstalled the strut and upper control arm. I drooped the supension out until the upper control arm was just a hair away from touching the spring. Then I moved the other end of the limit strap up to the upper mounting point and marked where it needed to be welded. I actually ended up moving it even farther up after I took the pic since the limiting straps will stretch 1" for every 12" of strap from what I am told. This turned out to be pretty accurate. So basically droop your suspension out to just before you have spindle to spring or control arm to spring contact. Stretch out the strap and mark where the upper edge of the bracket goes. Then go 3/4" to 1" further than that.

Then I disconnected the upper control arm and removed the strut again. I then welded the upper bracket in place and spray painted it. My vertical position welds are ugly as hell so I am not posting the unpainted pics...the painted ones are bad enough, lol. The welds do seem strong though (survived being hit by a sledge several times) so I think they'll work fine:

Then I put the strut and upper control arm back in for the last time. I also reconnected the swaybar link. Bolted in both ends of the limit strap and drooped out the suspension. The strap stretched tight and the uniball cup no longer touches the spring:

Couple of more shots with it drooped out:


And what it looks like with the tire on and the weight of the vehicle resting on the ground:


The other side of the vehicle went pretty much the same way.
The straps are pretty stiff so they don't flap around much with no tension. When they are fully stretched they are very tight though...you can flick them and they sound like a drum!
Look forward to giving these things a workout in the next few weeks and I'll report how they held up.
Little warmer outside today, after I was done I had an ice cold one of these...

Thanks Wills05XLT4x4!!!!
I'm running a pretty mild spacer lift, only 1.25" front and 1" rear, but in the front the uniball cup of my BTF upper control arms still hits the springs at full droop:
So I bought a set of 12" limit straps with mounting brackets from Ruffstuffspecialties.com. Here's what a strap looks like with all the hardware. The length measurement is from mounting hole to mounting hole:
Next, I used a wire wheel to clean all the paint off the points where I planned to weld the brackets. I also disconnected the upper control arm, removed the strut, and removed the swaybar end link to get the room I needed:
Next I welded one of the brackets to the lower control arm:
I spray painted it after it cooled down.
Then I hooked up one end of the limit strap to the lower control arm and reinstalled the strut and upper control arm. I drooped the supension out until the upper control arm was just a hair away from touching the spring. Then I moved the other end of the limit strap up to the upper mounting point and marked where it needed to be welded. I actually ended up moving it even farther up after I took the pic since the limiting straps will stretch 1" for every 12" of strap from what I am told. This turned out to be pretty accurate. So basically droop your suspension out to just before you have spindle to spring or control arm to spring contact. Stretch out the strap and mark where the upper edge of the bracket goes. Then go 3/4" to 1" further than that.
Then I disconnected the upper control arm and removed the strut again. I then welded the upper bracket in place and spray painted it. My vertical position welds are ugly as hell so I am not posting the unpainted pics...the painted ones are bad enough, lol. The welds do seem strong though (survived being hit by a sledge several times) so I think they'll work fine:
Then I put the strut and upper control arm back in for the last time. I also reconnected the swaybar link. Bolted in both ends of the limit strap and drooped out the suspension. The strap stretched tight and the uniball cup no longer touches the spring:
Couple of more shots with it drooped out:
And what it looks like with the tire on and the weight of the vehicle resting on the ground:
The other side of the vehicle went pretty much the same way.
The straps are pretty stiff so they don't flap around much with no tension. When they are fully stretched they are very tight though...you can flick them and they sound like a drum!
Look forward to giving these things a workout in the next few weeks and I'll report how they held up.
Little warmer outside today, after I was done I had an ice cold one of these...
Thanks Wills05XLT4x4!!!!
")