Tom's '97 XLT registry | Page 14 | Ford Explorer Forums - Serious Explorations

  • Register Today It's free!

Tom's '97 XLT registry

Here's my registry. It's not going to really serve as much of a build log or anything, just to help keep track of the (minor) things I do to it along the way.
(Edit: yeah, that all turned out to not be true...... Keep reading to see what I mean)


This is my 1997 XLT. I bought it on 10/13/2010 with 117,500 miles for $2000. It has the SOHC V6, 3.55 rear end and the "Controltrac 4 wheel drive".

This is basically as it was when I brought it home:
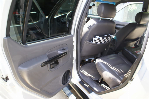

Interior shots:pG[/IMG]
(lost photos)

Features:
side-step boards
6,000 lb receiver
Ford mudflaps (removed)
hood wind/bug deflector

This Explorer wasn't abused- just a little neglected. The interior is in good shape. The paint isn't in horrible shape- some dings and scratches here and there. All-in-all, good shape for a 13 year old vehicle.

Issues:
cracked and pitted windshield (fixed via post 61)
inoperable 3rd brake light (fixed via post 68)
inoperable fog lights (DS housing is smashed on backside and button on dash does not illuminate) (removed)
poor heater output (fixed via post 3)
coolant temp gauge not moving much (fixed via post 3)
pulsing front brakes (fixed via post 2)
slightly sagging rear end (fixed via post 7)
weak hood lift struts (fixed via post 5)
weak glass lift struts
weak tailgate lift struts
broken driver's seat recline handle (fixed via post 8)
leaking rear transfer case output seal (fixed via post 23)
worn shocks (fixed via post 7)
alignment out-of-whack (fixed via post 12)
lack of engine power (fixed via post 3)

So basically from here on out, this registry will be dedicated to how I have breathed some life back into this thing and some adventures along the way. I've already addressed some of the issues mentioned above. I'll try to post as many pictures as I can, but I know I've already failed on some.


Join the Elite Explorers for $20 each year.
Elite Explorer members see no advertisements, no banner ads, no double underlined links,.
Add an avatar, upload photo attachments, and more!
.


Looks like fun!
You guys have much snow left?


Join the Elite Explorers for $20 each year.
Elite Explorer members see no advertisements, no banner ads, no double underlined links,.
Add an avatar, upload photo attachments, and more!
.


In areas. This particular area tends to not get much snow and quickly melts what it does get. The north end of the state would be a winch-fest still. And the higher passes will be snowed in until late May or June. Or at least I hope. More snow usually means less forest fires.


Leading the pack:
0697ED0D-44DA-4154-937D-1734D3991EF8.jpg


BC19E3BE-8B44-4E6D-A370-1227636ABC8B.jpg


Pikes Peak:
CA6BF46D-2D42-4E57-805E-684E990CF2A8.jpg


Driving through a burned out forest at dusk is a little creepy:
4EB8D8CD-39A2-4D8F-B543-3E5630E3DABE.jpg

36D70FB6-E882-4077-B0B1-5B75801720D1.jpg


Had to stop and clean the mud off my lights:
58919D6A-E074-4D94-A8ED-A666865E02B0.jpg


Nice. I see you got really lucky and almost joined the ranks of the flopped over gang. LOL


I wish I didn't do my 2" body lift, but my bumpers and sliders are built to that height so I'm stuck with it. And I think it looks way worse than it is. It's been tipped over farther before and it hasn't gone over. A wider track would help too.


I've been looking into my front springs. They are RE1354 springs from Rubicon Express. The spring rate listed is 184 lbs/in. When I measure them and assume a number for the shear modulus of steel, I get a spring rate of 170 lbs/in.

At least I'm in the ballpark.

Ideally I'd like to get rid of some of my height. I'm really too tall for what I like to do. Rubicon Express does not make a spring that really fits my needs. The RE1300 is close (3.5" lift vs my 5.5") but it has a spring rate of 240 lbs/in. I'm concerned that is too big of a jump in spring rate.

My other alternative is to start cutting coils. Assuming my numbers, cutting one coil would go from 170 to 184. Another coil would go to 201. Another would go to 221. And that's just in whole coil increments. But I'm not sure on what each would do to my ride height.

Thoughts? I may post this in the suspension section as well for those who are seeing my registry.


Haven't done anything on the springs yet. Need to hook up with a mechanic buddy of mine and use his lift in his shop. I'm going to swap my leaf springs side-to-side because the Chevy that I got mine from also suffer from the side lean.

But in the mean time I've been working on this:
2484EEC4-16CB-4ECC-902B-5C9DF6A84AB8.jpg


Is that from a Tacoma?


It's a generic 80-series Land Cruiser. It's taking a little massaging with a heat gun. In the end, it'll pass the 10 foot test.

But most importantly it'll hopefully keep my air filter cleaner on all these dirt roads I drive. Going to be doing a couple hundred miles in CO/UT at the end of May with a group so it'll get a work out.


Too bad you couldn't bring it back and run it along side the windshield pillar, gonna be a bad blind spot there.


The worst blind spot is the massive lift. The snorkel tube isn't that bad. My iPad hangs from the windshield over in that area so it's already partially blocked.

Here's some pictures of the process:

I decided I wanted no S-bent piping behind the fender and to just have the 90 degree at the end of the snorkel go straight into the airbox. Here's where it goes through the inner fender:
E665B7D4-3421-4E61-964E-2F384ECD4E26.jpg

95C9AF77-EBA3-4E7E-8C0D-64F4571B501B.jpg

A 3.5" hole saw made quick work of it. But I should have gone with the 4" to give myself a little forgiveness.

Fender off to cut the hole.
1BE09A23-CFAE-4F8E-BA69-2499514CFC74.jpg

287F76DE-E02A-45E7-9B21-38F9666097AC.jpg

4A1AECE1-102E-4628-9D77-0DBED093B3B6.jpg


Then some heat gun massaging and repeated test fitting:
2484EEC4-16CB-4ECC-902B-5C9DF6A84AB8.jpg


It's ready for the fastener template:
6F310301-0D88-4860-B8E5-58896B43FCA1.jpg


Installed:
18624DBB-4996-435A-A62A-EA37E0CDB129.jpg


This is the rubber hose connecting the snorkel to the airbox as seen between the fenders (fender liner removed):
76EECA73-EE81-4229-BD1F-1405559DC44D.jpg


Backside of fender showing a couple of the fasteners:
42B68F12-44D5-4EFE-A1C9-24B424E07DE1.jpg


I still want to bend the top of the snorkel so the snorkel head is straight. Other than that, I'm just waiting on the adhesive to dry on the airbox itself from where I closed off the OEM front hole.


Interested to know where you order the snorkel from.


Good job Tom never thought of doing it that way
IMG_0166_zps60911b57.jpg


53640A12-1CC1-4515-87D0-07C07E1615C8_zpskzzuwhdu.jpg


How does the front edge look down that low ?
I did have to s bend the tube in the fender but I'm thinking I may put my spare fender on and do it your way. Props man


I like the way yours looks. The air path for mine is simple and hooking it up is easy, but yours looks better. Yours looks like it belongs there, mine looks sort of hacked on.


I don't know Tom still think it looks good and as long as it's working it's job done


Well the ceramic pads I put in the rear about 20k miles ago wore out. One was metal on metal. Got warranty replacements. Had to buy new rotors though. I could probably turn the rotors, but I'm getting ready for a big trip in it and this was just easier. I'm keeping the old ones. Maybe the next time I wear one down metal to metal, I can use the one good one I still have and have a useable set.


Join the Elite Explorers for $20 each year.
Elite Explorer members see no advertisements, no banner ads, no double underlined links,.
Add an avatar, upload photo attachments, and more!
.


New front driveshaft. The old one developed a wobble/vibration above 40 mph. It was completely dry on spline lube and was about 1" too short. Old one used the Jeep Grand Cherokee slip shaft, new one has a beefier Spicer slip shaft. No more vibrations!
71F34F61-3853-41A1-A9E6-525448BAE287.jpg

EA0B419F-7342-448C-B446-7E4AC400B09C.jpg


Back
Top