Hello from Phoenix, AZ. My name is Greg.
This is gonna serve as my rough draft registry/build thread
OK I've been snipe'n this site for research, ideas and info for about 2 years now and I have to say thank you all for putt'n this thing together. I know my truck very well now with help and tips from this forum and of course busting some knuk on the sharp bits.
So it's time to participate!
I love this truck!
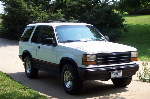
I'm add'n to the fold my '94 Ex Limited.
You know one of the purple one's. Dark Cranberry they call it. Not a bad color but a little soccer-momish. So that's gotta go!
Got it from the original owner with 108k very well maintained miles, absolutely free of rust. If not for the front leather the interior is 10 of 10. Date of purchase Sept 2010. Everything in working order and I do mean everything, including the beauty lights on the sun-visors.
Project "KITRINOS" that's Greek for "Yellow" (future color)
Here she is intermediate, cleaned up no lift just the Alcoa's and streety BFG 30x10 long trails.


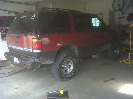
And where she is today 10/10/2013 with 2" susp. lift and BFG KMII's


Again, thanks for all. Hope to get some trail rides put together and hope to see you on the Dirt!
Project: Rear axle swap to 98' 3.73LS with disc brakes. Sorry no pics for this one. Uneventful bolt in swap. Nice! Trust me it's in there!
Project: The Ultimate no-loss cargo sytem:
Normal Position:

Drawer extended (300lb of tools in there! ) Deep enough to carry a car battery.

Rolled forward for cargo deck access!
(this was the goal for this project)
Not to loose the ability to stuff a washing machine (full size spare, whatever) in there without removal of the drawer from the vehicle... ..... even with cargo on the shelf!

As the shelf is free floating some safety straps and pins to hold snug. Testing note: the aluminum " stiffening" needs to be upgraded to steel.

Access to the trail recovery essentials. Tow strap and jumpers right here.

Access to side boxes when rolled forward (lid can be lifted/removed when retracted as long as no cargo is on shelf) (does not interfere with sub woofer):smoke:

Still have access to jack storage:

Just a plastic glide on front edge to slip over the seat backs. (Simple)

This Thing was fully loaded with camping gear on the shelf and all my tools plus trail spares (spare locking hubs, u-joints, oil, wheel bearings, etc.) on this years TruckHaven run, abused thoroughly and ZERO damage resulted..Tested tough!
Really adds to the trail versatility of my Ex.
Other niceties:
Total weight 75lb.
Only attachment is at the factory cargo tie down weld nuts. 8 bolts! and it's out.
Side support is provided by "L" and "T" brackets with rubber bumpers to protect the side panels.
When this thing is removed there is no evidence left behind. Back to factory original. No drilling/cutting. You don't even have to cut the carpet to install! Resale bonus!
Not exactly cheap $400.00 at least. The rollers are $4.20 each and there are 24 of them! 24 x $4.20 = $100.80
Original design had 18 - Not enough.
3/4 hard wood ply $80
1/2 hard wood ply $65
Carpet, glue, bolts, nuts, square tubing, patio door latch, truck straps, yata yata. lost track, at least $200 more. You can make some improvement here; I used all stainless (mistake) to soft and to expensive. which added to my cost. Had to redo with grade 5 stuff.
Be prepared to spend $400.00 to be realistic.
Enjoy!
Love this truck! .. .. FIRST GENS RULE! :exp:
Project: Steering shaft mod.
The victim: (Donor)
1993 Jeep Grand Cherokee 6 cyl. (ZJ)
Here's a pic of the two shafts for comparison Ford(top) ZJ(bottom)

The Plan:
The 93' ZJ shaft is just about 2" to long.
I will remove the rubber damper sleeve covering the slider and cut to length. Replace with shock boot.
Note: The older XJ shafts are about 3' long; can't be cut enough to get the right length ( the slider tube is not deep enough )
On the splined end the spline count is different; but only provides alignment and a "measure" of safety; not the primary holding mechanism. The "D" cut and clamp force is the primary.
However; I intend to machine the splines for a "better" fit.
Caution: Please do not except this as a go ahead to do this:
I will have to stress test this for a extended period of time to feel safe with it.
And for as long as I run it I will have to commit myself to daily safety inspection of this modification for as long as I own this truck.
If I feel this is in any way not holding dead fast I will scrap the whole thing or sacrifice the steering box by welding the spline joint to the input shaft.
OK, That's the Disclaimer.
Updates should come fast now.
NEXT WEEK; INSTALL!

Cut measurements worked out to:
6-1/4" off the stub.
2-3/4 off the tube.


I reexamined the spline situation; the clamp material is quite soft and filing on the splines only knocked the points off.
So, Plan "B": I will open the cuff enough to allow me to "tap" it onto the box shaft and clamp it down.
Turns out the "flat" is the primary stay, the splines insure the flats are 90* to the pinch bolt, so that when tightened down they pull together flat.
For an extra measure I am going to use different hardware; the original bolts thread into the cuff but do not pass all the way through, so I will use longer grade 8 bolts so I can use a castellated nut and cotter pin to secure it. Same on the upper double "D"

First things first;
Off to the hardware store for some hardware engineering;
The Jeep bolts are not long enough for a lock nut: Unacceptable!


Recessed for flange bolts:

I'll fix that!


The upper double "D" needs a 1/4" longer bolt than the lower:

Nylock with Loctite sounds good!


Ready to install!
Out with the old:
NOTE: PARK THE TRUCK, WHEELS STRAIGHT AND LOCK THE COLUMN:
DO NOT TURN THE WHEEL UNTIL I TELL YOU TO!

Some comparison shots:


Lower rag joint not look'n real safe!

The remains of the stub that was cut off the ZJ shaft is a perfect fit to "inside" sleeve the steering column tube. Nice! This one's for member "gmanpaint" in particular. (strengthen up the column)

The Ford shaft uses a through bolt, both as the "pinch" and as the safety; so next we have to address that:
We need to drill a "center" hole in the ZJ shaft to accommodate:

This leftover piece of the ZJ shaft is coming in handy!
It makes for a perfect gauge to scribe the center line to drill the hole.

We now have a pinch bolt, And a safety pin.
Drilling took 3 minutes; this stuff is really soft.. ... ..

Get both ends opened up so you don't have to fight with it:

Install the lower half first:
Line up the "flats" and tap it onto the gear box shaft: (Gently)
don't want to bust the u-joint. If your bang'n,, open the end up more.
Tap it down until the bolt "groove" is lined up:
Wait to install this bolt last; you will need to turn the wheel to get it in.

Grease the shaft:

Slide the upper onto the lower, then up onto the column.
Install the safety pin; loctite and nylock

Now the pinch bolt; Torque it home. Also loctite and nylock
This ain't going anywhere!

The whole enchilada in place:

Now to get the lower pinch bolt in:
Start the engine and turn the wheel so you can get at it through the wheel well.
No, it's not going to slip on the gear box shaft, I drove the truck 2 miles with NO pinch bolt as part of the safety testing.
Torque it home with loctite.

Now we need to turn the wheel again to get the lock nut on. (you guessed it! loctite and nylock)
And that ain't go'n anywhere either!

And that's that! DONE!
Some curb shots for testing;
Power steering gives out before you get any real force going on the steering wheel.

I'm feeling good about the durability and safety of this mod.
Now for a couple weeks of commuting to work for further testing.
Drives real NICE! no more mushy feel, steering response is way quicker.
Shaft $9.95
Grade 8 Bolts $2.75
Project: Smooth sexy limited edition sliders.
While abusing my 94' Ex Limited off road,
I noticed the the running boards are pretty sturdy.
They are in the right location, have good dimensions and sturdy mounts.
But they are very jaggy on the bottom and the plastic is, well; Plastic.
On one occasion if the running boards were off I would have destroyed both doors on the passenger side.
So I set out to build the (I think) first set of Limited edition (retain the running boards) Sliders.
So here they are: Hair-brained, what were you thinking, engineering what?
Some 3/16 a 50 ton press brake and a plasma-cutter, and you end up with this:

That's a big sucka!.....

Fit, weld, grind, drill, double check and before you know it.. .. ... ..


This is gonna serve as my rough draft registry/build thread
OK I've been snipe'n this site for research, ideas and info for about 2 years now and I have to say thank you all for putt'n this thing together. I know my truck very well now with help and tips from this forum and of course busting some knuk on the sharp bits.
So it's time to participate!
I love this truck!
I'm add'n to the fold my '94 Ex Limited.
You know one of the purple one's. Dark Cranberry they call it. Not a bad color but a little soccer-momish. So that's gotta go!
Got it from the original owner with 108k very well maintained miles, absolutely free of rust. If not for the front leather the interior is 10 of 10. Date of purchase Sept 2010. Everything in working order and I do mean everything, including the beauty lights on the sun-visors.
Project "KITRINOS" that's Greek for "Yellow" (future color)
Here she is intermediate, cleaned up no lift just the Alcoa's and streety BFG 30x10 long trails.
And where she is today 10/10/2013 with 2" susp. lift and BFG KMII's
Again, thanks for all. Hope to get some trail rides put together and hope to see you on the Dirt!
Project: Rear axle swap to 98' 3.73LS with disc brakes. Sorry no pics for this one. Uneventful bolt in swap. Nice! Trust me it's in there!
Project: The Ultimate no-loss cargo sytem:
Normal Position:
Drawer extended (300lb of tools in there!
) Deep enough to carry a car battery.Rolled forward for cargo deck access!
(this was the goal for this project)
Not to loose the ability to stuff a washing machine (full size spare, whatever) in there without removal of the drawer from the vehicle... ..... even with cargo on the shelf!
As the shelf is free floating some safety straps and pins to hold snug. Testing note: the aluminum " stiffening" needs to be upgraded to steel.
Access to the trail recovery essentials. Tow strap and jumpers right here.
Access to side boxes when rolled forward (lid can be lifted/removed when retracted as long as no cargo is on shelf) (does not interfere with sub woofer):smoke:
Still have access to jack storage:
Just a plastic glide on front edge to slip over the seat backs. (Simple)
This Thing was fully loaded with camping gear on the shelf and all my tools plus trail spares (spare locking hubs, u-joints, oil, wheel bearings, etc.) on this years TruckHaven run, abused thoroughly and ZERO damage resulted..Tested tough!
Really adds to the trail versatility of my Ex.
Other niceties:
Total weight 75lb.
Only attachment is at the factory cargo tie down weld nuts. 8 bolts! and it's out.
Side support is provided by "L" and "T" brackets with rubber bumpers to protect the side panels.
When this thing is removed there is no evidence left behind. Back to factory original. No drilling/cutting. You don't even have to cut the carpet to install! Resale bonus!
Not exactly cheap $400.00 at least. The rollers are $4.20 each and there are 24 of them! 24 x $4.20 = $100.80
Original design had 18 - Not enough.
3/4 hard wood ply $80
1/2 hard wood ply $65
Carpet, glue, bolts, nuts, square tubing, patio door latch, truck straps, yata yata. lost track, at least $200 more. You can make some improvement here; I used all stainless (mistake) to soft and to expensive. which added to my cost. Had to redo with grade 5 stuff.
Be prepared to spend $400.00 to be realistic.
Enjoy!
Love this truck! .. .. FIRST GENS RULE! :exp:
Project: Steering shaft mod.
The victim: (Donor)
1993 Jeep Grand Cherokee 6 cyl. (ZJ)
Here's a pic of the two shafts for comparison Ford(top) ZJ(bottom)
The Plan:
The 93' ZJ shaft is just about 2" to long.
I will remove the rubber damper sleeve covering the slider and cut to length. Replace with shock boot.
Note: The older XJ shafts are about 3' long; can't be cut enough to get the right length ( the slider tube is not deep enough )
On the splined end the spline count is different; but only provides alignment and a "measure" of safety; not the primary holding mechanism. The "D" cut and clamp force is the primary.
However; I intend to machine the splines for a "better" fit.
Caution: Please do not except this as a go ahead to do this:
I will have to stress test this for a extended period of time to feel safe with it.
And for as long as I run it I will have to commit myself to daily safety inspection of this modification for as long as I own this truck.
If I feel this is in any way not holding dead fast I will scrap the whole thing or sacrifice the steering box by welding the spline joint to the input shaft.
OK, That's the Disclaimer.
Updates should come fast now.
NEXT WEEK; INSTALL!
Cut measurements worked out to:
6-1/4" off the stub.
2-3/4 off the tube.
I reexamined the spline situation; the clamp material is quite soft and filing on the splines only knocked the points off.
So, Plan "B": I will open the cuff enough to allow me to "tap" it onto the box shaft and clamp it down.
Turns out the "flat" is the primary stay, the splines insure the flats are 90* to the pinch bolt, so that when tightened down they pull together flat.
For an extra measure I am going to use different hardware; the original bolts thread into the cuff but do not pass all the way through, so I will use longer grade 8 bolts so I can use a castellated nut and cotter pin to secure it. Same on the upper double "D"
First things first;
Off to the hardware store for some hardware engineering;
The Jeep bolts are not long enough for a lock nut: Unacceptable!
Recessed for flange bolts:
I'll fix that!
The upper double "D" needs a 1/4" longer bolt than the lower:
Nylock with Loctite sounds good!
Ready to install!
Out with the old:
NOTE: PARK THE TRUCK, WHEELS STRAIGHT AND LOCK THE COLUMN:
DO NOT TURN THE WHEEL UNTIL I TELL YOU TO!
Some comparison shots:
Lower rag joint not look'n real safe!
The remains of the stub that was cut off the ZJ shaft is a perfect fit to "inside" sleeve the steering column tube. Nice! This one's for member "gmanpaint" in particular. (strengthen up the column)
The Ford shaft uses a through bolt, both as the "pinch" and as the safety; so next we have to address that:
We need to drill a "center" hole in the ZJ shaft to accommodate:
This leftover piece of the ZJ shaft is coming in handy!
It makes for a perfect gauge to scribe the center line to drill the hole.
We now have a pinch bolt, And a safety pin.
Drilling took 3 minutes; this stuff is really soft.. ... ..
Get both ends opened up so you don't have to fight with it:
Install the lower half first:
Line up the "flats" and tap it onto the gear box shaft: (Gently)
don't want to bust the u-joint. If your bang'n,, open the end up more.
Tap it down until the bolt "groove" is lined up:
Wait to install this bolt last; you will need to turn the wheel to get it in.
Grease the shaft:
Slide the upper onto the lower, then up onto the column.
Install the safety pin; loctite and nylock
Now the pinch bolt; Torque it home. Also loctite and nylock
This ain't going anywhere!
The whole enchilada in place:
Now to get the lower pinch bolt in:
Start the engine and turn the wheel so you can get at it through the wheel well.
No, it's not going to slip on the gear box shaft, I drove the truck 2 miles with NO pinch bolt as part of the safety testing.
Torque it home with loctite.
Now we need to turn the wheel again to get the lock nut on. (you guessed it! loctite and nylock)
And that ain't go'n anywhere either!
And that's that! DONE!
Some curb shots for testing;
Power steering gives out before you get any real force going on the steering wheel.
I'm feeling good about the durability and safety of this mod.
Now for a couple weeks of commuting to work for further testing.
Drives real NICE! no more mushy feel, steering response is way quicker.
Shaft $9.95
Grade 8 Bolts $2.75
Project: Smooth sexy limited edition sliders.
While abusing my 94' Ex Limited off road,
I noticed the the running boards are pretty sturdy.
They are in the right location, have good dimensions and sturdy mounts.
But they are very jaggy on the bottom and the plastic is, well; Plastic.
On one occasion if the running boards were off I would have destroyed both doors on the passenger side.
So I set out to build the (I think) first set of Limited edition (retain the running boards) Sliders.
So here they are: Hair-brained, what were you thinking, engineering what?
Some 3/16 a 50 ton press brake and a plasma-cutter, and you end up with this:
That's a big sucka!.....
Fit, weld, grind, drill, double check and before you know it.. .. ... ..


 , 2
, 2