-
Performance Upgrades - Maintenance - Modifications - Problem Solving - Off-Road - Street Trucks.
Covering the Explorer, ST, Sport, Lincoln Aviator, Sport Trac,
Mercury Mountaineer, Mazda Navajo, Ford Ranger, Mazda Pickups, and the Aerostar.
Featuring H.I. - Human Intelligence.
Register Today It's free!
- Forums
- Generation Specific Forums
- 2002 - 2005 Explorer Mountaineer 3rd Generation
- Modified 2002 - 2005 Explorers
You are using an out of date browser. It may not display this or other websites correctly.
You should upgrade or use an alternative browser.
You should upgrade or use an alternative browser.
BTF Fabrication Explorer Lift Coil Spacer discussions
- Thread starter Turdle
- Start date
Elite Explorer members see no advertisements, no banner ads, no double underlined links,.
Add an avatar, upload photo attachments, and more!.
hvanorden
Member
- Joined
- November 20, 2012
- Messages
- 30
- Reaction score
- 0
- City, State
- Loveland, CO
- Year, Model & Trim Level
- 2005 Explorer XLT 4.0L
I just ordered my spacers today! I found that Brandon was very responsive. I sent him an email via his website on Saturday. He got back to me first thing this morning. We went back and forth on a couple of questions I had and then he sent me a link to pay him via Paypal. Told me the lead time was 1-2 weeks.
So far my experience has been good. I'll post some pictures of before and after pictures.
So far my experience has been good. I'll post some pictures of before and after pictures.
hvanorden
Member
- Joined
- November 20, 2012
- Messages
- 30
- Reaction score
- 0
- City, State
- Loveland, CO
- Year, Model & Trim Level
- 2005 Explorer XLT 4.0L
So a quick update to my last post. I ordered the spacers on the 3rd and Brandon emailed me last night (the 4th) to let me know that they he was already done and he was shipping them. He said that he ended up with a little extra time so he knocked them out really quick. I guess I got lucky!
So hopefully I'll have them next week and installed shortly after.
So hopefully I'll have them next week and installed shortly after.
hvanorden
Member
- Joined
- November 20, 2012
- Messages
- 30
- Reaction score
- 0
- City, State
- Loveland, CO
- Year, Model & Trim Level
- 2005 Explorer XLT 4.0L
I got my spacers from Brandon. First I have to say that the craftsmanship of these spacers is top notch. Brandon is an amazing welder. Here's a pic:


I really struggled getting them install last night. I didn't think about how hard it would be to re-install the large bolt on the bottom of the strut with the extra length.
Can anyone give me some advice on how to do that? I have the upper ball joint disconnected, but I can't push the wheel hub down far enough to line up the holes. I also tried a spring compressor tool to compressor the spring and shorten the strut. but with the tight space I'm only able to get on compressor on and it just wouldn't compress enough.
Any suggestions will be appreciated!
Here's a pic of the space mounted into the explorer:

A couple things to note. The holes on the spacer where just a tiny bit off and it wouldn't fit over the strut studs. It was a super easy fix. I just drilled the holes out on drill bit size bigger in my drill press. Took about 1 minute.
Second, the studs on my struts were too long to fit underneath the bolts for the spacer. So It required that I grind them down shorter with a die grinder. Again this wasn't a big deal and only took a couple of minutes. Here's a pic before I grinded it down:

I really struggled getting them install last night. I didn't think about how hard it would be to re-install the large bolt on the bottom of the strut with the extra length.
Can anyone give me some advice on how to do that? I have the upper ball joint disconnected, but I can't push the wheel hub down far enough to line up the holes. I also tried a spring compressor tool to compressor the spring and shorten the strut. but with the tight space I'm only able to get on compressor on and it just wouldn't compress enough.
Any suggestions will be appreciated!
Here's a pic of the space mounted into the explorer:
A couple things to note. The holes on the spacer where just a tiny bit off and it wouldn't fit over the strut studs. It was a super easy fix. I just drilled the holes out on drill bit size bigger in my drill press. Took about 1 minute.
Second, the studs on my struts were too long to fit underneath the bolts for the spacer. So It required that I grind them down shorter with a die grinder. Again this wasn't a big deal and only took a couple of minutes. Here's a pic before I grinded it down:
hvanorden
Member
- Joined
- November 20, 2012
- Messages
- 30
- Reaction score
- 0
- City, State
- Loveland, CO
- Year, Model & Trim Level
- 2005 Explorer XLT 4.0L
After further research on this site. I found the following thread and I think what is causing my issue of re-installing the lower bolt on the strut is the fact that I didn't undo the sway bar link. Hopefully doing this will allow me to get that lower bolt in.
Does anyone have experience doing this? How hard is it after disconnecting the sway bar link?
Thanks!
Does anyone have experience doing this? How hard is it after disconnecting the sway bar link?
Thanks!
fr0st m0nkey
Well-Known Member
- Joined
- March 12, 2007
- Messages
- 237
- Reaction score
- 3
- City, State
- Stockton, CA
- Year, Model & Trim Level
- '04 XLT
After further research on this site. I found the following thread and I think what is causing my issue of re-installing the lower bolt on the strut is the fact that I didn't undo the sway bar link. Hopefully doing this will allow me to get that lower bolt in.
Does anyone have experience doing this? How hard is it after disconnecting the sway bar link?
Thanks!
I'm very curious as well. I ordered a set of his spacers + UCA's last week and do not have access to a drill press or a die grinder. I was under the impression that these spacers were supposed to just bolt right up.
hvanorden
Member
- Joined
- November 20, 2012
- Messages
- 30
- Reaction score
- 0
- City, State
- Loveland, CO
- Year, Model & Trim Level
- 2005 Explorer XLT 4.0L
I'm very curious as well. I ordered a set of his spacers + UCA's last week and do not have access to a drill press or a die grinder. I was under the impression that these spacers were supposed to just bolt right up.
I failed to mention that I got a smaller size than most get. I didn't buy the UCA's like you did, so I didn't want to put my upper ball joints under too much stress. I got 1.75" fronts and 1.5" rear. So that had a lot to do with having to grind down the studs on the strut. I could have drilled the holes out with a hand drill, however when the press is sitting in the corner I look for every reason to use it!
Ronin8002
Explorer Addict
- Joined
- March 23, 2003
- Messages
- 4,416
- Reaction score
- 15
- City, State
- Virginia
- Year, Model & Trim Level
- 2008 XLT Ironman
Hvanorden,
Removing the sway bar links is helpful.
Also, I always recommend a different approach to installing these spacers.
Bolt the bottom of the strut in first. Then with the bolts at the top of the spacer removed, use your foot to push down on the control arm and swing the strut over into the strut tower. line up the holes, install bolts, done.
For reconnecting the ball joint to the spindle, put a floor jack under the lower control arm and jack it up until the strut compresses enough so the stem on the ball joint goes through the hole in the spindle. Put the nut on and reinsert the cotter pin.
Do the other side in the same way, and then reconnect the swaybar links.
Edit: you might also want to shoot those spacers with some paint
kifferarri
Well-Known Member
- Joined
- August 16, 2009
- Messages
- 102
- Reaction score
- 1
- Year, Model & Trim Level
- 02ExplorerXLT 87MustangGT
Also another note to answer frost monkey: My spacers where complete bolt up, no drilling or anything. They where drilled perfectly to where my strut mount bolts where.
hvanorden
Member
- Joined
- November 20, 2012
- Messages
- 30
- Reaction score
- 0
- City, State
- Loveland, CO
- Year, Model & Trim Level
- 2005 Explorer XLT 4.0L
I finished my install today. Disconnecting the the sway bar link was the key. With those disconnected it went together no problem (kind of embarrassed that I didn't figure that out on my own!).
Ronin's idea of bolting the bottom first also seems like a good approach. Although you'll still need to undo the sway bar. I did spray the spacer as Ronin mentions. I just used a clear coat rust protection (it's what was in the garage at the time), so they look untreated.
Couple of notes form my install. I ended up having to drill out the holes on both front spacers to get them to fit. I attribute this to be an isolated incident with my struts. The rears bolted up with no drilling. Although it was tight. Once the sway bar was disconnected it was still very useful to have a friend there helping. We used a 5ft pry bar to help pry the lower A arm down to get everything in place.
As for the rears. They were super easy. The hardest part was removing the rubber piece bolted to the top of the strut mount. What is this for? We destroyed it in the process and re-installed everything with out it. I hope that's ok? I couldn't see what it actually did, other than maybe reduce vibrations. Just a guess.
The other challenge we saw coming our way was getting a wrench on the back bolt to tighten the spacer to the strut mount (on the under side of the strut mount). We didn't even attempt it. It looked hard enough that we saw less work in breaking out the welder and welding the bolts to the spacer so that no wrench was required on the underside. This took just a few minutes for each spacer and made the reassembly super easy.
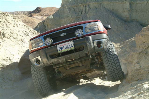
Thanks for the help and all the insanely useful info from this site! here are a couple of pics of the finished product.
This is the fronts only installed:

Here's what it looks like from inside the wheel well installed and sitting back on the ground:

All four spacers installed:

It drove great and my tires don't rub anymore. Can't wait to go hunting and take advantage of the extra ground clearance too! Might have to plan a prairie dog hunt sooner than normal") . Overall, I'm super pleased with the outcome. The spacers from Brandon are made with great quality and the install wasn't too hard, excluding some of my own mistakes.
. Overall, I'm super pleased with the outcome. The spacers from Brandon are made with great quality and the install wasn't too hard, excluding some of my own mistakes.
Ronin's idea of bolting the bottom first also seems like a good approach. Although you'll still need to undo the sway bar. I did spray the spacer as Ronin mentions. I just used a clear coat rust protection (it's what was in the garage at the time), so they look untreated.
Couple of notes form my install. I ended up having to drill out the holes on both front spacers to get them to fit. I attribute this to be an isolated incident with my struts. The rears bolted up with no drilling. Although it was tight. Once the sway bar was disconnected it was still very useful to have a friend there helping. We used a 5ft pry bar to help pry the lower A arm down to get everything in place.
As for the rears. They were super easy. The hardest part was removing the rubber piece bolted to the top of the strut mount. What is this for? We destroyed it in the process and re-installed everything with out it. I hope that's ok? I couldn't see what it actually did, other than maybe reduce vibrations. Just a guess.
The other challenge we saw coming our way was getting a wrench on the back bolt to tighten the spacer to the strut mount (on the under side of the strut mount). We didn't even attempt it. It looked hard enough that we saw less work in breaking out the welder and welding the bolts to the spacer so that no wrench was required on the underside. This took just a few minutes for each spacer and made the reassembly super easy.
Thanks for the help and all the insanely useful info from this site! here are a couple of pics of the finished product.
This is the fronts only installed:
Here's what it looks like from inside the wheel well installed and sitting back on the ground:
All four spacers installed:
It drove great and my tires don't rub anymore. Can't wait to go hunting and take advantage of the extra ground clearance too! Might have to plan a prairie dog hunt sooner than normal
. Overall, I'm super pleased with the outcome. The spacers from Brandon are made with great quality and the install wasn't too hard, excluding some of my own mistakes.Truck39Trash
Well-Known Member
- Joined
- May 9, 2005
- Messages
- 146
- Reaction score
- 0
- City, State
- North Myrtle Beach, SC.
- Year, Model & Trim Level
- 2005 Ford Explorer XLT
The Ex. looks good! On a side note I am very excited as I just ordered my spacers from Brandon. Very accommodating fellow. Super Excited.
seankaufman67
Member
- Joined
- February 28, 2014
- Messages
- 24
- Reaction score
- 0
- City, State
- Mendota, IL
- Year, Model & Trim Level
- 2005 Mercury Mountaineer
If anyone could offer any help with this ive tried everything on the fronts doing exactly what itsm says but tmstill cant get the lower to mount to bolt up. Any advice would be greatly appreciated.
Ronin8002
Explorer Addict
- Joined
- March 23, 2003
- Messages
- 4,416
- Reaction score
- 15
- City, State
- Virginia
- Year, Model & Trim Level
- 2008 XLT Ironman
If anyone could offer any help with this ive tried everything on the fronts doing exactly what itsm says but tmstill cant get the lower to mount to bolt up. Any advice would be greatly appreciated.
Bolt in the bottom first, then use your foot to push the lower control arm down. While you're holding it down swing the top of the shock over until it lines up in the right spot.
seankaufman67
Member
- Joined
- February 28, 2014
- Messages
- 24
- Reaction score
- 0
- City, State
- Mendota, IL
- Year, Model & Trim Level
- 2005 Mercury Mountaineer
Ive tried it both ways bolting the top in and pushing down on the control arm or bolting the bottom and swinging the top in. Ive pushed the control arm down as far as it will go its just not far enough.
Ronin8002
Explorer Addict
- Joined
- March 23, 2003
- Messages
- 4,416
- Reaction score
- 15
- City, State
- Virginia
- Year, Model & Trim Level
- 2008 XLT Ironman
Ive tried it both ways bolting the top in and pushing down on the control arm or bolting the bottom and swinging the top in. Ive pushed the control arm down as far as it will go its just not far enough.
If you are trying to install 2.25" spacers yeah they are a little tough but they will go in. Take the bolts out of the top part of the spacer if they are getting in the way. Might have to just swing it over so it just catches the edge of the shock tower then jockey it in with a prybar. Also undo the swaybar link if you haven't already.
seankaufman67
Member
- Joined
- February 28, 2014
- Messages
- 24
- Reaction score
- 0
- City, State
- Mendota, IL
- Year, Model & Trim Level
- 2005 Mercury Mountaineer
Ive tried everything it almost seems like the shock isnt compressed quite enough.
Ronin8002
Explorer Addict
- Joined
- March 23, 2003
- Messages
- 4,416
- Reaction score
- 15
- City, State
- Virginia
- Year, Model & Trim Level
- 2008 XLT Ironman
Ive tried everything it almost seems like the shock isnt compressed quite enough.
I have heard about a few people renting spring compressors from their local auto parts store when installing these. Might be worth looking into if nothing else has worked for you.
These are the truxxx spacers, yes?
Another thing you might try if you haven't already is loosening the nut/bolt that connects the lower control arm to the frame. If I remember correctly there is a rubber bushing in there that acts kind of like a torsion spring when you bend the control arm down...so that might be keeping you from getting it down low enough to swing the top of the strut over once you have the bottom part in.
- Joined
- June 21, 2012
- Messages
- 460
- Reaction score
- 1
- City, State
- Boston, Massachusetts
- Year, Model & Trim Level
- '03 Explorer Ltd. 4.6L V8
My method if installing them was mounting the top of the strut/spacer assembly to the frame first, and then doing the lining up of the lower bolt after. I figured trying to line up one big bolt would be easier than three small ones, and it turned out to be true.
-Dubya
-Dubya
Elite Explorer members see no advertisements, no banner ads, no double underlined links,.
Add an avatar, upload photo attachments, and more!.
seankaufman67
Member
- Joined
- February 28, 2014
- Messages
- 24
- Reaction score
- 0
- City, State
- Mendota, IL
- Year, Model & Trim Level
- 2005 Mercury Mountaineer
I do have brand new quick struts so that might be some of it. So i might just install the struts and ride on them a bit then try it.
Featured images


Featured images
Similar Threads
- Replies
- 12
- Views
- 3,552