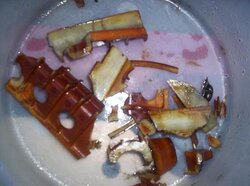
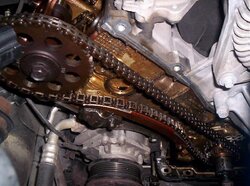
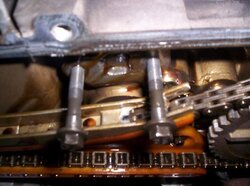
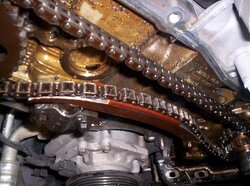
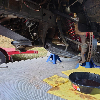
Got a local customer with an Explorer who came to the shop with a noise coming from the front cover. As I suspected the timing chain guide on the pass side was broken completely and both movable guides were worn through, right down to the tensioner. Attached is some pics.....
-
Performance Upgrades - Maintenance - Modifications - Problem Solving - Off-Road - Street Trucks.
Covering the Explorer, ST, Sport, Lincoln Aviator, Sport Trac,
Mercury Mountaineer, Mazda Navajo, Ford Ranger, Mazda Pickups, and the Aerostar.
Featuring H.I. - Human Intelligence.
Register Today It's free!
You are using an out of date browser. It may not display this or other websites correctly.
You should upgrade or use an alternative browser.
You should upgrade or use an alternative browser.
4.6L Explorer engine timing chain ooops!
- Thread starter jah81592
- Start date
Elite Explorer members see no advertisements, no banner ads, no double underlined links,.
Add an avatar, upload photo attachments, and more!.
Pontisteve
Well-Known Member
- Joined
- August 30, 2008
- Messages
- 510
- Reaction score
- 11
- City, State
- Florida
- Year, Model & Trim Level
- 03 Eddie Bauer 4WD V8
Yeah, the V6 tools hold just one cam in place. So you set each cam to match the TDC crank tool, separately. I like that the V8 evidently has a stable position where the crank tool will set it all to, and not move more etc.
The V6 TDC/crank tool is not very accurate. If I ever do another one, I plan to skip that tool and use the more method of locating actual TDC with a piston stop tool. Then with a degree wheel attached you can easily set the TDC accurately. That may or may not differ from how the cams were designed to run, but it makes more sense than the cheap tool that slips around a bit on the balancer grooves. Every movement is a change of the crank position. I see that coming soon for my 99 4.0 again, when I do the trans rebuild.
I have a 98 Explorer with the SOHC 4.0. I've never done any engine work to it, and it's got maybe 130k on it or something like that. Maybe more. I've been a bit surprised that I haven't had timing component issues, as I hear they are common. I've always ran motorcraft oil and filter at the oil change indicator (5k miles I believe). No problems so far. I hear they are a real pita to do.
I'm not sure why you would need a degree wheel. If you want to find true TDC, which is actually just step one of using a degree wheel, then screw the piston stop in and rotate the motor over until it hits a mark pretty close to TDC, like 10 BTDC, and mark a line on the balancer. Then rotate the engine backwards until it hits 10 ATDC without adjusting the piston stop, and mark another line on the balancer. True TDC is exactly between the two marks. Which is exactly where you should find some sort of timing mark or notch indicating TDC.
I use this method to determine if the balancer has spun it's outer hub on the inner hub, making the timing marks inaccurate. It works because the piston dwells for several degrees at TDC, so you can't just use the screwdriver furthest up method. By measuring down the cylinder a hair like this, and dividing the 2 measurements, you get true TDC, which is in the middle of the piston dwell at TDC (which probably lasts roughly 6 degrees of crank rotation).
Elite Explorer members see no advertisements, no banner ads, no double underlined links,.
Add an avatar, upload photo attachments, and more!.
- Joined
- June 17, 2004
- Messages
- 24,263
- Reaction score
- 4,729
- City, State
- Knoxville, TN
- Year, Model & Trim Level
- 98 Limited AWD 302
Yes, I said degree wheel because that's understood that you begin by locating TDC. The wheel itself isn't necessary per say, it's the easiest tool to use for doing the math with the locations made with the piston stop. It would be much harder to without the big degree wheel. Using the balancer and estimating the mid point of such marks would create the same kind of inaccuracy as the TDC tool has.
The degree wheel is large and allows a very accurate location of the TDC.
The SOHC 4.0 can be fairly reliable with excellent maintenance ..., if the external tensioners also do not lose tension in their internal springs. The oil pressure does most of the work, but the springs inside do help, and they get weak after a lot of miles. That's when the chains start to get loose, and a little lack of good oil or pressure starts the wear on the plastic guides. That's my take on what's left to watch for, given the upgraded internal tensioners/guides etc. Night,
Moto Martin
Member
- Joined
- October 26, 2013
- Messages
- 18
- Reaction score
- 0
- City, State
- So. Cal
- Year, Model & Trim Level
- 02 xlt 4.6 & 03 xlt 4.0
Even with the timing chains off and the spark plugs out, I cannot turn the crankshaft.
The crank keyway is at 3 o'clock. How would I go about removing the heads?
The crank keyway is at 3 o'clock. How would I go about removing the heads?
Pontisteve
Well-Known Member
- Joined
- August 30, 2008
- Messages
- 510
- Reaction score
- 11
- City, State
- Florida
- Year, Model & Trim Level
- 03 Eddie Bauer 4WD V8
Even with the timing chains off and the spark plugs out, I cannot turn the crankshaft.
The crank keyway is at 3 o'clock. How would I go about removing the heads?
Woah. Go slow here. First off, just because the chains are off does not mean you don't have valves open. If the cams are installed, and the rockers are installed, you have valves open. In order to turn the motor over, you could unbolt the cams (but they're under spring pressure), or remove the rocker arms. I would remove the rocker arms. You may have to rotate the motor in either direction a bit to do that.
You could also be looking at other things preventing motor rotation. Take the belt off first. That gets rid of any belt-driven accessories. I've seen motors diagnosed as bad because of a bad tensioner or alternator that was locked up and made the motor seem tight. It could also be a transmission or converter problem, although less likely. You have to unbolt the converter and remove the drive belt before you can completely condemn that a motor won't budge. Oh, and unbolt or check the starter for engagement as well.
If the motor rotated before you pulled the chains off, and now won't rotate beyond a certain point, then you are likely hitting the pistons against some open valves. Removal of rocker arms will allow you to rotate the short block any way you want. So then you position the #1 to the safe spot using the cam tool kit's crank holding tool, then rotate the cams to where the dots are going to line up with the chains dark links, and put it all together so everything lines up.
kwandrey
Member
- Joined
- November 17, 2014
- Messages
- 10
- Reaction score
- 0
- City, State
- Southern Pines NC
- Year, Model & Trim Level
- 2003 Ford Explorer
The guides broke and the passenger side tensioner arm was wore through and some wear on the tensioners.....the factory tensioners looked like the same material, hard plastic(Polymer), as the new ones. I replaced the following:
Tensioners
Tensioner arms
Guides
Valve cover gaskets
Timing chain cover gasket
Main seal
I have a new set of chains but they looked good and as you said the old ones should be fine.
Curious on the terminology "Tensioner Arms" are they the pivoting guides? I think most parts call outs call the "tensioner arm" a "Timing chain guide" correct?
Then the Guides mentioned are the stationary timing guides (tension-ed side of the chain) ? if "broke" I suspect at the mounting boss(s) from chain slop due to tensioner guide looseness?
If I have composite tensioners (2003 4.6) , can I swap and use the cast pre 2003 versions?
Tks, Ken
Pontisteve
Well-Known Member
- Joined
- August 30, 2008
- Messages
- 510
- Reaction score
- 11
- City, State
- Florida
- Year, Model & Trim Level
- 03 Eddie Bauer 4WD V8
Yeah, the V6 tools hold just one cam in place. So you set each cam to match the TDC crank tool, separately. I like that the V8 evidently has a stable position where the crank tool will set it all to, and not move more etc.
The V6 TDC/crank tool is not very accurate. If I ever do another one, I plan to skip that tool and use the more method of locating actual TDC with a piston stop tool. Then with a degree wheel attached you can easily set the TDC accurately. That may or may not differ from how the cams were designed to run, but it makes more sense than the cheap tool that slips around a bit on the balancer grooves. Every movement is a change of the crank position. I see that coming soon for my 99 4.0 again, when I do the trans rebuild.
You can do a real accurate measure of where TDC really is without the hastle of a degree wheel if you want. Screw in a piston stop to somewhere around 5 to 10 degrees BTDC. Rotate the motor til it hits that point, say 10 BTDC. Then rotate the motor backwards until it hits the piston stop again. This will be 10 ATDC. If you mark both of these 2 points with a sharpie, then true TDC will be exactly half way between these 2 points.
Also, if the spark plug screws into the head at angle that's exactly 90 degrees to the piston top (like the 4v motor does), then using the Innovative Products of America long TDC indicator and long piston stop work killer.
http://www.amazon.com/Innovative-Products-America-7886-Indicator/dp/B000FMSU9Q
http://www.summitracing.com/parts/ipa-7877
kwandrey
Member
- Joined
- November 17, 2014
- Messages
- 10
- Reaction score
- 0
- City, State
- Southern Pines NC
- Year, Model & Trim Level
- 2003 Ford Explorer
Composite VS Metal Ratchet Tensioners
Anyone have input on this? If I have composite tensioners (2003 4.6) , can I swap and use the cast ratcheting type pre 2003 versions? Same bolt pattern and sealing? Looks like the chain guides are the same.
Tks, Ken
Anyone have input on this? If I have composite tensioners (2003 4.6) , can I swap and use the cast ratcheting type pre 2003 versions? Same bolt pattern and sealing? Looks like the chain guides are the same.
Tks, Ken
Pontisteve
Well-Known Member
- Joined
- August 30, 2008
- Messages
- 510
- Reaction score
- 11
- City, State
- Florida
- Year, Model & Trim Level
- 03 Eddie Bauer 4WD V8
Anyone have input on this? If I have composite tensioners (2003 4.6) , can I swap and use the cast ratcheting type pre 2003 versions? Same bolt pattern and sealing? Looks like the chain guides are the same.
Tks, Ken
In the 4v motors, we do it all the time. The cast iron tensioners are more reliable. Other than that, they also have a ratcheting ladder that pops out more and more as the chain wears. This keeps the chain tight until oil pressure builds up.
I can't speak for the 2v motors, but you could probably google it. Or look into the part numbers to see if the 2v and 4v use the same composite tensioner. If they do, I would imagine that would be a green flag to use the cast iron ones on them too.
- Joined
- March 16, 2013
- Messages
- 4,260
- Reaction score
- 232
- City, State
- Woodstock, GA
- Year, Model & Trim Level
- 04 Ford Explorer 4.6l
I see no reason they wouldn't work. The plastic ones are a whole lot cheaper to build and weigh less. I'm sure these are the reasons Ford changed the material.
If anything, go to a parts store and visually inspect the components to see if they are the same. Guides and tensioners.
If anything, go to a parts store and visually inspect the components to see if they are the same. Guides and tensioners.
kwandrey
Member
- Joined
- November 17, 2014
- Messages
- 10
- Reaction score
- 0
- City, State
- Southern Pines NC
- Year, Model & Trim Level
- 2003 Ford Explorer
tensioners
Appreciate it. I think the ratchet and the metal body would makes the design more robust (more expensive to make as well) . Found this documented failure of the gasket on a composite tensioner. One shows the where the gasket blew out the backside sealing area. Note the metal inserts protrude from the main body some. This would allow the tensioner to loose needed oil pressure to maintain tension and only run on spring pressure. A Metal tensioner would have a FLAT sealing surface that would not be as subject to that type of failure.

Second tensioner with gasket removed shows surface imperfections in areas where gasket seals.

Found this write up for installing Composite tensioners in place of the Cast iron ratchet style. Mentioned trying to make it easier to install & fail I guess with no backup protection like when the ratchets were used.

Shows some typical composite model usage here,

Metal Tensioner back side

In the 4v motors, we do it all the time. The cast iron tensioners are more reliable. Other than that, they also have a ratcheting ladder that pops out more and more as the chain wears. This keeps the chain tight until oil pressure builds up.
I can't speak for the 2v motors, but you could probably google it. Or look into the part numbers to see if the 2v and 4v use the same composite tensioner. If they do, I would imagine that would be a green flag to use the cast iron ones on them too.
Appreciate it. I think the ratchet and the metal body would makes the design more robust (more expensive to make as well) . Found this documented failure of the gasket on a composite tensioner. One shows the where the gasket blew out the backside sealing area. Note the metal inserts protrude from the main body some. This would allow the tensioner to loose needed oil pressure to maintain tension and only run on spring pressure. A Metal tensioner would have a FLAT sealing surface that would not be as subject to that type of failure.
Second tensioner with gasket removed shows surface imperfections in areas where gasket seals.
Found this write up for installing Composite tensioners in place of the Cast iron ratchet style. Mentioned trying to make it easier to install & fail I guess with no backup protection like when the ratchets were used.
Shows some typical composite model usage here,
Metal Tensioner back side
- Joined
- March 16, 2013
- Messages
- 4,260
- Reaction score
- 232
- City, State
- Woodstock, GA
- Year, Model & Trim Level
- 04 Ford Explorer 4.6l
The seal within my composite tensioner failed and it leaked oil out the tip of the plunger. The piece that presses against the guide. I discovered this when I compressed it manually. Oil squirted/oozed out the tip. This failed tensioner required the same amount of pressure to compress as the non failed unit.
kwandrey
Member
- Joined
- November 17, 2014
- Messages
- 10
- Reaction score
- 0
- City, State
- Southern Pines NC
- Year, Model & Trim Level
- 2003 Ford Explorer
Spring
Got ya, the internal spring tension on both was the same But due to the oil leak the hydraulic pressure that actually tensions the chain was less. Since there was not a backup ratchet lock the tensioner was allowed to collapse I suspect. About ready to dig into mine today I'll post an update!
Ken
The seal within my composite tensioner failed and it leaked oil out the tip of the plunger. The piece that presses against the guide. I discovered this when I compressed it manually. Oil squirted/oozed out the tip. This failed tensioner required the same amount of pressure to compress as the non failed unit.
Got ya, the internal spring tension on both was the same But due to the oil leak the hydraulic pressure that actually tensions the chain was less. Since there was not a backup ratchet lock the tensioner was allowed to collapse I suspect. About ready to dig into mine today I'll post an update!
Ken
Pontisteve
Well-Known Member
- Joined
- August 30, 2008
- Messages
- 510
- Reaction score
- 11
- City, State
- Florida
- Year, Model & Trim Level
- 03 Eddie Bauer 4WD V8
The ratcheting ladders job was to hold Chain tension tight during cranking, not really to act as a backup for a lack of oil pressure. The spring pressure really amounts to doing the same thing. I think it was eliminated because it was seen as redundant, but the ladder was more robust in doing its job. Imagine engine kickback during a failed startup.
The cast tensioner does not warp, and that alone makes it a better choice. I've disassembled and photographed one of these, and the only component likely to be able to fail on it is the piston seal. It is a C shaped Teflon ring I think. If we could buy this seal, you would never have to buy a whole tensioner again. Everything else is heavy duty.
Also, I believe the spring tension may be higher on the cast iron units. When you pull the Allen wrench out, it makes a pronounced pop! The problem is how do you test them?
It would be neat to make up a steel box with oil in it that you could pressurize with shop air, and bolt the tensioner to it, to see if the seal blows oil by. Not really hard to make either. If the seal were bad, I don't know how you could replace it.
kwandrey
Member
- Joined
- November 17, 2014
- Messages
- 10
- Reaction score
- 0
- City, State
- Southern Pines NC
- Year, Model & Trim Level
- 2003 Ford Explorer
backup
The ratchet would help as a backup just the same if the seal failed. I can't see the rear sealing surface fail on a metal tensioner. I did many web searches prior to posting and see a lot of manufactures did use tensioners with ratchets. Really no composite tensioners in my searches so only can suspect Ford was trying to save money since the volume of V8 motors they built is very high.
The last 7 series BMW I had the M30 motor last of the "big 6, 3.5 BMW motor that was used and refined for years until it ended as B35 in 92 . It had a single oil fed tensioner , a long spring
 captivated in the casting to always apply pressure to the plastic guide. ( spring length approx 3x stroke) These motors run 300K,-500K without timing rail or tensioner failures. Same technology as was used in the earlier 4 cylinder 2.0 liter cylinder motors used in the 320i etc. in 80s.
I'm also a Porsche Nut and the early 911 cars were hydraulically checked ( check valve) from collapsing (on my 5th)

Then they went to spring over oil pressure fed metal tensioners needing external oil feed line through the casting, the 911 uses a sprocket idler though so no plastic also no ratchet.
Even then the Porsche mod was to add a clamping collar on the shaft of the tensioner so that in the case of tensioner failure the chain timing would not take out the valves etc. (I'll consider the Ford Ratchets doing similar).

I'll post what I find in ours, its not to bad sounding now. Just a slight chain rattle. May be just the guide worn, Have all the new guides and Metal tensioners at hand. One thing to note is the Length Ratio in the BMW and Porsche designs -more tensioner shaft bearing engagement than Ford has, likely limited space compromised the design somewhat, designers opted to run less shaft support.
Thanks for the dialog and inputs.
Ken
The ratcheting ladders job was to hold Chain tension tight during cranking, not really to act as a backup for a lack of oil pressure.
The ratchet would help as a backup just the same if the seal failed. I can't see the rear sealing surface fail on a metal tensioner. I did many web searches prior to posting and see a lot of manufactures did use tensioners with ratchets. Really no composite tensioners in my searches so only can suspect Ford was trying to save money since the volume of V8 motors they built is very high.
The last 7 series BMW I had the M30 motor last of the "big 6, 3.5 BMW motor that was used and refined for years until it ended as B35 in 92 . It had a single oil fed tensioner , a long spring
I'm also a Porsche Nut and the early 911 cars were hydraulically checked ( check valve) from collapsing (on my 5th)
Then they went to spring over oil pressure fed metal tensioners needing external oil feed line through the casting, the 911 uses a sprocket idler though so no plastic also no ratchet.
Even then the Porsche mod was to add a clamping collar on the shaft of the tensioner so that in the case of tensioner failure the chain timing would not take out the valves etc. (I'll consider the Ford Ratchets doing similar).
I'll post what I find in ours, its not to bad sounding now. Just a slight chain rattle. May be just the guide worn, Have all the new guides and Metal tensioners at hand. One thing to note is the Length Ratio in the BMW and Porsche designs -more tensioner shaft bearing engagement than Ford has, likely limited space compromised the design somewhat, designers opted to run less shaft support.
Thanks for the dialog and inputs.
Ken
kwandrey
Member
- Joined
- November 17, 2014
- Messages
- 10
- Reaction score
- 0
- City, State
- Southern Pines NC
- Year, Model & Trim Level
- 2003 Ford Explorer
test
Ken
Yes testing concept (But I'll just run new) all you really need is a flat plate with the bolt centers and a single hole feeding the tensioner reservoir with an NPT pipe thread on back side. Bolt up tensioner connect some fittings to NPT. Do similar to an air cylinder filled and air bled with fluid on one side of piston . Pressurize the opposite side with air and fluid acting on piston in cyl will be your " metal box" just run the Bore area to dial in needed PSI air to simulate oil psi. Ideally may want to have a stop to limit stroke put you in working range. Or Use an adjustable stop screw to test leak throughout the stroke, not sure if the tensioners have built in stops but likely do.The ratcheting ladders job was to hold Chain
It would be neat to make up a steel box with oil in it that you could pressurize with shop air, and bolt the tensioner to it, to see if the seal blows oil by. Not really hard to make either. If the seal were bad, I don't know how you could replace it.
Ken
Pontisteve
Well-Known Member
- Joined
- August 30, 2008
- Messages
- 510
- Reaction score
- 11
- City, State
- Florida
- Year, Model & Trim Level
- 03 Eddie Bauer 4WD V8
Yes testing concept (But I'll just run new) all you really need is a flat plate with the bolt centers and a single hole feeding the tensioner reservoir with an NPT pipe thread on back side. Bolt up tensioner connect some fittings to NPT. Do similar to an air cylinder filled and air bled with fluid on one side of piston . Pressurize the opposite side with air and fluid acting on piston in cyl will be your " metal box" just run the Bore area to dial in needed PSI air to simulate oil psi. Ideally may want to have a stop to limit stroke put you in working range. Or Use an adjustable stop screw to test leak throughout the stroke, not sure if the tensioners have built in stops but likely do.
Ken
I can't remember what limits stroke. I think nothing does, except the ladder covers the lip of the tensioner piston so I guess it would. The tensioner needs to be compressed and have an allen key stuck through it to hold it together for removal. The ladder would limit the piston, but I don't think anything limits the ladder. I can't quite remember.
I looked for disassembled pics, but unfortunately I didn't take any. I only have the secondary tensioner disassembled, off my 4v.
2000StreetRod
Moderator Emeritus
- Joined
- May 26, 2009
- Messages
- 10,597
- Reaction score
- 334
- City, State
- Greenville, SC
- Year, Model & Trim Level
- 00 Sport FI, 03 Ltd V8
4 Valve tensioners
I looked at the tensioners on the 2003 Aviator long block I recently purchased and they look like the one in the previous photo. I'm glad to learn I have the cast ones instead of the others. The guide surfaces are hardly worn. I wonder if the wear is less because of the cast tensioners with the ratchet.
I looked at the tensioners on the 2003 Aviator long block I recently purchased and they look like the one in the previous photo. I'm glad to learn I have the cast ones instead of the others. The guide surfaces are hardly worn. I wonder if the wear is less because of the cast tensioners with the ratchet.
Pontisteve
Well-Known Member
- Joined
- August 30, 2008
- Messages
- 510
- Reaction score
- 11
- City, State
- Florida
- Year, Model & Trim Level
- 03 Eddie Bauer 4WD V8
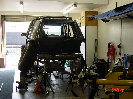
Some more pictures of my junk.


Pontisteve
Well-Known Member
- Joined
- August 30, 2008
- Messages
- 510
- Reaction score
- 11
- City, State
- Florida
- Year, Model & Trim Level
- 03 Eddie Bauer 4WD V8
I looked at the tensioners on the 2003 Aviator long block I recently purchased and they look like the one in the previous photo. I'm glad to learn I have the cast ones instead of the others. The guide surfaces are hardly worn. I wonder if the wear is less because of the cast tensioners with the ratchet.
I have come to believe that running Motorcraft 5w20 is the answer. I found out that Motorcraft oil specifications are basically double that of regular oil, and when I compared the Motorcraft spec to other oils at Walmart, only some synthetics met their requirements, no others. The stuff is semi-synthetic, and apparently that makes a difference.
I've always ran Motorcraft oil and filters, and have not had any failures of any of these timing components so far.
Elite Explorer members see no advertisements, no banner ads, no double underlined links,.
Add an avatar, upload photo attachments, and more!.
2000StreetRod
Moderator Emeritus
- Joined
- May 26, 2009
- Messages
- 10,597
- Reaction score
- 334
- City, State
- Greenville, SC
- Year, Model & Trim Level
- 00 Sport FI, 03 Ltd V8
throttle bodies?
Pontisteve, this is off topic but you have a lot of experience and may know the answer. Are the oval dimensions for a Mach 1 twin throttle body the same as a Lightning oval even though the throttle plates are different diameters? I want to know if a Lightning inlet tube with fit on a Mach 1 throttle body before I purchase one.
Pontisteve, this is off topic but you have a lot of experience and may know the answer. Are the oval dimensions for a Mach 1 twin throttle body the same as a Lightning oval even though the throttle plates are different diameters? I want to know if a Lightning inlet tube with fit on a Mach 1 throttle body before I purchase one.
Featured images


Featured images
Similar Threads
- Replies
- 160
- Views
- 181,228
- Replies
- 17
- Views
- 36,518
- Replies
- 4
- Views
- 2,029