KPT
Explorer Addict
- Joined
- February 5, 2003
- Messages
- 1,550
- Reaction score
- 2
- City, State
- NC
- Year, Model & Trim Level
- '95 XL 4x4
So my truck sat for a year with a bad t-case until I got unlazy enough to fix it. During that time a leak developed and the compressor seized.
To fix it I flushed the system, replaced the compressor, orifice tube, accumulator and all seals. This was my first ac repair.
If any refrigerant is left in your system, you must take it somewhere to have the refrigerant recovered.
I apologize in advance if the picture quality goes **** somewhere in the middle. My camera took a vacation in Ireland without me and I was using a lesser camera. Bonus points if someone picks out where.
Always check and make sure the system is empty before beginning any repairs.
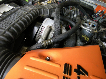
The low side valve of your system is here:

High side is here (ignore the raggedy wiring, its on the list to get redone):

Yes that hose should be red, I have a wonderful Harbor Freight gauge set and the high side hose developed some frightening buldges when I had the gauges on an R-22 unit.
It doesn't matter what order you disassemble but I did the accumulator first:

The low pressure sensor you see at the bottom of the pic has to come off, one of the refrigerant connections is threaded and the other is garter spring. The orifice tube is in the line by the shock bushings also.
I used a 1 1/8" wrench and an adjustable to get the threaded connection apart. 1 1/8" is not the right size, its metric but I am working with a stick and a rock here and that got the job done:

Different angle:

The nut on the accumulator side doesn't move. It is there so you don't damage the line from the evaporator. Oh there is a metal clamp that holds the joint together as a backup (its already off in the pic), it just pulls off.
The low side pressure sensor is only hand tight. Remove it, and if the o-ring stays in it like mine did remove that too:

The other line from the accumulator is the garter spring type. You need a quick disconnect tool to remove it. I think it was the 7/8" one:

I don't know if mine had more crap than usual in there since this is a trail rig but I had to turn it back and forth to work it in there. Once you get it in enough the two just pull apart.
The 8mm bolt in the middle of this pic holds the accumulator in. You don't need to remove it, just loosen it:

Here is the bracket to give you a better idea:

The orifice tube is here:

Pull the metal clamp off and use a 5/8" disconnect to separate the two.
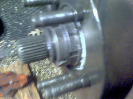
Use needle nose pliers to pull the orifice tube out, there are specialized pullers but the pliers worked fine for me. Its in like this to give you an idea of what you are grabbing:

Mine wasn't horrible but wasn't good. Why not replace a $3 part when you have the system apart though:

On to the compressor, the belt needs to be taken off first. If you don't know how to do that, perhaps this repair is not for you. Four bolts hold it to the engine, don't take them out yet. I think they were 13mm:

The wiring for the clutch is already unplugged in that pic. People other than me were driving my truck and I didn't want someone to turn the AC on and be concerned about the cloud of smoke coming from the compressor clutch.
Unplug the high side pressure sensor. The exhaust gas lines to the DPFE are off in this pic because that is coming off next:

Use a 10mm socket to remove the bolt that holds the refrigerant lines to the compressor:

Take the four bolts that hold the compressor down. Tip the compressor forward and pull out the plastic piece that supports a wiring harness:

Next separate the connection between the high side hose and the condenser:

If you are not flushing and not replacing all o-rings you don't have to separate this, but again why not replace very cheap parts while you can.
Time to start flushing. This is the flush gun I used:

I flushed everything opposite of the direction refrigerant flows. Evaporator:

For the condenser the flush gun goes here (yeah, its not in the line for that pic but goes in the line that was moved next to the alternator pulley):

Catch hose is here:

I did switch the hoses and flush again in the direction the refrigerant flows since the exhaust is lower than the intake.
The catch bucket looked clean, nothing but oil (the bucket wasn't perfectly clean to begin with, the chunks of who knows what were in there):

To fix it I flushed the system, replaced the compressor, orifice tube, accumulator and all seals. This was my first ac repair.
If any refrigerant is left in your system, you must take it somewhere to have the refrigerant recovered.
I apologize in advance if the picture quality goes **** somewhere in the middle. My camera took a vacation in Ireland without me and I was using a lesser camera. Bonus points if someone picks out where.
Always check and make sure the system is empty before beginning any repairs.
The low side valve of your system is here:
High side is here (ignore the raggedy wiring, its on the list to get redone):
Yes that hose should be red, I have a wonderful Harbor Freight gauge set and the high side hose developed some frightening buldges when I had the gauges on an R-22 unit.
It doesn't matter what order you disassemble but I did the accumulator first:
The low pressure sensor you see at the bottom of the pic has to come off, one of the refrigerant connections is threaded and the other is garter spring. The orifice tube is in the line by the shock bushings also.
I used a 1 1/8" wrench and an adjustable to get the threaded connection apart. 1 1/8" is not the right size, its metric but I am working with a stick and a rock here and that got the job done:
Different angle:
The nut on the accumulator side doesn't move. It is there so you don't damage the line from the evaporator. Oh there is a metal clamp that holds the joint together as a backup (its already off in the pic), it just pulls off.
The low side pressure sensor is only hand tight. Remove it, and if the o-ring stays in it like mine did remove that too:
The other line from the accumulator is the garter spring type. You need a quick disconnect tool to remove it. I think it was the 7/8" one:
I don't know if mine had more crap than usual in there since this is a trail rig but I had to turn it back and forth to work it in there. Once you get it in enough the two just pull apart.
The 8mm bolt in the middle of this pic holds the accumulator in. You don't need to remove it, just loosen it:
Here is the bracket to give you a better idea:
The orifice tube is here:
Pull the metal clamp off and use a 5/8" disconnect to separate the two.
Use needle nose pliers to pull the orifice tube out, there are specialized pullers but the pliers worked fine for me. Its in like this to give you an idea of what you are grabbing:
Mine wasn't horrible but wasn't good. Why not replace a $3 part when you have the system apart though:
On to the compressor, the belt needs to be taken off first. If you don't know how to do that, perhaps this repair is not for you. Four bolts hold it to the engine, don't take them out yet. I think they were 13mm:
The wiring for the clutch is already unplugged in that pic. People other than me were driving my truck and I didn't want someone to turn the AC on and be concerned about the cloud of smoke coming from the compressor clutch.
Unplug the high side pressure sensor. The exhaust gas lines to the DPFE are off in this pic because that is coming off next:
Use a 10mm socket to remove the bolt that holds the refrigerant lines to the compressor:
Take the four bolts that hold the compressor down. Tip the compressor forward and pull out the plastic piece that supports a wiring harness:
Next separate the connection between the high side hose and the condenser:
If you are not flushing and not replacing all o-rings you don't have to separate this, but again why not replace very cheap parts while you can.
Time to start flushing. This is the flush gun I used:
I flushed everything opposite of the direction refrigerant flows. Evaporator:
For the condenser the flush gun goes here (yeah, its not in the line for that pic but goes in the line that was moved next to the alternator pulley):
Catch hose is here:
I did switch the hoses and flush again in the direction the refrigerant flows since the exhaust is lower than the intake.
The catch bucket looked clean, nothing but oil (the bucket wasn't perfectly clean to begin with, the chunks of who knows what were in there):