Body Lift tips and stories | Ford Explorer Forums - Serious Explorations

  • Register Today It's free!

Body Lift tips and stories

AdvanceExpo

Active Member
Joined
June 1, 2006
Messages
80
Reaction score
0
City, State
Pineville, Louisiana
Year, Model & Trim Level
1991 XLT
I'm in the process of installing a body lift and I was wondering if any of you guys have tips for putting it on or stories to of what happened. I have all of the carpet pulled out along with the seats so all I have to do is undo the bolts that hold the body down to chassis. I just now have to wait until Saturday because I don't have another day off until then. Thanks guys in advance.


Join the Elite Explorers for $20 each year.
Elite Explorer members see no advertisements, no banner ads, no double underlined links,.
Add an avatar, upload photo attachments, and more!
.


Really no need to pull out all the carpet and seats. I was able to get to the bolts by just pulling back the carpet. In the front use the hole under the hood on both sides with a very long extension to get the front two bolts.


If all you have done at this point is what you have represented, then you have a laundry list of miscellaneous items to do. Before I take the time to list them, I presume that this is a 2 or 3 inch BL from PA? Did you remove the wires from the driver's wheel well, disconnect the e brake cable etc.?


I haven't disconnected the e brake or the wires because I have to be able to drive the truck to work tomorrow. And to answer the question about the bolts with the heating torch......I soaked them in PB the other day and they are turning with great ease. Thank God I live in the south where I dont really have to worry about rust or salt like the yanks do. It is actually an old trailmaster 3 inch body lift that was never put on a truck that I bought off of ebay from a company for 60 bucks shipped. I think this will be a piece of cake compared to the suspension lift we put on it back in December.


I did mine a couple of years ago -- no real problems except getting the bolts out. Used the Ford wrench (torch) on a couple. PB a few days ahead is a good thing.

Tips?

Loosen all the bolts, but don't take both sides out!

Do one side at a time.

Have a good jack that reaches high enough on hand, along with a piece of 2x6, 4x4, and some misc. blocks of wood. Place the wood under the body and lift one side at a time. Get the bolts at least started before heading to the other side.

Don't forget the fuel tank filler neck...

Make sure you re-route the e-brake cable before bolting the driver's side back down. Make sure the wires near the firewall are free -- they'll reach easy, but don't stretch them out.

You will have to "adjust" the brake lines some -- they'll make it easy -- just help them along as you lift the body by bending them carefully with your fingers as you lift.

I originally did the steering shaft addition, but later pulled it back out. Didn't need it on my truck. Worked better without it. Now is a great time to replace the rag joints on your steering shaft! Mine were JUNK and the added stress from a new angle after the lift almost made them fail. I replaced the entire lower shaft with another one I had laying around. You can get rag joints (that flexible joint that allows the steering shaft to have an angle) at any auto parts place. You have to grind out the old rivets (any grinder will do, even a cheapy bench grinder) and replace them with bolts and nuts. I recommend loc-tite on the bolts for the rag joints -- don't need it anywhere else.

That's about it. Fairly easy vehicle to body lift compared to some I've done.


I'm a manager at autozone and I went ahead and looked at the rag joint replacement before I even bought the lift. I'm doing the lift at my store that way I have everything I need right there in the store at my disposal and then pay for it and put it on. About the brake lines......the kit directions just say to pull the metal brake line coming from the master cylinder from their clips on the inside of the engine compartment loose and that they will be fine. So you suggest putting 4x4 between the body and chassis to set the body on until i get the bolts started and then lower the body onto the new bushings? That seems to make a lot of sense. I'm glad I came here to get advice before I tackle this job. On my suspension lift, they didn't come with instructions......that's skyjacker for ya....but I learned and you guys are helping me out a lot and I really appreciate that a lot. More tips would be great.


I am also thinking of doing a BL I have a simple question. When you get the kit does it come with new bolts or do i have to buy them?


TripleX...

Everything you need comes in the kit, including all new bolts.

IF your body mounts are in bad shape, you will need to replace them on your own (the rubber parts that the lift blocks bolt to, which are part of your truck and not part of the lift). Most of the mounts are still in good enough shape, unless you live in northern states with a lot of salt use, then all bets are off.

AdvanceExpo...

Yup -- the brake lines will just move with the lift. Just make sure that they don't get kinked. You shouldn't need any extra parts to do the lift, but it never hurts. Now, extra help is a plus -- as long as they are not the type that want to give instructions versus doing work... :D Like too many cooks spoil the soup, too many technicians spoil the body lift. :rolleyes:

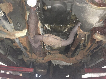
The wood blocks are to use to spread the load as you are lifting the body. Place them under the floor pan, and jack up against the wood. It works better that way than trying to lift on one point of the floor pan. If you do it right, and have the jack in the right spot, you can lift the entire side fairly evenly. The balance point is somewhere near the center of the rear doors (if a 4 door model). The rear of an Explorer body is heavier than the front due to all the interior, and rear hatch, glass, etc.

Don't forget the bolts on the front cowl (the part that holds the radiator in place)!


Well it's done and it looks great. It will look better when I get my rear bumper bracket cut tomorrow at a machine shop and when I get my new tires. It went on with ease. The hardest thing for me was cutting the corner off of the frame for the front bumper bracket mounts only because I had to do it with a hacksaw. I like that way everything turned out and love it. The bolts were very easy for some odd reason but I wouldn't do a body lift over again. Just time consuming. We finished everything up in about 5 hours. THanks for the tips and help guys.


Glad we could help. Also glad it turned out well.

Lifts are time consuming, whether body or suspension. I've probably installed 50+ lifts in my life on various vehicles and they all take time and have their individual quirks that make them difficult in some way or another. Be glad you got away as nicely as you did. Some folks that live in rust-belt country pray for a 5 hour, turn the bolt install... :D


Glad we could help. Also glad it turned out well.

Lifts are time consuming, whether body or suspension. I've probably installed 50+ lifts in my life on various vehicles and they all take time and have their individual quirks that make them difficult in some way or another. Be glad you got away as nicely as you did. Some folks that live in rust-belt country pray for a 5 hour, turn the bolt install...
Yes... pray and pray, and when you're done pray some more... I can tell you Jesus is very popular when working on 10+yrd vehicles in the rust belt. All lifts start out with good intentions, but stubborn bolts, rusted fittings, and unexpected worn/broken parts all add to delays. My SkyJacker lift took a week to put in mainly do to various part delays and snags trying to fit in parts which didn't match up 100% :frustrate , or breaking parts I intended to re-use :splat: . I broke front hard lines which where a std line with std fittings on one end and metric on the other :confused: The rear hard line broke and I had to drop th fuel tank to run new line.. As long as you plan ahead and expect delays you'll be ok, but if you think you'll bang out a lift in a few hours you can be in over your head quickly...


What size skyjacker did you install? I installed a 2 inch skyjacker and without instructions it took us about 8 hours to install. That was a little tougher than the body lift but I would do it all over again because now I know what I am doing. It rides a lot better with the suspension lift too but I am still having to be careful on turns right now until I get used to the lift and the body being so high. If I were to run 31s, how much more of a lift with that give me over the stock 225/70-15Rs?


What size skyjacker did you install? I installed a 2 inch skyjacker and without instructions it took us about 8 hours to install. That was a little tougher than the body lift but I would do it all over again because now I know what I am doing. It rides a lot better with the suspension lift too but I am still having to be careful on turns right now until I get used to the lift and the body being so high. If I were to run 31s, how much more of a lift with that give me over the stock 225/70-15Rs?

I installed a 4" SkyJacker Class II kit.. It contained new front coils, drop down brackets for the TTB & radius arms, longer radius arms, A new transmission Cross member, and new rear leaf springs. This kit can be easily converted into a a 6" lift by going SOA in the rear and installing longer coils up front and dropping the axle pivot bolts into the 6" position. I am running front and rear sway bars coupled with 33x12.5x15 tires; as such the ride is better than new and VERY Stable.

Using Tire/Gear Calculators I see your 225/70/15 are about 27.4" tall. So 31" tires are about 3.6" bigger for an overall lift increase of 1.8"


any comments now that you've installed yours? glad it went so well..but i beelive i will have some more concern with rust..my BL is on the way..and i hope to install ASAP..


any comments now that you've installed yours? glad it went so well..but i beelive i will have some more concern with rust..my BL is on the way..and i hope to install ASAP..


Soak the bolt big time with PB blasting spray or Liquid Wrench. Autoparts houses have these products in stock and know exactly where to look for them at. If you have rust, you will probably have to have a torch to cut the old bolts. Disconnect the parking brake under the drivers side door before you even get started. Any other questions just ask.


post some pics of your lifted truck :D


I will post some as soon as i get my rear bumper brackets from the machine shop tomorrow and clean the truck up a little.


Here's a picture of my truck after the 2 inch Skyjacker and the 3 inch body lift. It's a little dirty and I'm still waiting on the rear bumper brackets. I am running 31x10.50/15. I could have gone bigger but I don't want to have to fool with the rear end.

http://img502.imageshack.us/img502/8628/hpim2024wt6.jpg


Join the Elite Explorers for $20 each year.
Elite Explorer members see no advertisements, no banner ads, no double underlined links,.
Add an avatar, upload photo attachments, and more!
.


oh i see, you had to go play in the first mud puddle you could find on your way home, lol...it looks good :D


Back
Top