46" 1991 Explorer in Iceland. | Page 2 | Ford Explorer Forums - Serious Explorations

  • Register Today It's free!

46" 1991 Explorer in Iceland.

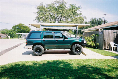
Hi, My name is Sævar and I´m 22, I live near the capital Reykjavik Iceland and I recently bought a slightly modified 91 Explorer


I have owned a lot of cars in my short yet life, but only 3 american made, first an AMC Eagle 82 and a Cherokee Country 1995, and now this Explorer


Ive mostly had Suzukies in the past, and for the longest time, since 2007 until recently I had a Vitara of which I also modified a little bit, heres a photograph


001.jpg


It has 38" super swampers and toyota pickup axles with locker, toyota transfer box and gearbox and 2.5 turbo diesel intercooled Hyundai engine


my plans with the explorer so far are unknown, Im thinking of finishing it up and using this winter and seeing what needs better finishing, but before that there are a few details of which need sorting such as

Checking the brakes, they have hydro assist, checking leaks, steering fluid is leaking and car has saginaw pump and steering jack so there are a lot of couplings of which could break a leak

finishing the fender flares, their surface is rough and unfinished and they are slightly too narrow for making the car road legal on these tires

the axles are D44 HD front and 14bolt 9.5" GM rear


here are some photos


002.jpg


003.jpg
I hope you come to like this project, at least Im a little excited to try him out but please if there are any comments or suggestions feel free to reply or message me personally


thanks


Join the Elite Explorers for $20 each year.
Elite Explorer members see no advertisements, no banner ads, no double underlined links,.
Add an avatar, upload photo attachments, and more!
.


Here's what I did for my dual battery mount:

ricksbatt.jpg


I cut the coolant tank apart and used a different windshield washer reservoir.

I haven't heard of anyone modifying their Explorer's A/C compressor for use as an air pump.


Join the Elite Explorers for $20 each year.
Elite Explorer members see no advertisements, no banner ads, no double underlined links,.
Add an avatar, upload photo attachments, and more!
.


That seems like a great place for the battery, thanks, I think i would move the coolant reservoir as well so the battery can be reached more easily from underneath the radiator frame

Here in Ice its common to use a/c compressors as air pumps, I don´t know how it's there, but maybe I'll just have to tear the thing apart and figure out how it works, also to prepare it for lubrication, see which is better to use grease nipples on the pump body or in-line fluid lubrication which would not be preferred


004.jpg


full size mud flaps


Thanks, ive been busy with the interior side for the last week or so, I bought another 93 eddie bauer explorer all electric and combined them for a pretty decent finish on the big black one

10687094_10153332882812907_1792075133963665145_n.jpg
10419528_10153332882367907_6458238806048050731_n.jpg
10665070_10153332882462907_7942568790509841749_n.jpg
10616119_10153332882712907_2170238878558189957_n.jpg
1743520_10153332882602907_4452102041377767073_n.jpg
10641136_10153332927102907_6986040201550782693_n.jpg


eddie bauer sport interior, JBL sound system with bass booster in the rear right panel

I spent a day moving the seat and center console from one truck to the other, scrubbing and nursing the seats, in fact a little more because I decided to use the passenger side upholstery on the driver side seat, because it was much less worn, then when it came to bolting it in the car, ofcourse it didnt fit... so this 2 hour assumed job turned into 6 hours very quickly

But im happy with the result

then I welded the handle for the back tilt back on, this handle was broken on both explorers driver seat

left is upholstry from passenger seat, right is from driver seat

10421116_10153329070677907_7972886587502170956_n.jpg


1899968_10153329070897907_2105572187893590164_n.jpg


In cars, nothing can be too easy, so ofcourse Ford decided to make a difference in the bolt pattern for similar looking seats between 1991 and 1993, PLEH
10687094_10153332882812907_1792075133963665145_n.jpg


The difference is not great so this was modified quickly
10419528_10153332882367907_6458238806048050731_n.jpg


Orginal JBL bass system, everything was in place for it in the big black 91 car, all wires and everything, so just a bolt in mod...
10665070_10153332882462907_7942568790509841749_n.jpg


The interior all clean and good, i attacked the floor carpets with a pressure washer and degreasing soap, the smell difference is absolutely stunning

1743520_10153332882602907_4452102041377767073_n.jpg


Seats all good, i put cleaner and conditioner on them

10616119_10153332882712907_2170238878558189957_n.jpg


The front seats are all good too, i fixed the air pockets that push into your back and on the side of your legs, they were both leaking
10641136_10153332927102907_6986040201550782693_n.jpg


front tire @ 2.5 psi, i get the same flat in the rear tire with 1 psi


10710691_10153335715752907_2787126531212003776_n.jpg
005.jpg


I went and had the car legally weighed for the registration progress, the values are in kilograms, and you can find converters on google, eiginþyngd is dry weight of car with all permanent attachments and full tank of fuel, the car was originally weighed at 2080 kg so the difference after all mods is 200 kg, which is about the weight of 3 passengers in good health

Framás is front axle, and afturás is rear axle


First tour, drove around town to see how it handles, not so great at first sight but mainly because the tires are completely unbalanced, Im waiting for them to be balanced as I speak

until next time...-


Thanks for the updates. Looking good!


Woke up with a splendid idea, and this is the days' progress, i was bored of working upwards in tight and stupid positions with a welder and angle grinder so i did this to speed the process and increase build quality

this will also make short work of replacing the clutch kit
and paint the frame and body floor

10468074_10153363852612907_2980545169792218436_n.jpg
10003264_10153363852962907_2677502630859408755_n.jpg


10522562_10153363852707907_2367667072563846849_n.jpg
10561688_10153363852522907_6854542945859903741_n.jpg
006.jpg


All the space in the world to replace clutch and build link mounts on the frame

524157_10153363852832907_3159742854314267982_n.jpg


16413_10153363853062907_7643426166928268821_n.jpg


Frame is as new, just needs wire wheeling and painting

10003264_10153363852962907_2677502630859408755_n.jpg


same can be said about the condition of the body floor, ive only found one rusty hole, below the rear right tail light in the corner of the wheelwell, but its easy to get to once the frame has been removed so i can fix it quickly

10522562_10153363852707907_2367667072563846849_n.jpg


Sweet... That really helps a lot!


yea, if anyone would like any detailed photos to resemble with the body off, now is the chance, i walk around with a camera phone so I can easily take a few snaps of some "hard to get to" areas while the body is off for you


anyway, this is the progress of today


Sævar this thread really needs to be retitled and moved to our Offroad Projects forum where it will get more attention.

What would you like me to change the title to?


Thanks Rick, the title might be 46" 91 Explorer of Iceland, my friends call it "Dora the Explorer" too... ;)

550px-doratheexplorer-color-step-11.jpg


Thanks, today I´ve got the flu and laying in bed at home so no progress, but the plan is to reattach the body first week of december and first trip around 15 dec :)

Also in the plan is to build 4 link rear suspension with coil springs


Awesome Explorer. I love the look of the Icelandic rigs. They aren't practical here, but I bet they are fun out on the snow!


Some progress in the weekend after losing the flu :)

Took out the transmission to make more room for full welding of the front radius arm mounts


Meanwhile my girlfriend was wirewheeling and painting the floorpan and rocker panels with light gray rust sealant

and next verse is to build 5 link rear suspension


Sunday


EEEK, I wouldnt want to have to budge that rotten old head bolt :D

Einmitt það sem ég hugsaði, og þetta hefði maður sko ekki upplifað i súkkunni! :)

Arm mounts fully welded

Floor pan and wheelwells looking healthier


New clutch kit and slave cylinder, gearbox painted white for better brightness underneath the car if something were to go wrong in bad situations


Another one of the radius arm mounts, pretty massive looking


up with the butt, time to throw up a coilsprung 5 link system, ive already got Land Rover coils and rancho 9000 shocks to use in the rear


Join the Elite Explorers for $20 each year.
Elite Explorer members see no advertisements, no banner ads, no double underlined links,.
Add an avatar, upload photo attachments, and more!
.


I love it, look forward to seeing action pics in the snow!!!

I've done a lot of work also with bodes off, makes stuff a lot easier!!


Back
Top