Completed Project - My 98 super charged EX | Page 11 | Ford Explorer Forums - Serious Explorations

  • Register Today It's free!

Completed Project My 98 super charged EX

Use this prefix for completed projects that are not "How to" articles or threads asking for help.
1998 Explorer 4.0 SOHC
Bought it with a melted alternator/wiring harness from a junkyard for $1,000
Fixed it, drove it for two weeks, then I boosted it.
Started with an M90 supercharger kit from www.Bansheesuperchargerkit.com
Upgraded to an M112 Lightning supercharger that was a prototype kit.
Next was the M122 off a 2012 GT500
I have reached 20 lbs of boost (with ARP head studs) and a 12.83 in a quarter mile.

Pictures
1. How it looked when I brought it home.
2.The M90 supercharger installed
3.The GT500 supercharger installed
4.How it looks now
5.Wheelie
green ex.jpg
DSC02710.JPG
5.JPG
Lowered Rear.jpg
Exploder wheelie.jpg


Join the Elite Explorers for $20 each year.
Elite Explorer members see no advertisements, no banner ads, no double underlined links,.
Add an avatar, upload photo attachments, and more!
.


LiveLink

I'm using SCT's LiveLink Gen-II on my wife's laptop and an SCT X3. I may purchase the SCT Advantage III Ford Pro Racer Software to tinker with after James completes the initial M90 tune. I remember that you've been doing your own tuning for quite a while. I seem to recall that the IAT has a major impact on how the PCM adjusts the spark advance. Are you still using the stock tables for IAT impact on spark advance?


Join the Elite Explorers for $20 each year.
Elite Explorer members see no advertisements, no banner ads, no double underlined links,.
Add an avatar, upload photo attachments, and more!
.


Tables

I was doing my own tuning by myself for quite a while but only concentrated on the bare essentials. WOT a/f and timing pretty much. Also everything else that I could find a good description on. I played around with tunes building off the 87 to 93 octane can tunes too. I increased the IAT temperature amount that topped out at 186 and changed it to the max value of 250. The 93 oct tune changed the values called spark retard for ACT (IAT) and spark retard multiplier. All that aside when I lowered Borderline spark table values, that brought the timing down to get rid of any signs of detonation or signals from the knock sensor.
Now I had to say "was" in the first sentence because I turned to SCT forums for some transmission tuning help. The Pro Racer Package forums are blocked unless you buy the package and then you are granted access. I met a very helpful person there who helped me with the transmission shift points and then took my whole tune, played with it and added some lightning tune tables.
He helped me a bunch and showed me a new way of looking at some things.
After driving around numerous times watching MAF ad counts I got the low speed driving area better tuned and it made a world of difference, even during the transition from standing the converter to WOT. I still have lots to learn, but having the software lets me look into things and try stuff out. Now if I can just work on my attention span.


Shocks

One last thing to post before the weekends over.
When looking into shocks on the summit website, I was concerned about shock absorber compressed and extended size. I did not know what the stock shock sizes were. I measured the old ones coming off my supercharged 2 door explorer sport and here is what I found.

Front
aprox 13 1/2 compressed
aprox 18 extended

Rear
aprox 15 compressed
aprox 25 extended

All above were inches.


spark plug gap

Ronald Caster's installation instructions suggest reducing the spark plug gap from 0.054" to 0.040". I've read other comments that reduced plug gap is desirable for forced induction. I assume the higher pressure during boost makes it harder for the spark to jump the gap. I suspect a smaller gap slightly decreases spark delay and may reduce the chance of detonation. What gap are you using and have you experimented with other values?


Spark

Imagine trying to do the long jump in a tornado, that is what it is like for the spark to jump the gap with turbulence in the cylinder. Raising compression or boosting will raise the turbulence making it harder for the spark to get across.
Lowering spark gap makes it easier to get across, so that can compensate for increased cylinder pressure/turbulence and try to prevent spark blowout.
The stock spec is .052 - .056, so .054 is middle of that for my truck. I am using .044 which is .010 less than middle of spec. I have been using that since day 1 with the first supercharger and never had any problems. I have changed the plugs twice since putting the m90 on. (not that they needed them).
.010 less than spec is a safe place to start.
I plan to experiment but have not yet since I keep changing other things. I know there is unleashed power to be had but I am going for the bigger gains first. Besides most ignition systems can handle more load than the vehicles were intended to operate at.
Some things to think about.
Three stages of ignition combustion are nucleus of the flame, hatching out, and propagation(can begin at .100 ball of flame). The last of which is where the power to push is made.
Growth lag is the time it takes for the ball of flame to grow from the spark plug gap size to .100
Reducing growth lag can reduce ignition lag.
Reducing ignition lag is said to increase power, but how much? How much can I gain in a 1/4 mile?
So having a spark plug gap closer to .100 is better for more power but if the ignition system can not provide a strong enough spark to jump that gap under those extreme conditions then the spark blows out, you start having misfires, and you loose power.
Ignition coils are often replaced (mine is stock), but increasing voltage to the primary coil windings is also another way of getting stronger spark that might be able to jump a larger gap during extreme conditions. There are different companies that make ignition system primary voltage boosters that may be interesting to you. Check out Jacobs Electronics, JMS, and MSD etc. Or just Google ignition system booster.
I plan to work on my ignition system to experiment but money and time will both be needed so it will have to wait.

Eidt: I am now at .030 Gap with 16lbs of boost and water methanol injection.


dual fire ignition system

Thanks for the information. I'll initially try 0.044" (same as yours).

A while back I started work on a dual fire ignition system and will resume work on it after the M90 installation is complete: Ignition Mods & MPG


Intercooler

So...
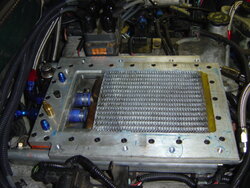
I have been using a heater core for an intercooler. It served its purpose for a while but It is time for an upgrade. I contacted Bell Intercoolers.
http://www.bellintercoolers.com
I was able to have one custom built to fit my custom intake. They are extremely good at what they do.
I will not be installing this until after a race on April 27th, but here are pictures of my current set up and the intercooler from Bell Intercoolers.
 

Attachments

  • Bell Intercooler.jpg
    Bell Intercooler.jpg
    52.8 KB · Views: 359
  • 5 M112.JPG
    5 M112.JPG
    153 KB · Views: 378
  • 3 M112.JPG
    3 M112.JPG
    151.9 KB · Views: 386


Defeating Knock

My 4.0 Explorer came with a knock sensor wired to the PCM. I can datalog it with the other sensors using SCT's Live Link. If I hear detonation (or not), I can look at the datalog and make adjustments to timing as needed. The PCM has the ability to back off the timing a little as well but with a stock tune is not that great at it, especially when putting 14 lbs of boost through what once was a naturally aspirated engine.
The 5.0L explorer engines in the 4 doors around the same year as mine did not have a knock sensor. The detonation limit was probably found on a dynamometer using expensive equipment at the factory and a conservative spark timing advance was then calculated. So what can you do when you don't have a Knock sensor or the other expensive equipment?
I came across this one possible solution that I thought was very unique so I had to try it out. This device is called the Vampire made by J&S Safeguard.
http://www.jandssafeguard.com
There are a few different models besides the Vampire, so contact J&S Safeguard for more information and your application.
I installed mine and then forgot to turn my intercooler pump and fan on. At the slightest sign of detonation the Vampire did its thing and my engine was protected. Then I looked in the mirror and said "het stupid, don't forget to turn on the intercooler pump and fan again!"
I am awaiting a gauge in the mail that will alert me when the Vampire is working, it plugs into the port that says monitor. For now I have it between the seat and console until I get the gauge, then it gets hidden away.
 

Attachments

  • DSC09650.jpg
    DSC09650.jpg
    75.2 KB · Views: 379
  • DSC09653.jpg
    DSC09653.jpg
    70.4 KB · Views: 381
  • DSC09656.jpg
    DSC09656.jpg
    84.7 KB · Views: 381


i think you have enough electronics to make the space shuttle blush! lol
we can all now see why you run as fast as you do. i did want to ask two things. how do you have your innercooler core mounted. as in, what is stopping it from flopping around. and, what are you using for fittings so it wont leak boost from where your tubes go into the intake for the cooler


That knock sensors super cool. $1000 bux though. Maybe ill actually get to a point that it makes sense one day. Great find.


wow.. very nice. Do you have a Wideband in each cylinder bank as well?


No leaks

i think you have enough electronics to make the space shuttle blush! lol
we can all now see why you run as fast as you do. i did want to ask two things. how do you have your innercooler core mounted. as in, what is stopping it from flopping around. and, what are you using for fittings so it wont leak boost from where your tubes go into the intake for the cooler

Mounted. lol. It was epoxy, then rtv. Its a snug fit and the hoses hold up one end. Never had a problem with mounting, did not move around or rattle either.
See 2000streetrod's install thread for the newer idea of resting pads under the heater core.
I will add a block under the new intercooler I install. I will coat it with RTV on top of the block to prevent vibrations and rattles. It will fit tight in the top plate as well and the hoses will still hold one end too.

No leaks. Its a fitting inside a fitting. One fitting threads in from one way, and the other threads into the first fitting. RPCaster is genius.


Vampire

That knock sensors super cool. $1000 bux though. Maybe ill actually get to a point that it makes sense one day. Great find.

The six channel vampire is aprox 600. Don't have to have a gauge to use it, I just like gauges. 600 is cheaper than an engine too.
Then there is always ebay where I got mine for under 400 used.
Did I tell you it has a feature that retards timing during Nitrous spraying. lol.

And no I don't have nitrous. yet.


Wideband

wow.. very nice. Do you have a Wideband in each cylinder bank as well?

No, although I have thought about it. Just one wideband for now.
The two A/F gauges in the picture are narrowband, can not tune off them but can alert you that one side is not working the same as the other.


Very nice set up.


Ex

Thanks ahodges!
I am in the middle of trying to get my O2 sensor monitors to run on this truck and they wont. Trying to post a picture on SCT's ProRacer forum but can not post pics when it says I can. So here is a test pic of my 2 door datalog.
 

Attachments

  • 2dr ego current complete.jpg
    2dr ego current complete.jpg
    53.7 KB · Views: 359


4 door

Here is my 4 door datalog
 

Attachments

  • 4dr ego test enabled.jpg
    4dr ego test enabled.jpg
    53.9 KB · Views: 363


Intercooler

Finally got my O2 monitors to run by putting my older smaller injectors in temporarily. Then swapped back to the 60lb ones. Had to install a new M112 since the old one got noisy. Took the opportunity to do it all at once and to install the intercooler I got from Bell. Its back up and running.
 

Attachments

  • Intercooler mount 3.JPG
    Intercooler mount 3.JPG
    153.8 KB · Views: 271
  • Intercooler mount 1.JPG
    Intercooler mount 1.JPG
    151.6 KB · Views: 274
  • Intercooler mount 2.JPG
    Intercooler mount 2.JPG
    117.4 KB · Views: 266
  • Intercooler mount 4.JPG
    Intercooler mount 4.JPG
    157.8 KB · Views: 276


Fuel Pressure Regulator

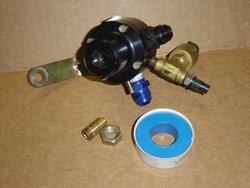
I have been using an adjustable fuel pressure regulator so I can set my fuel pressure where needed. I used to run higher pressures to mimic some of the newer returnless fuel system pressures even though mine is a return system.
It also helped when I had injectors that were a little too small. I have been using a Mallory 4305M which is stated to have a range of 30-100 psi base fuel pressure. It is attached to a manifold vacuum hose as well so it will go lower when vacuum is applied and raise the pressure when boost is there.
Mine is getting up there in years and was not holding vacuum on the port so I emailed Mallory and they told me the rebuild kit number was 3178. I ordered it from summit through eBay and used a coupon I got in an email for
$20.00 off. Putting Teflon tape around the adjustment screw stopped the vacuum leak.
 

Attachments

  • Fuel Pressure regulator 2.JPG
    Fuel Pressure regulator 2.JPG
    136.4 KB · Views: 294
  • Fuel Pressure Regulator 4.JPG
    Fuel Pressure Regulator 4.JPG
    139.5 KB · Views: 272
  • Fuel pressure regulator 1.JPG
    Fuel pressure regulator 1.JPG
    131.4 KB · Views: 284
  • Fuel Pressure regulator 3.JPG
    Fuel Pressure regulator 3.JPG
    139.1 KB · Views: 286


Join the Elite Explorers for $20 each year.
Elite Explorer members see no advertisements, no banner ads, no double underlined links,.
Add an avatar, upload photo attachments, and more!
.


S7

We had our 200th class finish our training program recently. We had a party to celebrate and to inspire some interest in our area of the school. A coworker had his uncle bring up a couple of his interesting cars. This one got most of the attention.
 

Attachments

  • S7 1.JPG
    S7 1.JPG
    97.4 KB · Views: 281
  • S7 2.JPG
    S7 2.JPG
    140.3 KB · Views: 270
  • S7 3.JPG
    S7 3.JPG
    149.4 KB · Views: 297


Back
Top